This thread has been locked.
If you have a related question, please click the "Ask a related question" button in the top right corner. The newly created question will be automatically linked to this question.
关于如何从头开始编写毫米波传感器应用,是否有相关指南(帮助了解演示版的工作原理)?
答:以下是为毫米波传感器应用创建 CCS 工程的步骤
1) 打开 CCS GUI 并确保 CCS 中安装了最新版本的“mmwave radar device support”。
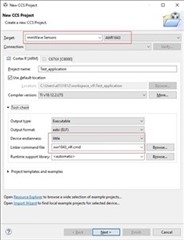
2) 选择“File”->“New”->“CCS Project”
3) 这些步骤将为毫米波传感器创建基本的 sysbios 应用,其中的默认链接器命令和 sysbios 配置 (app.cfg) 是从 CCS 生成的。用户需要根据其应用需求修改这些文件。
4) 按以下路径添加搜索路径、宏定义和库:“Project Properties”->“Build”->“ARM/C6000 compiler”->“Include Options”;“ProjectProperties”->“Build”->“ARM/C6000 Compiler”->“Predfined Symbols”;“Project Properties”->“Build”->“ARM/C6000 Linker”->“File Search Path”。请参阅任何 TI-Rex 实验室 CCS 工程进行参考。
5) 这是向应用中添加基本的启动代码片段(在所有应用中通用)。
MSS (main.c)
DSS (main.c)
#include <ti/drivers/soc/soc.h>
#include <ti/drivers/esm/esm.h>
#include <ti/common/sys_common.h>
int main(void)
{
int32_t errCode;
SOC_Handle socHandle;
SOC_Cfg socCfg;
/* Initialize the ESM: Don’t clear errors as TI RTOS does it */
ESM_init(0U);
/* Initialize the SOC confiugration: */
memset ((void *)&socCfg, 0, sizeof(SOC_Cfg));
/* Populate the SOC configuration: */
socCfg.clockCfg = SOC_SysClock_INIT;
socCfg.mpuCfg = SOC_MPUCfg_CONFIG;
/* require to unhalt the DSS if this core is available in selected device */
socCfg.dssCfg = SOC_DSSCfg_UNHALT;
/* Initialize the SOC Module: This is done as soon as the application is started
* to ensure that the MPU is correctly configured.*/
socHandle = SOC_init (&socCfg, &errCode);
int main (void)
/* Initialize and populate the demo MCB */
memset ((void*)&gMmwDssMCB, 0, sizeof(MmwDemo_DSS_MCB));
socCfg.clockCfg = SOC_SysClock_BYPASS_INIT;
6) 现在,您甚至可以参考毫米波演示或任何 TI-Rex 实验室应用,从而在应用中嵌入多种外设和信号处理特性。


 打开“Project templates”->“SYS/BIOS”->“TI Target Examples”->“Typical”