This thread has been locked.

If you have a related question, please click the "Ask a related question" button in the top right corner. The newly created question will be automatically linked to this question.

[参考译文] MSP432E401Y:如何从外部 SDRAM 执行代码。

Guru**** 657930 points
Other Parts Discussed in Thread: TMS570LC4357, MSP432E401Y
请注意,本文内容源自机器翻译,可能存在语法或其它翻译错误,仅供参考。如需获取准确内容,请参阅链接中的英语原文或自行翻译。

https://e2e.ti.com/support/microcontrollers/arm-based-microcontrollers-group/arm-based-microcontrollers/f/arm-based-microcontrollers-forum/1230571/msp432e401y-how-to-execute-code-from-external-sdram

器件型号:MSP432E401Y
主题中讨论的其他器件:TMS570LC4357

尊敬的 TI 团队:

 1. 我将尝试通过以下线程中建议的方式更改链接器脚本文件、从 SDRAM 执行代码。
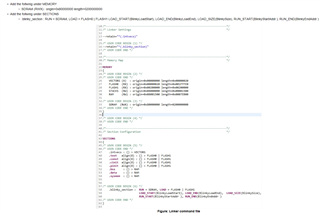
https://e2e.ti.com/support/microcontrollers/arm-based-microcontrollers-group/arm-based-microcontrollers/f/arm-based-microcontrollers-forum/1166516/msp43

我当前修改的脚本文件如下:

/ /
/*禁止警告和错误:*/
/*#10199-D CRC 表运算符(crc_table_for_<>)已忽略:
CRC table 运算符无法与空输出段关联*/
--diag_suppress=10199

--retain=interruptVectors

#define APP_BASE 0x60000000


#define RAM_BASE 0x60100000

内存
{
FLASH (RX):origin = APP_BASE,length = 0x00100000
SRAM (rwx):origin = RAM_BASE、length = 0x00040000

/*以下命令行选项作为 CCS 项目的一部分设置。 */
/*如果您正在使用命令行进行构建,或者出于某种原因想要*/
/*在此处定义它们,您可以根据需要取消注释和修改这些行。 */
/*如果您使用 CCS 进行构建、则最好制作任何此类项目*/
/*对 CCS 项目的修改,并保留该文件。 */
/**/
/*--heap_size=0 */
/*--stack_size=256 */
/*--library=rtsv7M4_T_le_eabi.lib */

/*内存中的段分配*/

部分
{
#ifndef gen_crc_table
.intvecs:> app_base
.text :>闪存
.const :>闪存
cinit :>闪存
请输入您的密码:> FLASH
.rodata :>闪存
init_array:> FLASH
#else
.intvecs:> 0x00000000、crc_table (crc_table_for_intvecs)
.text:> flash、crc_table (crc_table_for_text)
.const:> FLASH、crc_table (crc_table_for_const)
.cinit:> flash、crc_table (crc_table_for_cinit)
.pinit:> FLASH、crc_table (crc_table_for_Pinit)
.rodata:> FLASH、crc_table (crc_table_for_Pinit)
init_array:> FLASH、crc_table (crc_table_for_init_array)
.TI.crctab:>闪存
#endif

.vtable:> RAM_BASE
.data :> SRAM
bss :> SRAM
.sysmem:> SRAM
.stack:> SRAM

__STACK_TOP =_STACK + 512;

******************* /


1.将.out 文件数据复制到 SDRAM 后,我将调用下面的函数。  

******************* /

uint32 entryPiont;

entryPiont = 0x60000000;//SDRAM 存储器地址

appEntry =(void (*)(void)) entryPiont;

(* appEntry)();

***************** /

2.代码未按预期从 SDRAM 执行。

3.是否需要在链接程序脚本或更高级别的函数中进行任何修改?

此致、

Naga Narasimha Rao P

  • 请注意,本文内容源自机器翻译,可能存在语法或其它翻译错误,仅供参考。如需获取准确内容,请参阅链接中的英语原文或自行翻译。

    您好!

     下面是在 SDRAM 中运行代码的不同 MCU TMS570LC4357的示例。 这里演示了链接器命令文件如何使用 LOAD_START、LOAD_END 设置加载地址、以及如何使用 RUN_START 和 RUN_END 设置运行地址。 我们的想法是将代码加载到闪存中、然后从 SDRAM 运行代码。 您需要先将代码从闪存复制到 SDRAM、然后才能运行代码。 此外、还需要确保在将代码从闪存复制到 SDRAM 之前、SDRAM 已完全初始化。 我强烈建议您首先使用一个简单的示例、例如 hello 或 blinky。 一旦您可以运行 SDRAM 闪烁之类的代码、就可以适应更大的应用。  

     请注意、对于此器件  TMS570LC4357、SDRAM 映射到0x80000000、而 TM4C129的 SDRAM 映射到0x60000000 。  

    /* Include Files */
    
    #include "HL_sys_common.h"
    #include "HL_system.h"
    
    /* USER CODE BEGIN (1) */
    #include "HL_emif.h"
    #include "HL_sys_mpu.h"
    #include "HL_gio.h"
    #include "HL_het.h"
    #include "HL_mibspi.h"
    /* USER CODE END */
    
    /** @fn void main(void)
    *   @brief Application main function
    *   @note This function is empty by default.
    *
    *   This function is called after startup.
    *   The user can use this function to implement the application.
    */
    
    /* USER CODE BEGIN (2) */
    #pragma SET_CODE_SECTION(".blinky_section")
    void blinky()
    {
    	int i;
    	gioSetDirection(hetPORT1, 1);
    	while(1)
    	{
    		gioToggleBit(hetPORT1, 0);
    		for(i=0;i<1000000;i++);
    	}
    }
    #pragma SET_CODE_SECTION()
    
    extern uint32 BlinkyLoadStart;
    extern uint32 BlinkyLoadEnd;
    extern uint32 BlinkySize;
    extern uint32 BlinkyStartAddr;
    extern uint32 BlinkyEndAddr;
    /* USER CODE END */
    
    uint8	emacAddress[6U] = 	{0xFFU, 0xFFU, 0xFFU, 0xFFU, 0xFFU, 0xFFU};
    uint32 	emacPhyAddress	=	1U;
    
    void main(void)
    {
    /* USER CODE BEGIN (3) */
    	int i;
        uint32 size=(uint32)&BlinkySize;
    
    	emif_SDRAMInit();
    
        for(i=0;i<size;i++)
        {
            ((char *)&BlinkyStartAddr)[i] =((char *)&BlinkyLoadStart)[i];
        }
    
    	blinky();
    	while(1);
    /* USER CODE END */
    }

    有关加载地址和运行地址的详细信息、请参阅《ARM 汇编用户指南》 https://www.ti.com/lit/pdf/spnu118。 

  • 请注意,本文内容源自机器翻译,可能存在语法或其它翻译错误,仅供参考。如需获取准确内容,请参阅链接中的英语原文或自行翻译。

    亲爱的蔡杏娟。

    我使用 在内部闪存中使用 JTAG 运行的定制应用代码将.out 文件数据写入 SDRAM。 将使用(QT GUI)应用从以太网接口接收数据、并接收从起始地址写入 SDRAM 中的数据。 然后将控制权授予 SDRAM 起始地址、如上所述。  

    1.正如您之前讲过的、我对 链接器脚本文件存储器映射部分进行了更改。 但现在您给出的示例是、代码完全不同。

    2.我想在 SDRAM 中运行下面的例子,把.out 文件写入 SDRAM ,然后从 SDRAM 开始执行代码?

    3.在下面的代码和链接器脚本中需要做哪些更改?

    4. MSP432E401Y SDRAM 起始地址为 0X60000000 并且我们的定制板中的 SDRAM 的大小 512 兆位。

    5.在下面的示例代码和链接器脚本文件中需要做什么更改?

    //*****************************************************************************
    //
    // blinky.c - Simple example to blink the on-board LED.
    //
    // Copyright (c) 2013-2017 Texas Instruments Incorporated.  All rights reserved.
    // Software License Agreement
    //
    // Texas Instruments (TI) is supplying this software for use solely and
    // exclusively on TI's microcontroller products. The software is owned by
    // TI and/or its suppliers, and is protected under applicable copyright
    // laws. You may not combine this software with "viral" open-source
    // software in order to form a larger program.
    //
    // THIS SOFTWARE IS PROVIDED "AS IS" AND WITH ALL FAULTS.
    // NO WARRANTIES, WHETHER EXPRESS, IMPLIED OR STATUTORY, INCLUDING, BUT
    // NOT LIMITED TO, IMPLIED WARRANTIES OF MERCHANTABILITY AND FITNESS FOR
    // A PARTICULAR PURPOSE APPLY TO THIS SOFTWARE. TI SHALL NOT, UNDER ANY
    // CIRCUMSTANCES, BE LIABLE FOR SPECIAL, INCIDENTAL, OR CONSEQUENTIAL
    // DAMAGES, FOR ANY REASON WHATSOEVER.
    //
    //*****************************************************************************
    
    #include <stdint.h>
    #include <stdbool.h>
    #include "ti/devices/msp432e4/driverlib/driverlib.h"
    
    //*****************************************************************************
    //
    //! \addtogroup example_list
    //! <h1>Blinky (blinky)</h1>
    //!
    //! A very simple example that blinks the on-board LED using direct register
    //! access.
    //
    //*****************************************************************************
    
    //*****************************************************************************
    //
    // The error routine that is called if the driver library encounters an error.
    //
    //*****************************************************************************
    #ifdef DEBUG
    void
    __error__(char *pcFilename, uint32_t ui32Line)
    {
        while(1);
    }
    #endif
    
    //*****************************************************************************
    //
    // Blink the on-board LED.
    //
    //*****************************************************************************
    int
    main(void)
    {
        volatile uint32_t ui32Loop;
    
        //
        // Enable the GPIO port that is used for the on-board LED.
        //
        SysCtlPeripheralEnable(SYSCTL_PERIPH_GPION);
    
        //
        // Check if the peripheral access is enabled.
        //
        while(!SysCtlPeripheralReady(SYSCTL_PERIPH_GPION))
        {
        }
    
        //
        // Enable the GPIO pin for the LED (PN0).  Set the direction as output, and
        // enable the GPIO pin for digital function.
        //
        GPIOPinTypeGPIOOutput(GPIO_PORTN_BASE, GPIO_PIN_0);
    
        //
        // Loop forever.
        //
        while(1)
        {
            //
            // Turn on the LED.
            //
            GPIOPinWrite(GPIO_PORTN_BASE, GPIO_PIN_0, GPIO_PIN_0);
    
            //
            // Delay for a bit.
            //
            for(ui32Loop = 0; ui32Loop < 200000; ui32Loop++)
            {
            }
    
            //
            // Turn off the LED.
            //
            GPIOPinWrite(GPIO_PORTN_BASE, GPIO_PIN_0, 0x0);
    
            //
            // Delay for a bit.
            //
            for(ui32Loop = 0; ui32Loop < 200000; ui32Loop++)
            {
            }
        }
    }
    
    /******************************************************************************
    *
    * Copyright (C) 2019 Texas Instruments Incorporated - http://www.ti.com/
    *
    * Redistribution and use in source and binary forms, with or without
    * modification, are permitted provided that the following conditions
    * are met:
    *
    *  Redistributions of source code must retain the above copyright
    *  notice, this list of conditions and the following disclaimer.
    *
    *  Redistributions in binary form must reproduce the above copyright
    *  notice, this list of conditions and the following disclaimer in the
    *  documentation and/or other materials provided with the
    *  distribution.
    *
    *  Neither the name of Texas Instruments Incorporated nor the names of
    *  its contributors may be used to endorse or promote products derived
    *  from this software without specific prior written permission.
    *
    * THIS SOFTWARE IS PROVIDED BY THE COPYRIGHT HOLDERS AND CONTRIBUTORS
    * "AS IS" AND ANY EXPRESS OR IMPLIED WARRANTIES, INCLUDING, BUT NOT
    * LIMITED TO, THE IMPLIED WARRANTIES OF MERCHANTABILITY AND FITNESS FOR
    * A PARTICULAR PURPOSE ARE DISCLAIMED. IN NO EVENT SHALL THE COPYRIGHT
    * OWNER OR CONTRIBUTORS BE LIABLE FOR ANY DIRECT, INDIRECT, INCIDENTAL,
    * SPECIAL, EXEMPLARY, OR CONSEQUENTIAL DAMAGES (INCLUDING, BUT NOT
    * LIMITED TO, PROCUREMENT OF SUBSTITUTE GOODS OR SERVICES; LOSS OF USE,
    * DATA, OR PROFITS; OR BUSINESS INTERRUPTION) HOWEVER CAUSED AND ON ANY
    * THEORY OF LIABILITY, WHETHER IN CONTRACT, STRICT LIABILITY, OR TORT
    * (INCLUDING NEGLIGENCE OR OTHERWISE) ARISING IN ANY WAY OUT OF THE USE
    * OF THIS SOFTWARE, EVEN IF ADVISED OF THE POSSIBILITY OF SUCH DAMAGE.
    *
     *****************************************************************************/
    /* Suppress warnings and errors:                                            */
    /* #10199-D CRC table operator (crc_table_for_<>) ignored:
        CRC table operator cannot be associated with empty output section       */
    --diag_suppress=10199
    
    --retain=interruptVectors
    
    MEMORY
    {
        FLASH (RX) : origin = 0x00000000, length = 0x00100000
        SRAM (RWX) : origin = 0x20000000, length = 0x00040000
    }
    
    /* The following command line options are set as part of the CCS project.    */
    /* If you are building using the command line, or for some reason want to    */
    /* define them here, you can uncomment and modify these lines as needed.     */
    /* If you are using CCS for building, it is probably better to make any such */
    /* modifications in your CCS project and leave this file alone.              */
    /*                                                                           */
    /* --heap_size=0                                                             */
    /* --stack_size=256                                                          */
    /* --library=rtsv7M4_T_le_eabi.lib                                           */
    
    /* Section allocation in memory */
    
    SECTIONS
    {
    #ifndef gen_crc_table
        .intvecs:   > 0x00000000
        .text   :   > FLASH
        .const  :   > FLASH
        .cinit  :   > FLASH
        .pinit  :   > FLASH
    	.rodata :   > FLASH
        .init_array : > FLASH
    #else
        .intvecs:   > 0x00000000, crc_table(crc_table_for_intvecs)
        .text   :   > FLASH, crc_table(crc_table_for_text)
        .const  :   > FLASH, crc_table(crc_table_for_const)
        .cinit  :   > FLASH, crc_table(crc_table_for_cinit)
        .pinit  :   > FLASH, crc_table(crc_table_for_pinit)
    	.rodata : 	> FLASH, crc_table(crc_table_for_pinit)
        .init_array : > FLASH, crc_table(crc_table_for_init_array)
        .TI.crctab  : > FLASH
    #endif
    
        .vtable :   > 0x20000000
        .data   :   > SRAM
        .bss    :   > SRAM
        .sysmem :   > SRAM
        .stack  :   > SRAM
    }
    
    __STACK_TOP = __stack + 512;
    

    此致、

    Naga Narasimha Rao P

  • 请注意,本文内容源自机器翻译,可能存在语法或其它翻译错误,仅供参考。如需获取准确内容,请参阅链接中的英语原文或自行翻译。

    您好!

     我想看看我是否能为你找到一个例子,但由于即将到来的美国假期,可能能够提供帮助的人是不在办公室,这将需要一些时间。 话虽如此、我之前展示的示例代码和链接器命令文件应作为实现此目标的概念。 是的、正如我在开头所述、它用于不同的器件。

     在这个例子中,它调用 EMIF_SDRAMInit ()。 您必须将其替换为您自己的 TM4C129上 EPI 模块初始化。  有关如何为 SDRAM 操作初始化 EPI、您可以参阅位于 C:\ti\TivaWare_C_Series-2.2.0.295\examples\peripherals\epi\SDRAM.c 的 TivaWare 示例。  

     如果我找到一个更好的示例、我会重新发布。  

  • 请注意,本文内容源自机器翻译,可能存在语法或其它翻译错误,仅供参考。如需获取准确内容,请参阅链接中的英语原文或自行翻译。

    您好!

    请提供 示例代码以尽快从 SDRAM 中执行代码。

    此致、

    Naga Narasimha Rao P  

  • 请注意,本文内容源自机器翻译,可能存在语法或其它翻译错误,仅供参考。如需获取准确内容,请参阅链接中的英语原文或自行翻译。

    您好!

     今天是美国公共假日。 请预计响应会延迟。  

  • 请注意,本文内容源自机器翻译,可能存在语法或其它翻译错误,仅供参考。如需获取准确内容,请参阅链接中的英语原文或自行翻译。

    您好!

     请查看该 TI 参考设计。  https://www.ti.com/tool/TIDM-TM4C129SDRAMNVM。  虽然此设计用于 TM4C129 MCU、但它与 MSP432E 的器件相同。 它们使用相同的 driverlib。 该设计应在 SDRAM 之外运行代码。 设计页面中缺少软件配套资料、但我将在此处附上。  

    e2e.ti.com/.../TIDM_2D00_TM4C129SDRAMNVM.zip

  • 请注意,本文内容源自机器翻译,可能存在语法或其它翻译错误,仅供参考。如需获取准确内容,请参阅链接中的英语原文或自行翻译。

    您好!

     请提供 MSP432E401Y MCU 的示例代码和链接器脚本、以从 SDRAM 执行代码。  

     我计划 按照以下方法从 SDRAM 执行代码:

    1.我将在 MCU 的内部闪存中运行引导加载程序代码。 其中包含 SDRAM 和外部 SPI 闪存( NVM )初始化。

    2.然后引导加载程序会将应用程序映像文件从外部闪存复制到 SDRAM 中。

    3.然后执行 SDRAM 形式的应用程序。

    此致、

    Naga Narasimha Rao P

  • 请注意,本文内容源自机器翻译,可能存在语法或其它翻译错误,仅供参考。如需获取准确内容,请参阅链接中的英语原文或自行翻译。

    TI 参考设计软件配套资料具有您所需的一切。 我不知道还能提供什么。 配套软件具有带挂钩函数的引导加载程序、可用于初始化 EPI 和 SPI 闪存。 请查看 bl_config.h 文件。 引导加载程序示例位于 ektm4c129_qssi_bootloader 中。 该应用示例位于 ektm4c129_qssi_boot_deme1中。