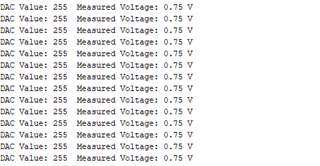
写一个代码 Arduino 但我没有得到正确的 DAC 结果在 Vout 引脚,不断我读错误的值,只是检查我的代码,让我知道
#include
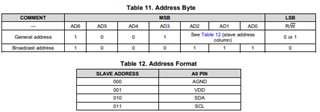
#define DevID 0x50 // DAC 器件 ID
#define regDAC 0x40 // DAC 寄存器地址
#define VREF 3 // DAC 基准电压
#define DAC_resolution 1024 // DAC 分辨率(8位)
//重置 DAC 的函数
void DAC_RESET(){
Wire.beginTransmission(devId);
Wire.write (regDAC);
Wire.write (0x06);
Wire.endTransmission ();
}
//函数为 DAC 上电
void dac_power_on (){
Wire.beginTransmission(devId);
Wire.write (regDAC);
Wire.write (0x0F);
Wire.endTransmission ();
}
//此函数关闭 DAC
void dac_power_off (){
Wire.beginTransmission(devId);
Wire.write (regDAC);
Wire.write (0x00);
Wire.endTransmission ();
}
//函数锁定 DAC
void DAC_LOCK (){
Wire.beginTransmission(devId);
Wire.write (0xD3);
Wire.write (0x50);
Wire.endTransmission ();
}
//设置 DAC 的输出电压函数
void SET_DAC_OUTPUT_VOLTAGE (双电压){
//根据所需的电压计算 DAC 代码
int dacCode =(int)(volt/VREF * DAC_resolution);
//将 DAC 代码写入寄存器
Wire.beginTransmission(devId);
Wire.write (0x21);
Wire.write (dacCode);
Wire.endTransmission ();
}
void setup(){
Wire.begin();
Serial.begin(9600);
//重置 DAC
// dac_reset ();
//给 DAC 上电
dac_power_on ();
dac_lock();
//执行其它初始化任务...
}
void loop(){
//连续测量 DAC 值
//将 DAC 输出电压设置为2.5V
SET_DAC_OUTPUT_VOLTAGE (3.0);
//读取 DAC 值
wire.requestFrom (DevID、1);//从 DAC 请求1个字节
如果(Wire.available()){
int dacCode = Wire.Read ();
双精度电压=(double) dacCode / DAC_resolution * VREF;
//打印测得的电压
serial.print ("DAC 值:");
serial.print (dacCode);
serial.print ("测量电压:");
serial.print (电压、2);
serial.println (" V");
}
//如果需要添加延迟
延迟(1000);
} 

