作者:TI工程师 Yue Tang
SensorController Studio里有很多例子,但是缺少在LaunchPad上使用I2C的例子。本文将使用TI的CC1352P无线MCU及OPT3004光照度传感器,来填补这一空缺。
介绍
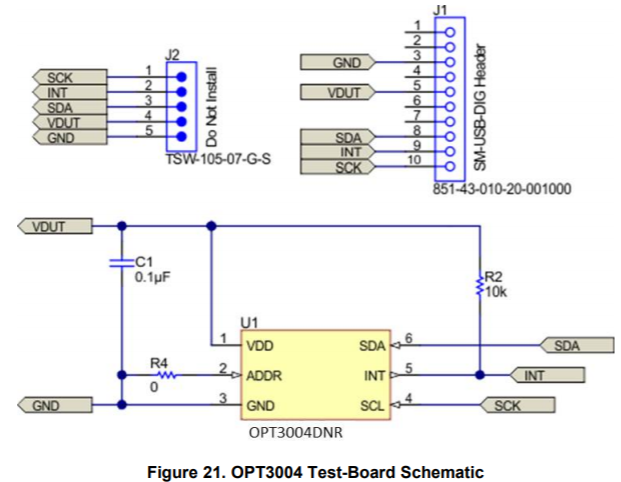
OPT3004是一款用于测量可见光密度的传感器。传感器的光谱响应与人眼的视觉响应紧密匹配,并且具有很高的红外线阻隔率。OPT3004 器件具有精密的光谱响应和增强的红外阻隔功能,因此能够准确测量人眼可见光的强度,且不受光源影响。
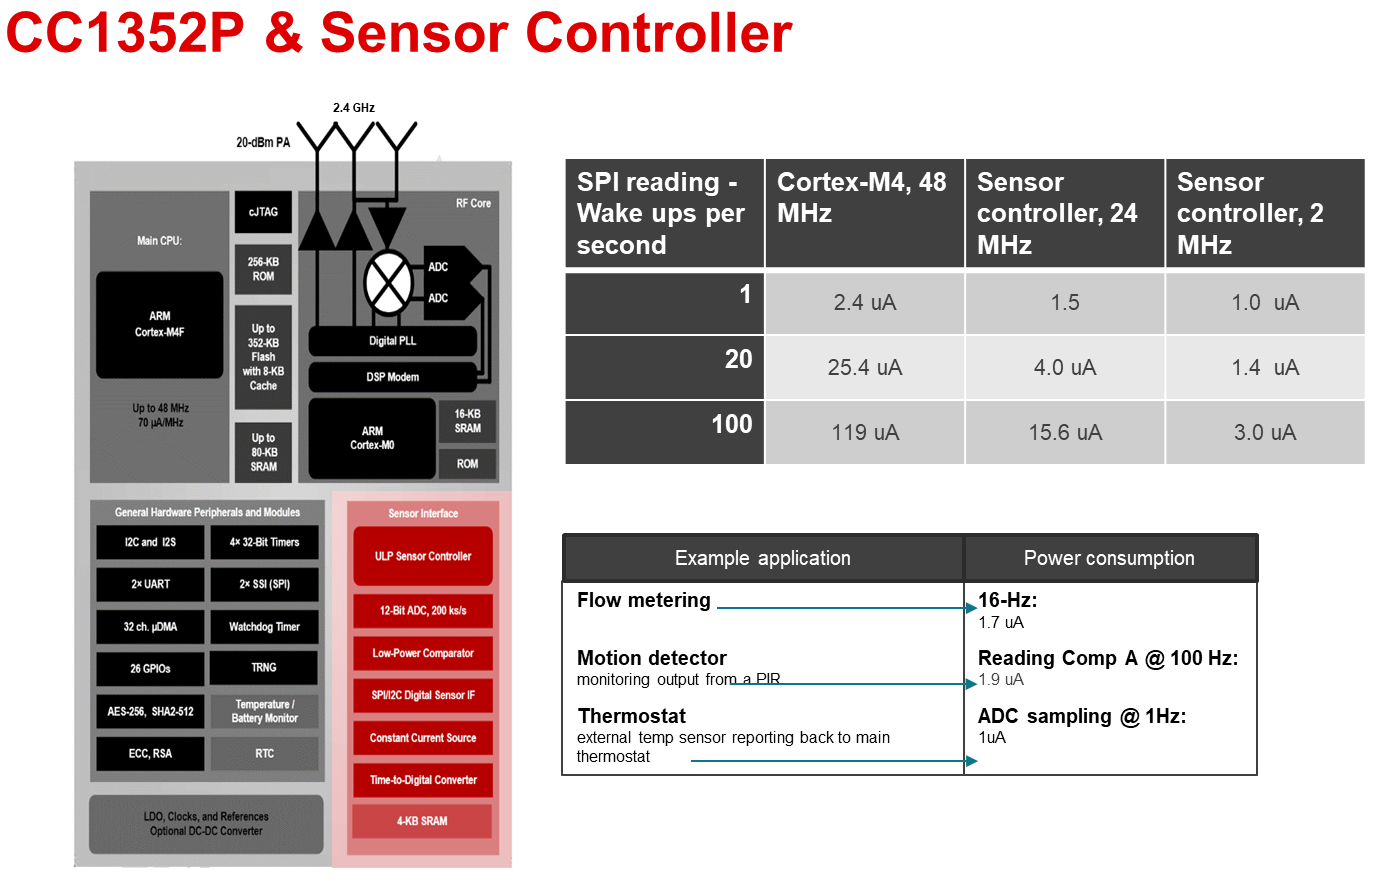
CC1352P 是一款多协议低于 1GHz 和 2.4GHz 无线 MCU,面向无线 M-Bus、IEEE 802.15.4g、支持 IPv6 的智能对象 (6LoWPAN)、Thread、 Zigbee®、KNX RF、 Wi-SUN®、低功耗 Bluetooth® 5 以及专有系统,包括 TI 15.4-Stack。该器件包含具有一流效率的 +20dBm 集成高功率放大器,适用于远距离 应用
Sensor Controller传感器控制器是simplelink系列无线MCU CC26xx/CC13xx都包含的一个小型 CPU 内核,针对低功耗和高效外设运行进行了高度优化。传感器控制器位于 CC26xx/CC13xx 辅助 (AUX) 电源/时钟域中,可以独立于系统 CPU 和 MCU 域电源状态自主执行简单的后台任务,以达到极低功耗。关于Sensor Controller的细节和使用方法,请访问Sensor Controller Project from Scratch。
如下的两篇文章也将非常有助于您理解Sensor Controller这一非常有特色的功能:
Getting Started With the CC13xx and CC26xx Sensor Controller
Ultra-Low Power Designs With the CC13x2 and CC26x2 Sensor Controller
硬件连接
需要的硬件:
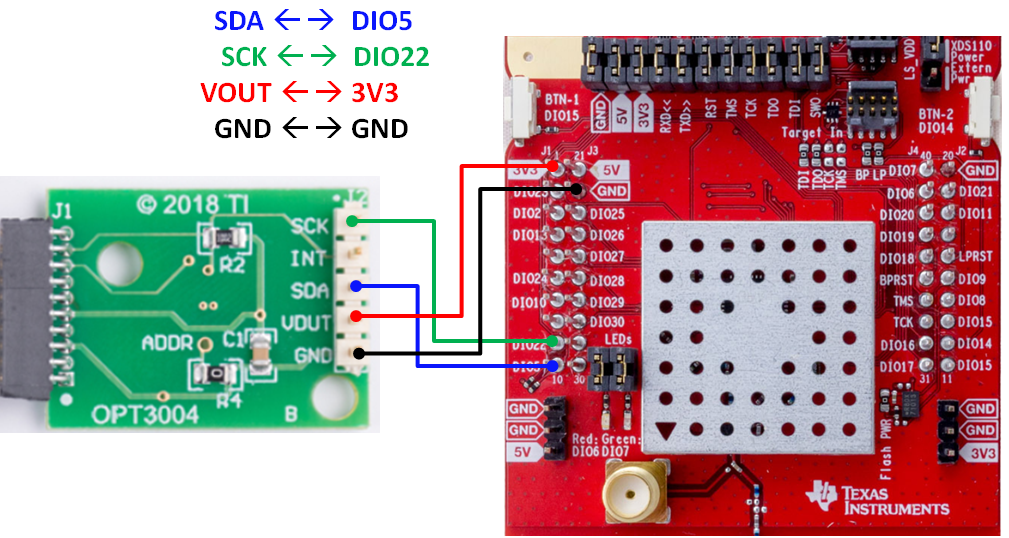
连接如下图:
|
OPT3004EVM[原理图下载] |
LAUNCHXL-CC1352P[原理图下载] |
|
SDA |
DIO5 |
|
SCK |
DIO22 |
|
VOUT |
3V3 |
|
GND |
GND |
|
|
|
|
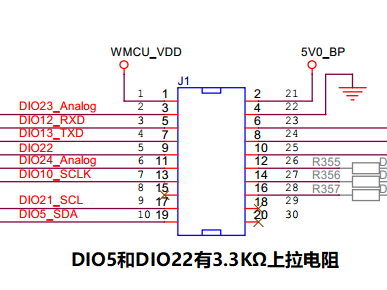
请根据实际板子情况进行连接,CC1352P的DIO5和DIO22已通过3.3KΩ电阻上拉,因此直接使用这两个引脚。 |
|
软件操作
需要的软件:
如下是Sensor Controller配置,工程下载
|
Constants |
|
|
|
ALS_CFG_ONE_SHOOT |
0xC210 |
OPT3004 configuration triggering 100ms single conversion |
|
ALS_CFG_RESET |
0xC810 |
OPT3004 configuration at reset (shutdown) |
|
ALS_I2C_ADDR |
0x0088 |
OPT3004 I2C address |
|
ALS_REG_CFG |
1 |
OPT3004 configuration register[配置寄存器 1] |
|
ALS_REG_RESULT |
0 |
OPT3004 result register[结果寄存器 0] |
|
DataStructures |
|
|
|
cfg.highThreshold |
65535 |
High alert threshold |
|
cfg.lowThreshold |
0 |
Low alert threshold |
|
0 |
Light sensor output value |
|
Task Resources |
|
|
Serial Interfaces |
I2C Master |
|
System CPU Communication |
System CPU Alert |
|
Task Event Handling |
Timer 1 Event Trigger |
|
Task Execution |
RTC-Based Execution Scheduling |
|
IO Mapping |
|
DIO22 – I2C SCL DIO5 – I2C SDA
|
|
代码 |
|
|
Initialization Code |
// Schedule the first execution fwScheduleTask(1); |
|
Execution Code |
// Configure and start the next measurement i2cStart(); i2cTx(I2C_OP_WRITE | ALS_I2C_ADDR); // i2cTx(ALS_REG_CFG); i2cTx(ALS_CFG_ONE_SHOT >> 8); i2cTx(ALS_CFG_ONE_SHOT >> 0); i2cStop();
// Read the result after 100 milliseconds + a 20% margin evhSetupTimer1Trigger(0, 120, 2);
// Schedule the next execution fwScheduleTask(1); |
|
Event Handler A Code |
// If a measurement was successfully started during the last execution ... if (state.i2cStatus == 0x0000) {
// Select the result register i2cStart(); i2cTx(I2C_OP_WRITE | ALS_I2C_ADDR); i2cTx(ALS_REG_RESULT);
// If successful if (state.i2cStatus == 0x0000) { U16 resultRegH; U16 resultRegL; // Read the result i2cRepeatedStart(); i2cTx(I2C_OP_READ | ALS_I2C_ADDR); i2cRxAck(resultRegH); i2cRxNack(resultRegL); i2cStop();
// Convert the result (4-bit exponent + 12-bit mantissa) into 16-bit fixed-point U16 exp = resultRegH >> 4; U16 mant = (resultRegH << 12) | (resultRegL << 4); // The exponent is in range 0 to 11 U16 value = mant >> (11 - exp); output.value = value;
// Notify the application if (value < cfg.lowThreshold) { fwGenAlertInterrupt(); } if (value > cfg.highThreshold) { fwGenAlertInterrupt(); } } else { i2cStop(); } } |
|
Termination Code |
// Shut down the light sensor i2cStart(); i2cTx(I2C_OP_WRITE | ALS_I2C_ADDR); i2cTx(ALS_REG_CFG); i2cTx(ALS_CFG_RESET >> 8); i2cTx(ALS_CFG_RESET >> 0); i2cStop();
// Cancel the potentially active event trigger evhCancelTrigger(0); |
运行效果:
功耗实测
使用Sensor Controller生成工程,并使用IAR编译和烧录【工程下载】
所需软件:
SIMPLELINK-CC13X2-26X2-SDK 【本文使用的版本:simplelink_cc13x2_26x2_sdk_3_20_00_68】
功耗测试工具:
功耗测试使用IMETER-BOOST, 这是一款低成本便携式功耗测试仪。
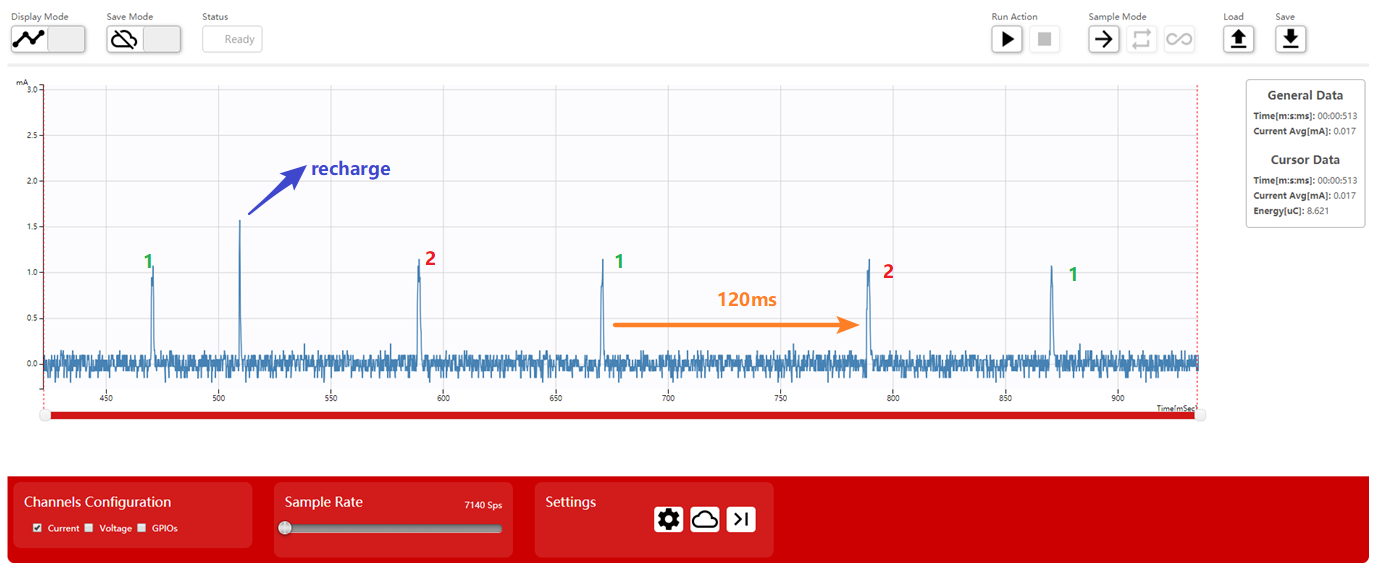
例子中,每秒进行5次光照度传感器读取,平均电流大约17uA。
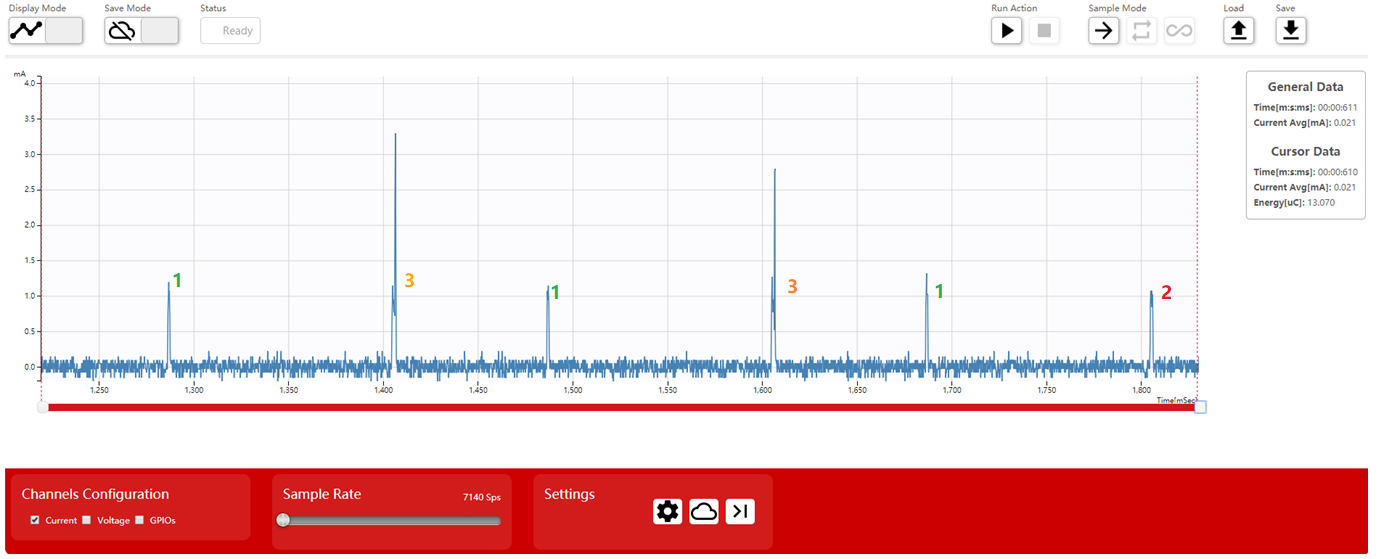
每次读取包含两个尖峰,如下(1)(2)
(1) Execution Code – 开启了一个120ms的延迟,用于OPT3004形成稳定的数据
(2) Event Handler A Code 。或得并换算读取到光照度值
人为引起照度变化【如使用光源照射】,使照度超过阈值,则会激活主MCU进行处理,如下3。
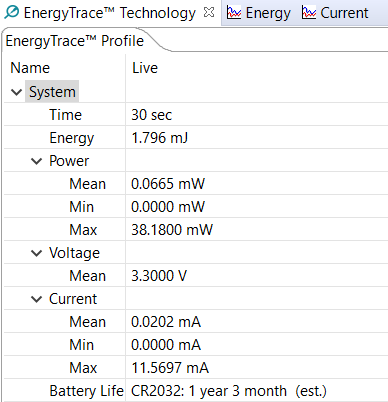
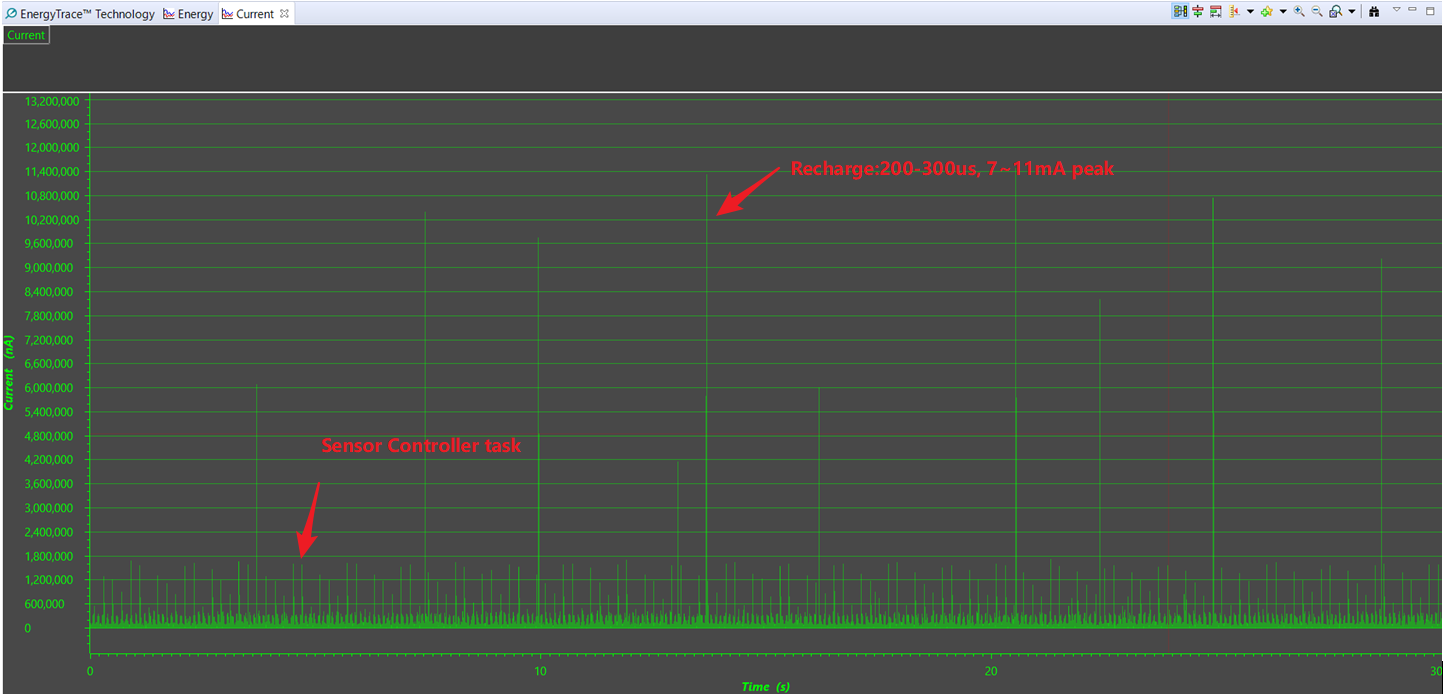
使用EnergyTrace的测试数据
EnergyTrace的使用请阅读博文 《SimpleLink™ Launchpad能量跟踪功能》
|
30秒连续运行下,平均电流20uA ,使用CR2032 200mAh的电池,评估可运行一年三个月。 |

