This thread has been locked.
If you have a related question, please click the "Ask a related question" button in the top right corner. The newly created question will be automatically linked to this question.
本人总结了关于TI DSP的boot原理,格式,以及参考代码供大家参考。不足之处,敬请指正。
2014.12.8: 更新:改成CCSV5.5工程,内容稍做修改与简化。
也可以参考Starterware里的bootloader example,说明如下:
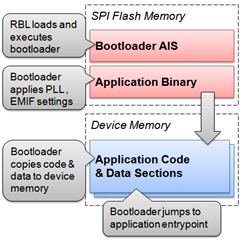
The StarterWare bootloader is a platform-specific helper application that makes it easy to transition from running a StarterWare application in a debug context (i.e. in Code Composer Studio with a GEL file) to a production context (i.e. running the application automatically when the board is powered on). The bootloader acts as an intermediary between the ROM bootloader (RBL) and the application. During boot, the StarterWare bootloader takes the following actions:
If the bootloader encounters an error during boot, it prints diagnostic messages to the UART console.
The StarterWare bootloader comes pre-built with the standard installation and typically does not need to be modified or rebuilt unless you want to port it to a custom hardware platform. The prebuilt binary can be found in the following location:
<StarterWare Installation Path>/binary/armv5/<toolchain>/c6748/evmC6748/bootloader/Release/boot.out
Booting a StarterWare application requires two binary images:
These images are generated using two separate tools, both of which are included in the tools folder of the standard StarterWare installation.
The AISgen GUI can be used to generate the StarterWare bootloader AIS file. All of the critical settings are located on the General tab of the AISgen GUI:
The AISgen tool has many options to configure the device at boot time, but these are generally not necessary since the StarterWare bootloader will boot very quickly and apply its own configuration immediately. The following screenshot shows the typical settings that should be specified to generate the bootloader AIS file. Simply click the Generate AIS button to create the AIS file.
The out2rprc command line utility is used to generate the application binary image. This tool strips out the initialized sections from the executable file (i.e. *.out) and places them in a compact format that the StarterWare bootloader can understand. Generating this binary file is very simple:
$> out2rprc.exe [application].out [application].bin
The output (bin) file is typically much smaller than the original executable (out) file.
Once you have generated both binary images (i.e. the AIS and bin files described above), you are ready to flash these images to the EVM's SPI flash memory. This can be done using the standard serial flasher utility that's included in the tools folder of the standard StarterWare installation:
$> sfh_OMAP-L138.exe -flash -targetType C6748 [bootloader].ais [application].bin
The SFH tool may take several minutes to complete depending on the size of the application. When SFH completes successfully, your application is ready to boot.
After the binary images have been flashed to the EVM, the application is ready to boot. This is as simple as setting the boot switches for SPI0 flash boot (5:8 = 0000 on the EVM) and powering on or resetting the board.
During boot, control passes from the ROM bootloader to the StarterWare bootloader, which configures the system and loads the application. Finally, the bootloader jumps to the application entrypoint. The overall process is summarized in the following diagram.
Tony您好,我看了这个Boot_DSP_on_SOC_V0.1,我尝试在仿真器上首先执行arm程序,然后loaddsp到RAM上,随后使用唤醒操作dsp,但是,发现唤醒后,dsp并没有执行(led没有变化),
为验证程序争取与否,我尝试单独用仿真器加载这个dsp文件测试可以正常工作,如点亮led.这是为什么呢?
可以先把DSP RESET 一下
在
//Wake up the DSP前面加上
CSL_FINST(psc0Regs->MDCTL[CSL_PSC_DSP], PSC_MDCTL_LRST, ASSERT);
while(CSL_FEXT(psc0Regs->PTSTAT, PSC_PTSTAT_GOSTAT1)==CSL_PSC_PTSTAT_GOSTAT1_IN_TRANSITION);
Tony您好:
我看了您写的 Boot_DSP_on_SOC_V0.1,所以想尝试一个在用CCS跑一下您的ARM程序(OMAPL138_ARMbootDSPCoff\OMAPL138DemoInterrupt),但打开后发现没有.pjt文件(可能是我知道的太少了),所以就用OMAPL138DemoInterrupt中的代码自己建了一个工程,同时又手动添加了rts67plus.lib,编译链接时出现了下面的错误。
error: library 'C:\CCStudio_v3.3\C6000\cgtools\lib\rts67plus.lib', member'boot.obj' is of unknown type。这个错误怎么办呀。呵呵
您好Tony:
omap-l138 ARM端程序应该加载哪个RTS库,是rts32arm9.lib?我加载之后出现了下面的错误:
undefined first referenced
symbol in file
--------- ----------------
pinit C:\CCStudio_v3.3\tms470\cgtools\lib\rts32arm9.lib
cinit C:\CCStudio_v3.3\tms470\cgtools\lib\rts32arm9.lib
>> error: symbol referencing errors - './Debug/omap-l138_int.out' not built
hi,Tony
Boot_DSP_on_SOC_V0.1.zip 很好,很强大,OMAPL138DemoInterrupt 是用CC5开发的,我用ccs4无法使用,可以通过某些设置后直接在CCS4 上使用吗?后来我新建了一个CCS4默认的hello的工程,并加入OMAPL138DemoInterrupt中的src,在仿真的时候跑到_call_swi(327680);就死在那里了,而且无法在handler.asm 中设置断点,设置后显示是灰色,并且有个"!".我想问一下是有什么设置没有设置好吗?如果是,怎么样进行设置,谢谢!
viky zhong,请问你的上述问题解决了吗?我在官方的开发板上跑ARM程序是可以的,也能够进中断,但是在自己做的板子上遇见跟你一样的问题,不知道能否帮忙解答一下,谢谢
你好:我用的是ccs4.2,我按照上面的工程,在CCS4.2中测试了arm加载dsp,但是dsp没有启动
(1)当我不屏蔽掉switch_to_privileged_mode();,的时候程序打印出 cannot open the file,当我屏蔽掉switch_to_privileged_mode();程序可以执行完毕,但是dsp没有启动。我认为switch_to_privileged_mode();不应该被屏蔽掉,但是为什么,有了这个语句之后会打不开dsp的文件呢
(2)另外,那位有ccs4.2的类似程序,能给我参考一下,邮箱 ytuxiaobin@163.com
关于上面的问题,我找到原因了,switch_to_privileged_mode();会对file的指针造成影响,另外现在arm能够加载dsp,而且dsp也能够运行,但是要求的前提是uboot没有加载,这个比较麻烦,大家有遇见这个情况吗?
tony,您好,我运行Boot_DSP_on_SOC_V0.1.zip里的程序,烧写 .bin(ubl_spi.out和一个点亮LED的程序用AIS工具生成的的),我断电后LED并没有点亮,单独运行时LED能点亮,请问我的问题出在哪了? 楼上有位仁兄说reset DSP,可我没有找到唤醒DSP的程序,麻烦指点下我,唤醒DSP的程序在哪,谢谢。。。
这个demo是讲如何通过ROM bootloader一次性加载ARM和DSP的代码,要将ARM与DSP的.out文件通过Aisgen.exe合成一个文件进行烧写,而不是分开烧写,分开烧写的话你可以参考另一个demo,ARM如何加载DSP代码。
请看一下附带的说明文档。
Tony Tang:
”一次性加载ARM和DSP的代码,要将ARM与DSP的.out文件通过Aisgen.exe合成一个文件进行烧写“
(1)这应该理解为烧写只烧写UBL,而UBOOT不是必须的?
(2)dsp的程序大小是否收到限制?
tony tang:
你好,我看了你的那个“分开加载dsp和arm”这个程序我能够在仿真环境下修改以适合我购买的合纵达开发板,实验的结果是能够在仿真环境下实现ARM对DSP的唤醒,dsp也能够正确运行。
另外我也看了你的“一次性加载ARM和DSP的代码”,这个代码中dsp的程序是用bios下的,我对bios不熟悉,所以修改了你给出的OMAPL138_INT_DSP这个程序,代码的执行设定了在了与ARM不重合的shared RAM中,然后用AISGEN将arm的OUT文件与其相连合成一个,但是烧写的结果是ARM的程序可以运行,而dsp的程序没有运行,试着修改了多次,仍然没有成功,所以有几个问题想请教一下:
(1)ARM与dsp一起烧写是否要求dsp的程序要是dsp bios的?
(2)我使用的nand write烧写程序,是由合纵达提供,烧写的nand flash,他是将程序烧写到了nand flash第一个block,这里的位置是否有问题?
(3)我看了你的dsp bios的那个程序(文件夹 dsp),里面的程序的入口地址是0x11800000,ARM程序的入口地址是0x8000412c,这两个程序的在两个不同的ram中,这里我不大理解,arm的RBL能够把烧写的程序加载到两个不同的RAM中吗?关于这方面的文档资料有哪些?能否给个链接?
(4)烧写的时候对nand write的烧写方式有什么特殊要求吗?
(5)关于我以上的调试过程,你能否给几个调试的建议
谢谢
Tony Tang你好,你贴出来的nand-writer-03.20.00.08.tar.gz 可以在我的板子上运行,你写的例子OMAPL138_DSPL2BOOT是用的SPIFLASH,若要改为NANDFLASH上boot,AISgen for D800K008上的配置需要怎么修改呢(尤其是CS3 setup,设为0x00000012不知对不对)?
我用的SEED_DEC138开发板,nandflash型号K9F4G08U0A。
Tony Tang:
我现在在单核芯片C6746上实现二次加载DSP应用程序,根据你的文档“How to boot ARM+DSP SOC”,我先将DSP的.out文件通过hex6x.exe转换成.bin,boot引脚设置为SPI Flash启动,一上电后,存放在SPI Flash的secondry-bootloader程序正确行动,并将存放在FLASH芯片上的bin文件搬运到指定的位置,这些功能都完成实现,并正确执行。
现在问题是:将DSP应用程序的指定到片内存放时(通过修改CMD文件,应用程序存放地址且不与secondary-bootloader程序存放地址重叠),程序能成功跳转到DSP应用程序,并成功运行。一旦将DSP应用程序存放在DDR位置时,程序无法跳转到DSP应用程序的EntryPoint位置,不知道是何原因,麻烦指点一下。另外看了“How to boot ARM+DSP SOC”文档的page10 "Use DM6437 BSL LED demo, get entry point from map file; and memory content from CCS memory view for later AIS file content comparison."我不明白你这句话的目的是什么,.bin文件最前面四个字节已经指明了entry point ,为何还要从.map文件获取?不太理解。
wei zhou1 说:你贴出来的nand-writer-03.20.00.08.tar.gz 可以在我的板子上运行,你写的例子OMAPL138_DSPL2BOOT是用的SPIFLASH,若要改为NANDFLASH上boot,AISgen for D800K008上的配置需要怎么修改呢(尤其是CS3 setup,设为0x00000012不知对不对)?
我用的SEED_DEC138开发板,nandflash型号K9F4G08U0A。
默认配置即可运行,如果想优先时序,提高速度,可以参考NAND的时序配置工具:http://processors.wiki.ti.com/index.php/Programming_Asynchronous_EMIF_on_OMAP-L13x_/_C674x_/_AM1x
Tony:
Step1:
我将Secondary_bootloader.out通过AISgen.exe生成AIS_boot.bin,在AIS的GUI界面中,确实没有配置PLL及DDR参数,但是在bootloader程序有对PLL及DDR进行初始化操作.
Step2:
将AIS_boot.bin烧写到SPI Flash首地址中,配置boot引脚为SPI FLASH启动,重新上电后,Secondary_bootloader能成功运行,并输出调试信息,以及DDR的读写测试信息均正常,说明在Secondary_bootloader已经正确配置了PLL及DDR.
Step3:
将DSP应用程序.out通过hex6x.exe工具转换成.bin文件,烧写到Flash另一位置。
Step4:
重新上电,Secondary_bootloader程序运行,并输出调试信息,并将DSP应用程序.bin文件搬运到指定位置,搬运完成后,执行跳转指定到Entry_point处。
测试结果:
DSP应用程序的cmd将代码全部指定分配在片内时,可以得到预期结果,将cmd部分代码分配到DDR时,跳转不成功。
这是整个测试流程,不知道哪里存在问题,请帮忙看一看,搞了一周多了,都没有什么眉目。
Tony:
在上面的步骤中,第二步是可以完成确认的,通过串口输出的调试信息符合预期,另外通过仿真器来运行的话,也是一样的结果,即DSP应用程序的cmd将代码全部指定分配在片内时,可以得到预期结果,将cmd部分代码分配到DDR时,跳转不成功。
基于你昨天给我的一些建议,我不仅在bootloader程序中,有对PLL及DDR的初始化,在AISgen的GUI界面中,同时也对PLL1及DDR进行了初始化。这样的话,跳转到仅7K大小LED闪亮程序(代码分配在DDR),这时运行成功了。但是我用一个64K的另一程序替代LED闪亮程序时,程序依旧无法运行。
现在我有二个疑问:1、在我前面的一些测试中,尽管没有在AISgen的GUI对PLL及DDR进行初始化操作,但是bootloader程序能对DDR正确读写测试的情况下,为何无法运行代码分配在DDR的应用程序。
2、为何现在小程序可以在DDR可以运行,大程序无法在DDR运行(大程序通过仿真器运行是没有问题的)。是不是我将bootloader程序都分配在片内存储区上(共40个K),所以小程序没问题,大程序就有问题了么?
Gang,
建议到这上版块上问一下,C6416是他们在维护支持:
http://www.deyisupport.com/question_answer/dsp_arm/c6000_multicore/f/53.aspx
你好!Tony Tang
现在我在OMAPL138上只用DSP核,不用ARM9;用了你的例程Boot_DSP_on_SOC_V0.1;可以正常启动了。有几个疑问想请教你:
对这两个文件有点疑惑:1.Boot_DSP_on_SOC_V0.1\OMAPL138_DSPL2BOOT\dsp\Mp3Postproc_omapl138cfg.cmd;2.
Boot_DSP_on_SOC_V0.1\OMAPL138_DSPL2BOOT\dsp\myboot.asm
1.myboot.asm文件是进入C语言环境的参数设置,cmd文件中入口地址一定要设置为0x11800000么?
2.Mp3Postproc_omapl138cfg.cmd 的 .text ..cinit 可以分配到DDR2的空间地址么,我设置到这个地址,是用不了;地址一定要设置为0x11800080开始么?