This thread has been locked.

If you have a related question, please click the "Ask a related question" button in the top right corner. The newly created question will be automatically linked to this question.

DLPDLCR230NPEVM: DLPDLCR230NPEVM

Part Number: DLPDLCR230NPEVM


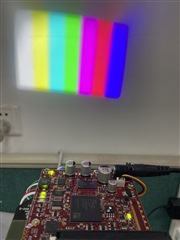
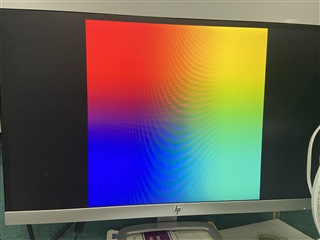
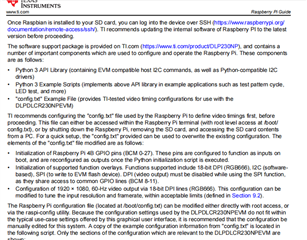
I want to control the device(DLPDLCR230NPEVM) with raspberry pi .After replacing  config.txt file with the sample config which downloaded from the official website ,the color screen is always displayed and cannot be turned on when restarting the raspberry pi. I wonder if it has anything to do with the model of raspberry pi while Raspberry pi 3B+ is now used.Or anything else?

  • For your case, first step you may want to verify if the DLPC230NP EVM board can still work independently. If things work okay, you may try with Rasperry Pi 4 which is compatible with DLPC230NP EVM out of box.

  •  I have verified   the DLPC230NP EVM board can  work independently as shown in the picture.And i changed for Rasperry Pi 4.But the problem  still exists.I followed the step in the user' guide.After  I modified the config file and restarted the raspberry pi, the raspberry pi could not start normally. I don't know what the problem is.Or there is anything wrong in my process?

    # For more options and information see
    # http://rpf.io/configtxt
    # Some settings may impact device functionality. See link above for details
    
    # #########################################
    # DO NOT MODIFY THE LINES BELOW THIS POINT
    # #########################################
    
    # uncomment if you get no picture on HDMI for a default "safe" mode
    #hdmi_safe=1
    
    # uncomment this if your display has a black border of unused pixels visible
    # and your display can output without overscan
    disable_overscan=1
    
    # uncomment the following to adjust overscan. Use positive numbers if console
    # goes off screen, and negative if there is too much border
    #overscan_left=16
    #overscan_right=16
    #overscan_top=16
    #overscan_bottom=16
    
    # uncomment to force a console size. By default it will be display's size minus
    # overscan.
    #framebuffer_width=1280
    #framebuffer_height=720
    
    # uncomment if hdmi display is not detected and composite is being output
    hdmi_force_hotplug=1
    
    # uncomment to force a specific HDMI mode (this will force VGA)
    hdmi_group=2
    hdmi_mode=82
    
    # uncomment to force a HDMI mode rather than DVI. This can make audio work in
    # DMT (computer monitor) modes
    #hdmi_drive=2
    
    # uncomment to increase signal to HDMI, if you have interference, blanking, or
    # no display
    config_hdmi_boost=4
    
    # uncomment for composite PAL
    #sdtv_mode=2
    
    #uncomment to overclock the arm. 700 MHz is the default.
    #arm_freq=800
    
    # Additional overlays and parameters are documented /boot/overlays/README
    
    # Enable audio (loads snd_bcm2835)
    dtparam=audio=on
    
    # Uncomment this to enable infrared communication.
    #dtoverlay=gpio-ir,gpio_pin=17
    #dtoverlay=gpio-ir-tx,gpio_pin=18
    
    # #########################################
    # DO NOT MODIFY THE LINES ABOVE THIS POINT
    # #########################################
    
    # Uncomment some or all of these to enable the optional hardware interfaces
    #dtparam=i2c_arm=on
    #dtparam=i2s=on
    dtparam=spi=on
    
    # Configure Raspberry PI for SSH over USB
    dtoverlay=dwc2
    
    # Configure I2C on GPIO Pins #22 and #23
    dtoverlay=i2c-gpio,i2c-gpio_sda=23,i2c_gpio_scl=22,i2c_gpio_delay_us=2
    
    # Configure DPI on GPIO Pins #0 through #21
    gpio=0=op
    gpio=0=pn
    gpio=1-27=ip
    gpio=1-27=pn
    
    
    # Enable DPI18 Overlay
    enable_dpi_lcd=1
    display_default_lcd=1
    dpi_group=2
    dpi_mode=87
    
    # Configure DPI Video Timings
    # RGB 666 CFG 1 (MODE 5)
    dpi_output_format=458773 
    
    # 58 Hz Timings (Low-End Spec)
    # Works at GPIO DRIVE 5-7
    hdmi_timings=1920 0 20 10 10 1080 0 10 10 10 0 0 0 58 0 125000000 3
    
    # NOTE: GPIO PINS #24 - #27 ARE DRIVEN SEPARATELY BY WiringPi SOFTWARE
    
    [pi4]
    # Enable DRM VC4 V3D driver on top of the dispmanx display stack
    #dtoverlay=vc4-fkms-v3d
    #max_framebuffers=2
    
    [all]
    #dtoverlay=vc4-fkms-v3d
    

  • For English communication you can submit this to EtoE English website

    https://e2e.ti.com/support/dlp-products-group/dlp/f/dlp-products-forum