This thread has been locked.

If you have a related question, please click the "Ask a related question" button in the top right corner. The newly created question will be automatically linked to this question.

DS90UB929-Q1EVM: HDMI input to display on the LCD

Part Number: DS90UB929-Q1EVM
Other Parts Discussed in Thread: ALP

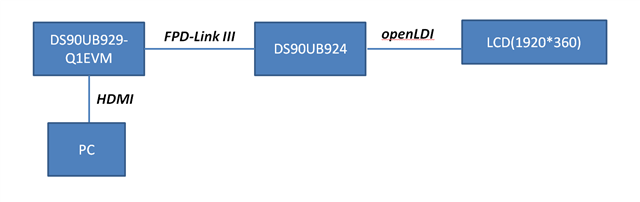
Our environment as above pic, I want to show my pc screen on the LCD.

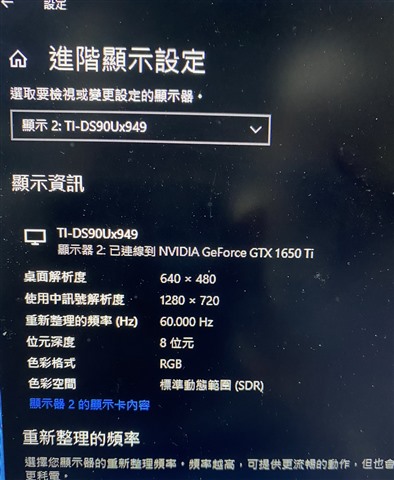
The LCD is 1920*360, and we fail to  show pc screen on LCD.

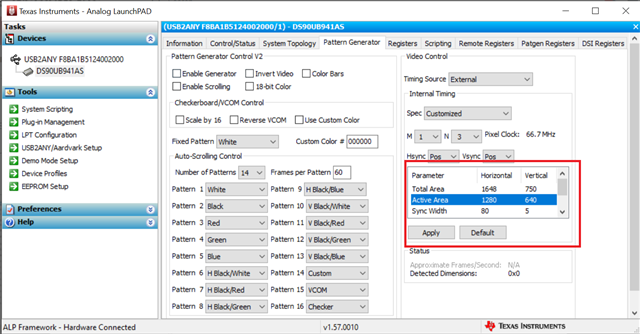
I can show color bar on LCD by use pattern generator on 929EVM.

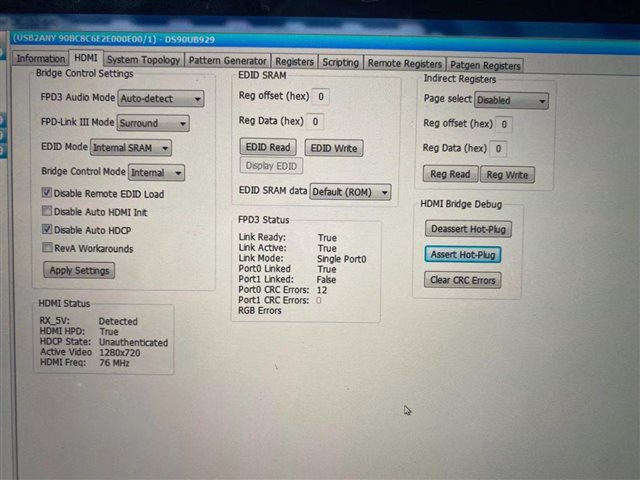
Above pic is the setting in ALP HDMI page.

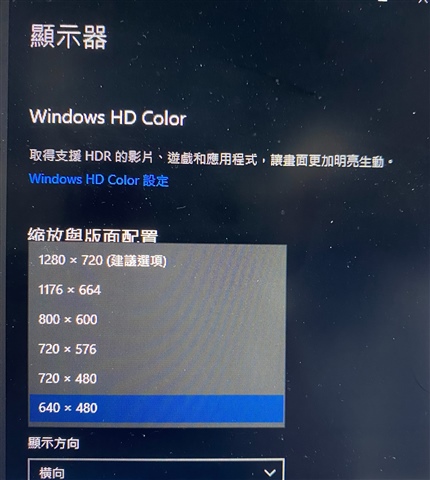
The active video show 1280*720, it's not fix to our LCD, any setting need to change?

Or there are any register need to set?

Is there any document about HDMI input operation?

thanks

BR

Derek

  • Hello, what  the Information Lab appears the  detected  input HDMI information, that can't change. 

    You could change the LCD  resolution, doesn't it ? 

    In addition, if you want to use the Pattern Generator tab in ALP, it can change the resolution like this:

  • Hi

    Is the bottom-left corner is information Lab? It's show ALP Framework - Hardware Connected.

    Our product LCD resolution is 1920*360, couldn't change.

    1. I success to use pattern Generator and change the resolution on 929EVM pattern Generator tab. I can show color on LCD.

    2. I fail to use PC HDMI input on 929EVM and show the PC screen on LCD.

    My question is any setting need to modify when use HDMI input?

    BR

    Derek

  • Hi

    this is the resolution show on our PC when HDMI connect to 929EVM


  • Hi 

    this is our register in 929EVM

    0x0,0x18
    0x1,0x0
    0x2,0x0
    0x3,0xda
    0x4,0x80
    0x5,0x0
    0x6,0x58
    0x7,0x5a
    0x8,0x5a
    0x9,0x0
    0xa,0x40
    0xb,0x0
    0xc,0x7
    0xd,0x10
    0xe,0x0
    0xf,0x0
    0x10,0x0
    0x11,0x0
    0x12,0x0
    0x13,0x88
    0x14,0x0
    0x15,0x1
    0x16,0xfe
    0x17,0x1e
    0x18,0x7f
    0x19,0x7f
    0x1a,0x1
    0x1b,0x0
    0x1c,0x0
    0x1d,0x0
    0x1e,0x1
    0x1f,0xf5
    0x20,0x3
    0x21,0x0
    0x22,0x25
    0x23,0x0
    0x24,0x0
    0x25,0x0
    0x26,0x0
    0x27,0x0
    0x28,0x1
    0x29,0x20
    0x2a,0x20
    0x2b,0xf8
    0x2c,0x0
    0x2d,0x0
    0x2e,0xa5
    0x2f,0x5a
    0x30,0x0
    0x31,0x0
    0x32,0x0
    0x33,0x0
    0x34,0x0
    0x35,0x0
    0x36,0x0
    0x37,0x0
    0x38,0x0
    0x39,0x0
    0x3a,0x0
    0x3b,0x0
    0x3c,0x0
    0x3d,0x0
    0x3e,0x0
    0x3f,0x0
    0x40,0x14
    0x41,0x4e
    0x42,0x0
    0x43,0x0
    0x44,0x80
    0x45,0x0
    0x46,0x0
    0x47,0x0
    0x48,0xd
    0x49,0xa0
    0x4a,0x0
    0x4b,0x1
    0x4c,0x0
    0x4d,0x0
    0x4e,0x1
    0x4f,0x0
    0x50,0x97
    0x51,0xa1
    0x52,0x1e
    0x53,0x0
    0x54,0x0
    0x55,0xc
    0x56,0x0
    0x57,0x0
    0x58,0x0
    0x59,0x0
    0x5a,0xdd
    0x5b,0x20
    0x5c,0x2
    0x5d,0x6
    0x5e,0x44
    0x5f,0x4c
    0x60,0x22
    0x61,0x2
    0x62,0x0
    0x63,0x0
    0x64,0x10
    0x65,0x0
    0x66,0xff
    0x67,0x0
    0x68,0x0
    0x69,0x0
    0x6a,0x0
    0x6b,0x0
    0x6c,0x0
    0x6d,0x0
    0x6e,0x0
    0x6f,0x0
    0x70,0x0
    0x71,0x0
    0x72,0x0
    0x73,0x0
    0x74,0x0
    0x75,0x0
    0x76,0x0
    0x77,0x0
    0x78,0x0
    0x79,0x0
    0x7a,0x0
    0x7b,0x0
    0x7c,0x0
    0x7d,0x0
    0x7e,0x0
    0x7f,0x0
    0x80,0x0
    0x81,0x0
    0x82,0x0
    0x83,0x0
    0x84,0x0
    0x85,0x0
    0x86,0x0
    0x87,0x0
    0x88,0x0
    0x89,0x0
    0x8a,0x0
    0x8b,0x0
    0x8c,0x0
    0x8d,0x0
    0x8e,0x0
    0x8f,0x0
    0x90,0x0
    0x91,0x0
    0x92,0x0
    0x93,0x0
    0x94,0x0
    0x95,0x0
    0x96,0x0
    0x97,0x0
    0x98,0x0
    0x99,0x0
    0x9a,0x0
    0x9b,0x0
    0x9c,0x0
    0x9d,0x0
    0x9e,0x0
    0x9f,0x0
    0xa0,0x0
    0xa1,0x0
    0xa2,0x0
    0xa3,0x0
    0xa4,0x0
    0xa5,0x0
    0xa6,0x0
    0xa7,0x0
    0xa8,0x0
    0xa9,0x0
    0xaa,0x0
    0xab,0x0
    0xac,0x0
    0xad,0x0
    0xae,0x0
    0xaf,0x0
    0xb0,0x0
    0xb1,0x0
    0xb2,0x0
    0xb3,0x0
    0xb4,0x0
    0xb5,0x0
    0xb6,0x0
    0xb7,0x0
    0xb8,0x0
    0xb9,0x0
    0xba,0x0
    0xbb,0x0
    0xbc,0x0
    0xbd,0x0
    0xbe,0x0
    0xbf,0x0
    0xc0,0x5
    0xc1,0x0
    0xc2,0x88
    0xc3,0x0
    0xc4,0x28
    0xc5,0x38
    0xc6,0x0
    0xc7,0x0
    0xc8,0xc0
    0xc9,0x0
    0xca,0x0
    0xcb,0x0
    0xcc,0x0
    0xcd,0x0
    0xce,0xff
    0xcf,0x0
    0xd0,0x10
    0xd1,0x0
    0xd2,0x0
    0xd3,0x0
    0xd4,0x0
    0xd5,0x0
    0xd6,0x0
    0xd7,0x0
    0xd8,0x0
    0xd9,0x0
    0xda,0x0
    0xdb,0x0
    0xdc,0x0
    0xdd,0x0
    0xde,0x0
    0xdf,0x0
    0xe0,0x5
    0xe1,0x0
    0xe2,0x88
    0xe3,0x0
    0xe4,0x28
    0xe5,0x38
    0xe6,0x0
    0xe7,0x0
    0xe8,0x0
    0xe9,0x0
    0xea,0x0
    0xeb,0x0
    0xec,0x0
    0xed,0x0
    0xee,0x0
    0xef,0x0
    0xf0,0x5f
    0xf1,0x55
    0xf2,0x42
    0xf3,0x39
    0xf4,0x32
    0xf5,0x39
    0xf6,0x0
    0xf7,0x0
    0xf8,0x0
    0xf9,0x0
    0xfa,0x0
    0xfb,0x0
    0xfc,0x0
    0xfd,0x0
    0xfe,0x0
    0xff,0x0

  • Hello, there is no idea to change input HDMI resolution on DS90UB929 side.

    For example, PC connected the UB929, if we want to change the input resolution, we should change the PC resolution as the above image listed. There is no related configuration of UB929 to change the input resolution. 

  • hi

    any other register need to set?

    for example, EDID setting?

  •  If you want to write assigned EDID to internal SRAM, you can use both EDID_SEL & REM_EDID_LOAD in mode_sel0/1 ( can use either strap or register setting) to choose the EDID from internal SDRAM, in this way, your HDMI source can read this assigned EDID through DDC. Detailed solution as below:

    The process for reading EDID SRAM is as follows:

    1.  Write to APB_ADR0 to set the 8-bit register address.

    2.  Set the APB_READ bit in the APB_CTL register.  This will initiate the APB Interface read. 

     The APB_ENABLE bit must also be set during the APB_CTL register write, while the APB_SELECT bits must be set to 01.  If desired, the APB_AUTO_INC bit may be set to enable the auto-increment function.

    3.  Read the APB_DATA0 registers.

    4.  If APB_AUTO_INC was set, the next register location may be read by repeating steps 2 and 3, otherwise repeat steps 1-3 to read another register location.

    The process for writing the EDID SRAM is as follows:

    1.  Set APB_ENABLE in the APB_CTL register.  This bit should remain set through remainder of procedure.  The APB_SELECT bits should be set to 01.  If desired, the APB_AUTO_INC bit may be set to enable the auto-increment function.

    2.  Write to APB_ADR0 to set the 8-bit register address.

    3.  Write the 8-bit data to the APB_DATA0 register.  The APB Interface write will occur once APB_DATA0 has been written.

    4.  If APB_AUTO_INC is set, the next register location may be written by repeating step 2, otherwise repeat steps 1 and 2 to write another register location.