请注意,本文内容源自机器翻译,可能存在语法或其它翻译错误,仅供参考。如需获取准确内容,请参阅链接中的英语原文或自行翻译。
器件型号:TMS570LS1224PGE
您好!
我们目前遇到的问题与本主题中所述的完全相同:
不幸的是,除了"它应该以这种方式工作"之外,没有提供任何解决办法。
我们使用"example_etpwm_ecap"示例成功设置 ECAP 读数。 即使占空比或周期发生轻微变化、它也能正常运行。
但是、我们需要采集67Hz、3.3V 的 PWM、占空比约为10-20%、与示例中生成的 PWM 相比、这非常慢。 理论上、应该可以在计数器溢出之前捕获周期长度高达53秒的信号。
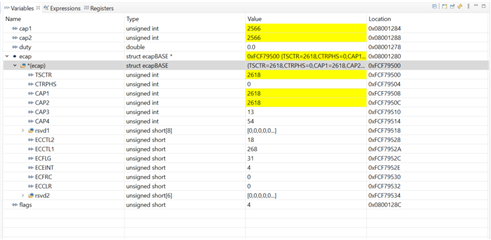
当尝试读取我们的慢速信号时、所有 ECAP 计数器都显示相同的值、因此我们只将占空比和周期值设置为零。 看起来所有捕捉事件都同时发生、并且同时触发上升沿和下降沿。
我们已经通过不同的来源生成了所需的信号(以及类似的信号)、以确保我们的信号源不是问题所在。 示波器中的信号看起来很好。
为什么该示例不适用于低频信号? 读取相对较慢的信号需要做些什么?
此致
克里斯蒂安
/** @example example_etpwm_ecap.c
* This is an example which describes the steps to configure ETPWM for generating PWM signal
* and ECAP to capture the same and calculate its frequency and duty cycle,Here ETPWM1A pin is configured
* to generate a PWM wave and is fed to ECAP1 pin.
*
*
* @b Step @b 1:
*
* Create a new project.
*
* Navigate: -> File -> New -> Project
*
* @image html example_createProject.jpg "Figure: Create a new Project"
*
* @b Step @b 2:
*
* Configure driver code generation:
* - Enable ETPWM and ECAP drivers
* - Disable others
*
* Navigate: -> TMS570LS12x/RM46 -> Enable Drivers
*
* @b Step @b 3:
*
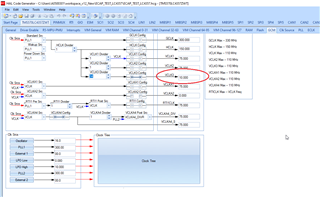
* Configure PINMUX to enable ETPWM1A and ECAP1 pins (or enable ETPWM and ECAP checkboxes)
*
* Navigate: -> PINMUX -> Pin Muxing
*
* Enable TBCLK sync
*
* Navigate: -> PINMUX -> Special Pin Muxing
*
* @b Step @b 4:
*
* Enable ECAP1 Interrupt in VIM (Channel 104)
*
* Navigate: -> TMS570LS12x/RM46 -> VIM Channel 96-127
*
* @b Step @b 4:
*
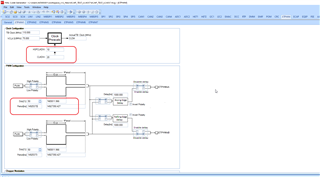
* Configure EPWM1A with specified duty and period
*
* @image html etpwm_module_enable.jpg "Figure: Enable ETPWM modules"
* @image html etpwm_config.jpg "Figure: EPWM1A configuration"
*
* @b Step @b 5:
*
* Configure ECAP1 as follows
*
* @image html ecap_module_enable.jpg "Figure: Enable ETPWM modules"
* @image html ecap_config.jpg "Figure: EPWM1A configuration"
*
* @b Step @b 6:
*
* Connect the pin ETPWM1A and ECAP1:
*
*
* @b Step @b 7:
*
* Copy the source code below into your sys_main.c or replace sys_main.c with this file.
*
* The example file can also be found in the examples folder: ../HALCoGen/examples
*
* @note HALCoGen generates an empty main function in sys_main.c,
*
*
*/
/*
* Copyright (C) 2009-2015 Texas Instruments Incorporated - www.ti.com
*
*
* Redistribution and use in source and binary forms, with or without
* modification, are permitted provided that the following conditions
* are met:
*
* Redistributions of source code must retain the above copyright
* notice, this list of conditions and the following disclaimer.
*
* Redistributions in binary form must reproduce the above copyright
* notice, this list of conditions and the following disclaimer in the
* documentation and/or other materials provided with the
* distribution.
*
* Neither the name of Texas Instruments Incorporated nor the names of
* its contributors may be used to endorse or promote products derived
* from this software without specific prior written permission.
*
* THIS SOFTWARE IS PROVIDED BY THE COPYRIGHT HOLDERS AND CONTRIBUTORS
* "AS IS" AND ANY EXPRESS OR IMPLIED WARRANTIES, INCLUDING, BUT NOT
* LIMITED TO, THE IMPLIED WARRANTIES OF MERCHANTABILITY AND FITNESS FOR
* A PARTICULAR PURPOSE ARE DISCLAIMED. IN NO EVENT SHALL THE COPYRIGHT
* OWNER OR CONTRIBUTORS BE LIABLE FOR ANY DIRECT, INDIRECT, INCIDENTAL,
* SPECIAL, EXEMPLARY, OR CONSEQUENTIAL DAMAGES INCLUDING, BUT NOT
* LIMITED TO, PROCUREMENT OF SUBSTITUTE GOODS OR SERVICES; LOSS OF USE,
* DATA, OR PROFITS; OR BUSINESS INTERRUPTION HOWEVER CAUSED AND ON ANY
* THEORY OF LIABILITY, WHETHER IN CONTRACT, STRICT LIABILITY, OR TORT
* INCLUDING NEGLIGENCE OR OTHERWISE ARISING IN ANY WAY OUT OF THE USE
* OF THIS SOFTWARE, EVEN IF ADVISED OF THE POSSIBILITY OF SUCH DAMAGE.
*
*/
/* USER CODE BEGIN (0) */
/* USER CODE END */
/* Include Files */
#include "sys_common.h"
/* USER CODE BEGIN (1) */
#include "stdio.h"
#include "system.h"
#include "etpwm.h"
#include "ecap.h"
/* USER CODE END */
/** @fn void main(void)
* @brief Application main function
*
*/
/* USER CODE BEGIN (2) */
/* USER CODE END */
void main(void)
{
/* USER CODE BEGIN (3) */
_enable_interrupt_();
#if 1
/* Initialise EPWM and ECAP with GUI configuration */
etpwmInit();
ecapInit();
#else
/* Alternate code for configuring ETPWM and ECAP */
/* Configure ETPWM1 */
/* Set the TBCLK frequency = VCLK4 frequency = 90MHz */
etpwmSetClkDiv(etpwmREG1, ClkDiv_by_1, HspClkDiv_by_1);
/* Set the time period as 1000 ns (Divider value = (1000ns * 90MHz) - 1 = 89)*/
etpwmSetTimebasePeriod(etpwmREG1, 89);
/* Configure Compare A value as half the time period */
etpwmSetCmpA(etpwmREG1, 45);
/* Configure mthe module to set PWMA value as 1 when CTR=0 and as 0 when CTR=CmpA */
etpwmActionQualConfig_t configPWMA;
configPWMA.CtrEqZero_Action = ActionQual_Set;
configPWMA.CtrEqCmpAUp_Action = ActionQual_Clear;
configPWMA.CtrEqPeriod_Action = ActionQual_Disabled;
configPWMA.CtrEqCmpADown_Action = ActionQual_Disabled;
configPWMA.CtrEqCmpBUp_Action = ActionQual_Disabled;
configPWMA.CtrEqCmpBDown_Action = ActionQual_Disabled;
etpwmSetActionQualPwmA(etpwmREG1, configPWMA);
/* Start counter in CountUp mode */
etpwmSetCount(etpwmREG1, 0);
etpwmSetCounterMode(etpwmREG1, CounterMode_Up);
etpwmStartTBCLK();
/* Configure ECAP1 */
/* Configure Event 1 to Capture the rising edge */
ecapSetCaptureEvent1(ecapREG1, RISING_EDGE, RESET_DISABLE);
/* Configure Event 2 to Capture the falling edge */
ecapSetCaptureEvent2(ecapREG1, FALLING_EDGE, RESET_DISABLE);
/* Configure Event 3 to Capture the rising edge with reset counter enable */
ecapSetCaptureEvent3(ecapREG1, RISING_EDGE, RESET_ENABLE);
/* Set Capure mode as Continuous and Wrap event as CAP3 */
ecapSetCaptureMode(ecapREG1, CONTINUOUS, CAPTURE_EVENT3);
/* Start counter */
ecapStartCounter(ecapREG1);
/* Enable Loading on Capture */
ecapEnableCapture(ecapREG1);
/* Enable Interrupt for CAP3 event */
ecapEnableInterrupt(ecapREG1, ecapInt_CEVT3);
#endif
/* ... run forever */
while(1);
/* USER CODE END */
}
/* USER CODE BEGIN (4) */
void ecapNotification(ecapBASE_t *ecap,uint16 flags)
{
uint32 cap1, cap2, cap3;
float64 duty, period;
cap1 = ecapGetCAP1(ecapREG1);
cap2 = ecapGetCAP2(ecapREG1);
cap3 = ecapGetCAP3(ecapREG1);
duty = (cap2 - cap1)*1000/VCLK4_FREQ;
period = (cap3 - cap1)*1000/VCLK4_FREQ;
printf("Duty = %fns\n", duty);
printf("Period = %fns\n\n", period);
}
/* USER CODE END */