This thread has been locked.

If you have a related question, please click the "Ask a related question" button in the top right corner. The newly created question will be automatically linked to this question.

[参考译文] TDA4VM-Q1:TDA4 VM SDK 10_01_00_04:在 openvx 流水线模式下、最终输出会导致一帧包含不正确数据、后跟一帧正常数据的问题。

Guru**** 2378650 points
请注意,本文内容源自机器翻译,可能存在语法或其它翻译错误,仅供参考。如需获取准确内容,请参阅链接中的英语原文或自行翻译。

https://e2e.ti.com/support/processors-group/processors/f/processors-forum/1493586/tda4vm-q1-tda4-vm-sdk-10_01_00_04-in-openvx-pipeline-mode-the-final-output-results-in-an-issue-where-one-frame-contains-incorrect-data-followed-by-one-frame-of-normal-data

器件型号:TDA4VM-Q1

工具/软件:

您好:

 这个问题跟以下这个:(+) TDA4VE-Q1:TDA4 VM SDK 10_01_00_04:TIDL 节点在流水线模式下异常。 -处理器论坛-处理器- TI E2E 支持论坛
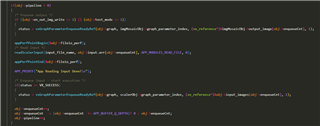
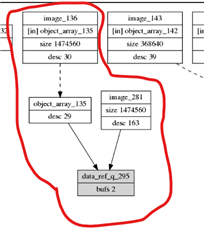
1. 这是我们的图形设计图

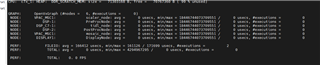
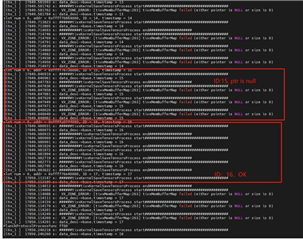
2.在 save_tensor 节点中、我们添加了日志记录、发现 TIDL 节点每隔一帧交替输出一个空指针和正常数据。 因此、我们已经确认 TIDL 输出在这两个输出之间交替  一个正确的帧和一个异常帧

3.演示。

在上周的会议中、我们被建议参考  SDK 10.1演示代码  响应。

我们比较了 SDK 8.4和 SDK 10.1中的演示代码: psdkra/vision_apps/apps/dl_demos/app_tidl_seg。 代码是相同的、在应用程序级别没有差异。 如果 SDK 10.1有更新的演示、您能提供一个副本供我们比较吗?
此致、
XJC
  • 请注意,本文内容源自机器翻译,可能存在语法或其它翻译错误,仅供参考。如需获取准确内容,请参阅链接中的英语原文或自行翻译。

    尊敬的 xjc:

    您能否提供有关图形的更多信息、例如流水线深度、缓冲区深度、节点参数和用于将 tidl 输出链接到 save_tensor_node 输入的缓冲区。

    我看到3个复制节点提供空输出、但第一个节点提供数据、我假设流水线深度为2、对于第一个管道、所有4个复制节点提供数据、在第二个管道中、3个节点提供空。 这也意味着没有为这些节点正确创建缓冲区。

    还共享点图可视化输出以分析创建的缓冲区。

    此致、
    Gokul

  • 请注意,本文内容源自机器翻译,可能存在语法或其它翻译错误,仅供参考。如需获取准确内容,请参阅链接中的英语原文或自行翻译。

    Hi Gokul:

    1.这是我的图形流水线深度代码设计:

       	graph_parameter_index = 0;
    	add_graph_parameter_by_node_index(graphObj->graph, graphObj->virtualCameraObj.node, 0);
    	graphObj->inputObj.graph_parameter_index = graph_parameter_index;
       	graph_parameters_queue_params_list[graph_parameter_index].graph_parameter_index = graph_parameter_index;
        graph_parameters_queue_params_list[graph_parameter_index].refs_list_size = 4;
        graph_parameters_queue_params_list[graph_parameter_index].refs_list = (vx_reference*)&graphObj->inputObj.input_image_arr[0];
        graph_parameter_index++;
    
    	add_graph_parameter_by_node_index(graphObj->graph, graphObj->imageMattingObj.node, 2);
    	graphObj->imageMattingObj.graph_parameter_index = graph_parameter_index;
        graph_parameters_queue_params_list[graph_parameter_index].graph_parameter_index = graph_parameter_index;
        graph_parameters_queue_params_list[graph_parameter_index].refs_list_size = 8;
    	graph_parameters_queue_params_list[graph_parameter_index].refs_list = (vx_reference*)&graphObj->imageMattingObj.out_image_arr[0];
    	graph_parameter_index++;
    
    	add_graph_parameter_by_node_index(graphObj->graph, graphObj->CameraFeatureSaveTensorObj.node, 1);
    	graphObj->CameraFeatureSaveTensorObj.graph_parameter_index = graph_parameter_index;
    	graph_parameters_queue_params_list[graph_parameter_index].graph_parameter_index = graph_parameter_index;
    	graph_parameters_queue_params_list[graph_parameter_index].refs_list_size = 8;
    	graph_parameters_queue_params_list[graph_parameter_index].refs_list = (vx_reference*)&graphObj->CameraFeatureSaveTensorObj.data_arr[0];
    	graph_parameter_index++;
    	
    	vxSetGraphScheduleConfig(graphObj->graph,
                VX_GRAPH_SCHEDULE_MODE_QUEUE_AUTO,
                graph_parameter_index,
                graph_parameters_queue_params_list);
    
    	tivxSetGraphPipelineDepth(graphObj->graph, 4);
    	
    #define NUM_DEPTH 2
    	tivxSetNodeParameterNumBufByIndex(graphObj->virtualCameraObj.node, 1, NUM_DEPTH);
    	tivxSetNodeParameterNumBufByIndex(graphObj->virtualCameraObj.node, 2, NUM_DEPTH);
    
    	tivxSetNodeParameterNumBufByIndex(graphObj->CameraFeaturePreProcObj.node, 2, NUM_DEPTH);
    	tivxSetNodeParameterNumBufByIndex(graphObj->CameraFeatureTIDLObj.node, 7, NUM_DEPTH);

    2.这是我的图形 点图可视化。

    此致、

    XJC

  • 请注意,本文内容源自机器翻译,可能存在语法或其它翻译错误,仅供参考。如需获取准确内容,请参阅链接中的英语原文或自行翻译。

    Hi  Gokul:

    如果图像不清晰、请下载此 zip 文件。

    e2e.ti.com/.../parking3.zip

    此致、

    XJC

  • 请注意,本文内容源自机器翻译,可能存在语法或其它翻译错误,仅供参考。如需获取准确内容,请参阅链接中的英语原文或自行翻译。

    嗨、xie、

    感谢您分享这些图表、

    您能否分享如何为 virtualCameraObj.node 创建图形(发送创建节点的代码片段)?

    在图形中、我只能看到其他节点使用 virtual_camera_node 的一个输出。 在这种情况下、为什么要将第一个和第二个参数作为节点参数? 如果只有第1个参数作为输入传递到 image_matting_node、则注释掉第2个参数的节点参数设置。

    此外、根据您要将缓冲区深度设置为2的代码、但有2种不同的类型创建为2个缓冲区、理想情况下2个缓冲区应该是相同的类型。

    此外、还可以将 NUM_DEPTH 设置为4并将.refs_list_size = 8更改为4。

    将流水线深度设置为5 (可选)。

    您是否可以在执行更改后发送图形输出并发送 virtual_camera_node 的节点创建部分?

    此致、
    Gokul

  • 请注意,本文内容源自机器翻译,可能存在语法或其它翻译错误,仅供参考。如需获取准确内容,请参阅链接中的英语原文或自行翻译。

    Gokul 您好:

    1.在中设置两种不同输出类型的原因 virtualCameraObj

    virtualCameraObj节点有一个特殊要求—其内部处理在 GPU 上实现。 我们的 GPU 节点只能处理 RGBA 格式的图像、如果我们使用 NV12图像格式、将导致运行时错误。 但是、下游节点需要 NV12格式的映像。

    为了处理此情况、节点有两个输出:

    • 输出0采用 RGBA 格式、但存储器实际上包含 NV12图像数据。 此输出不会传递到下游。
    • 输出1采用 NV12格式、这是传递到下游节点的输出1。 在内部(在目标内)、我们将 NV12图像数据从输出0 (技术上采用 RGBA 格式)复制到输出1 (正确格式化的 NV12图像)。

    这样、virtualCameraObj节点最终会向下游流水线提供 NV12映像格式。

    创建代码:

    vx_status app_init_virtual_camera(vx_context context, VirtualCameraObj *obj, char *objName)
    {
            vx_status status = VX_SUCCESS;
            vx_image out_image, out_image_2;
            vx_uint32 i = 0;
    
            out_image = vxCreateImage(context, obj->width, obj->height, obj->format);
            for (i = 0; i < obj->num_buf; i++)
            {
                    obj->output_arr[i] = vxCreateObjectArray(context, (vx_reference)out_image, obj->num_channel);
            obj->output_image[i] = (vx_image)vxGetObjectArrayItem((vx_object_array)obj->output_arr[i], 0);
            }
    
            out_image_2 = vxCreateImage(context, obj->width_2, obj->height_2, obj->format_2);
            for (i = 0; i < obj->num_buf; i++)
            {
                    obj->output_arr_2[i] = vxCreateObjectArray(context, (vx_reference)out_image_2, obj->num_channel);
            obj->output_image_2[i] = (vx_image)vxGetObjectArrayItem((vx_object_array)obj->output_arr_2[i], 0);
            }
    
            vxReleaseImage(&out_image);
            vxReleaseImage(&out_image_2);
    
            return status;
    }
    
    vx_status app_create_graph_virtual_camera(vx_graph graph, VirtualCameraObj *obj, vx_object_array input_image_arr)
    {
            vx_status status = VX_SUCCESS;
            vx_image output[2] = {NULL, NULL};
    
            output[0] = (vx_image)vxGetObjectArrayItem((vx_object_array)obj->output_arr[0], 0);
            output[1] = (vx_image)vxGetObjectArrayItem((vx_object_array)obj->output_arr_2[0], 0);
    
        obj->node = tivxVirtualCameraNode(graph, input_image_arr, output[0], output[1]);
            status = vxGetStatus((vx_reference)obj->node);
    
            if (obj->inst == 1)
            {
            status = vxSetNodeTarget(obj->node, VX_TARGET_STRING, TIVX_TARGET_DSP1);
            }
            else if (obj->inst == 2)
            {
                    status = vxSetNodeTarget(obj->node, VX_TARGET_STRING, TIVX_TARGET_DSP2);
            }
            else if (obj->inst == 3)
            {
                    status = vxSetNodeTarget(obj->node, VX_TARGET_STRING, TIVX_TARGET_MPU_0);
            }
            vxSetReferenceName((vx_reference)obj->node, "tivxVirtualCameraode");
    
            vxReleaseImage(&output[0]);
            vxReleaseImage(&output[1]);
    
            return(status);
    }
    

    copy code virtualCameraObj 目标节点:将 NV12图像数据从输出0 (技术上采用 RGBA 格式)复制到输出1 (正确格式化的 NV12图像)。

                output_target_ptr[0] = tivxMemShared2TargetPtr(&output_desc->mem_ptr[0]);
                output_target_ptr[1] = (char *)output_target_ptr[0] + CAMERA_VIRTUAL_WIDTH*2*CAMERA_VIRTUAL_HEIGHT*2;
    
                output_target_ptr_2[0] = tivxMemShared2TargetPtr(&output_desc_2->mem_ptr[0]);
                output_target_ptr_2[1] = tivxMemShared2TargetPtr(&output_desc_2->mem_ptr[1]);
    
                memcpy((uint8_t *)output_target_ptr_2[0],(uint8_t *)output_target_ptr[0],sizeof(char)*output_desc_2->mem_size[0]);
                memcpy((uint8_t *)output_target_ptr_2[1],(uint8_t *)output_target_ptr[1],sizeof(char)*output_desc_2->mem_size[1]);
    

    这可能与我们的交替帧错误问题有关吗? 因为根据我观察到的情况、预处理节点之前的所有帧都似乎是正常且一致的。

    2.  可以将 NUM_DEPTH 更改为4并将.refs_list_size = 8更改为4。 将流水线深度设置为5 (可选)。

    这是更新后的图形图。

  • 请注意,本文内容源自机器翻译,可能存在语法或其它翻译错误,仅供参考。如需获取准确内容,请参阅链接中的英语原文或自行翻译。

    补充资料:

  • 请注意,本文内容源自机器翻译,可能存在语法或其它翻译错误,仅供参考。如需获取准确内容,请参阅链接中的英语原文或自行翻译。

    嗨、xie、

    您是否已注释掉这一行

    tivxSetNodeParameterNumBufByIndex (graphObj->virtualCameraObj.node、1、NUM_DEPTH);

    无论如何、openvx 图中不使用此输出0、因此您不必指定缓冲区深度  

    在我仍在看到时确认  

    对于缓冲区1、其 obj_array 和其他缓冲区(2、3、4)、其类型为 vx_image、其仅针对 virtual_camera_node 发生、其他缓冲区似乎没问题

    这是否与我们的交替帧错误问题有关? 因为根据我观察到的情况、预处理节点之前的所有帧似乎都是正常且一致的。

    我来检查一下

    此致、
    Gokul

  • 请注意,本文内容源自机器翻译,可能存在语法或其它翻译错误,仅供参考。如需获取准确内容,请参阅链接中的英语原文或自行翻译。

    Hi Gokul:

    我之前没有注释掉这段代码。

    tivxSetNodeParameterNumBufByIndex (graphObj->virtualCameraObj.node、1、NUM_DEPTH);

    现在、注释掉后、仍然会发生交替帧错误。

    我们是否应该检查任何其他潜在问题?

    此致、
    XJC
  • 请注意,本文内容源自机器翻译,可能存在语法或其它翻译错误,仅供参考。如需获取准确内容,请参阅链接中的英语原文或自行翻译。

    嗨、xie、

    您是否可以在注释后共享图形输出

    我的怀疑是缓冲器没有从 tidl 节点填充。

    在上一篇文章中、我提到 virtual_camera 的输出应该是 object_arr、但在图形中只有一个缓冲区是 obj_arr、另一个缓冲区是 vx_image。

    您能分享如何为 imageMatting 节点、saveTensor 节点和 tidl 节点创建图形,也共享 saveTensorNode 的排队和出队部分

    此致、
    Gokul

  • 请注意,本文内容源自机器翻译,可能存在语法或其它翻译错误,仅供参考。如需获取准确内容,请参阅链接中的英语原文或自行翻译。

    尊敬的 xjc:

    1. 该virtual_camera节点是 GPU 渲染节点、一次只能处理一个帧。 因此、其缓冲器只能设置为1。 如果设置为4、则会出现与图像相关的异常。

    缓冲区创建是 openvx 框架的一部分、当节点开始执行框架时、将一个缓冲区分配给节点进程函数。 如果 virtual_camera 为 openvx 节点、则这应该不是问题。

    是否正在运行且流水线深度设置为1且所有缓冲区深度设置为1的应用程序。 app_seg_cam 有类似的管道 ,其中 tidl 节点被复制,该应用是否适合您?

    此致、
    Gokul

  • 请注意,本文内容源自机器翻译,可能存在语法或其它翻译错误,仅供参考。如需获取准确内容,请参阅链接中的英语原文或自行翻译。

    Hi Gokul:

    是否正在运行且流水线深度设置为1且所有缓冲区深度设置为1的应用程序。

    -----

    是的、我们目前拥有 流水线深度设置为4 所有缓冲深度均设置为1 。 此设置可以正常工作、但它基本上在中运行 方式 、导致帧速率非常低。

    我们希望提高整体帧速率、因此我们增加了流水线深度和缓冲区大小。 但是、这导致了当前的问题。

    此致、
    XJC
  • 请注意,本文内容源自机器翻译,可能存在语法或其它翻译错误,仅供参考。如需获取准确内容,请参阅链接中的英语原文或自行翻译。

    尊敬的 xjc:

    入队和出队部分中的对象 frameTensorCam 的类型是什么。

    您可以共享管道上的排队部分并在您为 saveTensorNode 执行排队/出队部分的任何位置共享该片段吗

    也共享 saveTensorNode ( app_init_save_tensor ())的 init 部分。

    此致、
    Gokul

  • 请注意,本文内容源自机器翻译,可能存在语法或其它翻译错误,仅供参考。如需获取准确内容,请参阅链接中的英语原文或自行翻译。

    Gokul 您好:

    1.  app_init_save_tensor ()

    vx_status app_init_save_tensors(vx_context context, SaveTensorsObj *obj, char *objName, vx_user_data_object config)
    {
            vx_status status = VX_SUCCESS;
            vx_map_id map_id_config[2];
            sTIDL_IOBufDesc_t *ioBufDesc;
            tivxTIDLJ7Params *tidlParams;
            tivxSaveTensorsParams *tensorParams = NULL;
            vx_uint32 i = 0;
            vx_uint32 size = 0;
            vx_uint32 type_size = 0;
            vx_user_data_object data;
    
            obj->params = vxCreateUserDataObject(context, "tivxSaveTensorsParams", sizeof(tivxSaveTensorsParams), NULL);
            vxMapUserDataObject(obj->params, 0, sizeof(tivxSaveTensorsParams), &map_id_config[0],
                                                    (void **)&tensorParams, VX_WRITE_ONLY, VX_MEMORY_TYPE_HOST, 0);
    
            vxMapUserDataObject(config, 0, sizeof(tivxTIDLJ7Params), &map_id_config[1],
                                                    (void **)&tidlParams, VX_READ_ONLY, VX_MEMORY_TYPE_HOST, 0);
    
            ioBufDesc = (sTIDL_IOBufDesc_t *)&tidlParams->ioBufDesc;
            tensorParams->num_tensor = ioBufDesc->numOutputBuf;
            for (i = 0; i < ioBufDesc->numOutputBuf; i++)
            {
                    type_size = get_vx_tensor_type_size(ioBufDesc->outElementType[i]);
                    size = size + ioBufDesc->outHeight[i]*ioBufDesc->outWidth[i]*ioBufDesc->outNumChannels[i]*type_size;
    
                    tensorParams->width[i] = ioBufDesc->outWidth[i];
                    tensorParams->height[i] = ioBufDesc->outHeight[i];
                    tensorParams->padL[i] = ioBufDesc->outPadL[i];
                    tensorParams->padR[i] = ioBufDesc->outPadR[i];
                    tensorParams->padT[i] = ioBufDesc->outPadT[i];
                    tensorParams->padB[i] = ioBufDesc->outPadB[i];
                    tensorParams->outChannelPitch[i] = ioBufDesc->outChannelPitch[i];
                    tensorParams->outNumChannels[i] = ioBufDesc->outNumChannels[i];
            }
            tensorParams->tidl_flag = obj->tidl_flag;
            vxUnmapUserDataObject(obj->params, map_id_config[0]);
            vxUnmapUserDataObject(config, map_id_config[1]);
    
            printf("###########cal size:%d pass size:%d###############\n", size, obj->size);
            data = vxCreateUserDataObject(context, "", obj->size, NULL);
            for (i = 0; i < obj->num_buf; i++)
            {
                    obj->data_arr[i] = vxCreateObjectArray(context, (vx_reference)data, obj->num_channel);
                    obj->data[i] = (vx_user_data_object)vxGetObjectArrayItem((vx_object_array)obj->data_arr[i], 0);
            }
    
            //vxReleaseUserDataObject(&data);
            return status;
    }
    

    2. 入队和出队部分中的 TensorFrameCam 的类型是什么。

    ----- vx_object_array 帧 TensorCam;
    3、 您可以在 saveTensorNode 的入队/出队部分中共享管道上的入队部分并共享片段吗

    我们只是执行出队,然后是入队,而不需要任何额外的处理

    	status = vxGraphParameterDequeueDoneRef(graphObj->graph, graphObj->CameraFeatureSaveTensorObj.graph_parameter_index, (vx_reference*)&frameTensorCam, 1, &num_refs);
    	if (status != VX_SUCCESS)
    	{
    		MV_LOG_ERROR("vxGraphParameterDequeueDoneRef CameraFeatureTIDLObj failed!!\n");
    		return;
    	}
    	status = vxGraphParameterEnqueueReadyRef(graphObj->graph, graphObj->CameraFeatureSaveTensorObj.graph_parameter_index, (vx_reference*)&frameTensorCam, 1);

     →是否可以提供一个官方演示、演示带有 TIDL 的流水线 save_tensor、其中流水线深度和缓冲区计数都大于2?
    我已经TIDL_SEG在 SDK 10.0和8.4中比较了演示、它们几乎完全相同。 但是、该演示中的图形结构与我遇到问题的图形结构大不相同。 它使用 TIDL→后处理链接、并且后处理节点不由流水线管理、仅使用缓冲深度1、而不是2。 我尝试了相应地修改演示、但流水线无法运行。
    →、如果您能提供一个参考演示来展示 TIDL 的 save_tensor 以及流水线管理和缓冲区深度> 2、我将不胜感激。
    此致、
    XJC
  • 请注意,本文内容源自机器翻译,可能存在语法或其它翻译错误,仅供参考。如需获取准确内容,请参阅链接中的英语原文或自行翻译。

    嗨、xie、

    我们只需执行出队、然后是入队、而无需任何额外处理

    我是在要求排队的零件。 根据缓冲区深度、您必须将所有图形参数的缓冲区排入图形的队列中。

    在 app_tidl_seg 中的 app_run_grap_for_one_frame_pipeline ()中,您可以看到2个图形参数排队(如果已启用),同样,您必须排队等待根据缓冲区深度创建的3个图形参数。 另外,我建议为输入和输出节点创建图形参数,而不是中间节点(映像节点),这可能会影响流水线性能,

    它使用 TIDL→postproc 链接、后处理节点不由流水线管理、只使用缓冲深度1、而不是2。 我尝试相应地修改演示、但管道运行失败。

    我可以看到、在 app_tidl_seg 中、后 proc 输出的缓冲区深度设置为2。 流水线针对整个图、因此 postproc_node 由流水线管理。

    因此、如果您能提供一个参考演示来展示 TIDL→μ V save_tensor 以及流水线管理和缓冲区深度> 2、我将不胜感激。

    在 app_tidl_seg_cam 演示中、缓冲区深度设置为4、流水线深度设置为7、并且根据摄像头输入数量复制 tidl 节点。 请参阅它。

    此致、
    Gokul

  • 请注意,本文内容源自机器翻译,可能存在语法或其它翻译错误,仅供参考。如需获取准确内容,请参阅链接中的英语原文或自行翻译。

    Hi Gokul:

    1.在 app_tidl_seg 的 app_run_graph_for_one_frame_pipeline ()中,您可以看到2个图形参数排队(如果启用),同样,您必须排队等待根据每个缓冲区深度创建的3个图形参数。

    ----- 是的、我必须排队等待缓冲深度图参数。

    for (nIndex = 0; nIndex < graphObj->BevFeatureSaveTensorObj.num_buf; nIndex++)
    {
    	status = vxGraphParameterEnqueueReadyRef(graphObj->graph, graphObj->BevFeatureSaveTensorObj.graph_parameter_index, (vx_reference*)&pBuf->bevTensorArr, 1);
    }

    2.还建议为输入和输出节点创建图形参数,而不是为中间节点(映像节点)创建图形参数,这可能会影响流水线性能,

    ----- 因为我需要中间节点的结果、所以我必须将其出队。

    3. 在 app_tidl_seg_cam 演示中、缓冲区深度设置为4、流水线深度设置为7、并且根据摄像头输入数量复制 tidl 节点。 请参阅它。

    ------------------------ 现在、情况下的 后处理节点 就像一样

    tivxSetNodeParameterNumBufByIndex(Obj->postProcObj.node, 4, 2);
    
    但我要设置为、将此节点设置为流水线:
    graph_parameter_index = 0;
    add_graph_parameter_by_node_index(graphObj->graph, Obj->postProcObj.node, 0);
    graphObj->postProcObj.graph_parameter_index = graph_parameter_index;
    graph_parameters_queue_params_list[graph_parameter_index].graph_parameter_index = graph_parameter_index;
    graph_parameters_queue_params_list[graph_parameter_index].refs_list_size = 2;
    graph_parameters_queue_params_list[graph_parameter_index].refs_list = (vx_reference*)&Obj->postProcObj.out_arr[0];
    graph_parameter_index++;
    
    我以前尝试过修改它,但我发现它要么丢了一个错误,或管道卡住,无法运行。  

    因此、我希望有一个专门展示此用例的演示、而不是默认的 SDK 演示。 在 SDK 的演示中、由于结果未出队、因此我的save_tensor节点也可以正常工作。 但是、一旦我将此节点设置为流水线的一部分并尝试使其出队、就会出现问题。 因此、我想确认以这种方式配置的演示是否也会遇到相同的问题。

    此致、

    XJC

  • 请注意,本文内容源自机器翻译,可能存在语法或其它翻译错误,仅供参考。如需获取准确内容,请参阅链接中的英语原文或自行翻译。

    嗨、xie、

    1.我希望 graphObj->BevFeatureSaveTensorObj.num_buf 等于 saveTensorNode  的.refs_list_size

    在启动过程中、您必须将创建的缓冲区作为图形参数入队、

    能改变吗

    for (nIndex = 0; nIndex < graphObj->BevFeatureSaveTensorObj.num_buf; nIndex++)
    {
    	status = vxGraphParameterEnqueueReadyRef(graphObj->graph, graphObj->BevFeatureSaveTensorObj.graph_parameter_index, (vx_reference*)&pBuf->bevTensorArr, 1);
    }

    最终目的

    for (nIndex = 0; nIndex < graphObj->BevFeatureSaveTensorObj.num_buf; nIndex++)
    {
    	status = vxGraphParameterEnqueueReadyRef(graphObj->graph, graphObj->BevFeatureSaveTensorObj.graph_parameter_index, (vx_reference*)&graphObj->CameraFeatureSaveTensorObj.data_arr[nIndex], 1);
    }

    2.好的

    3.是的,我理解你想把 saveTensorNode 的输出作为图形参数,这样你就可以将缓冲区从应用程序入队和出队了。

    设置图形参数和将节点设置为流水线之间存在混淆、让我澄清一下、没有将节点设置为流水线的配置、流水线用于整个图形、因此图形中的所有节点都在流水线中。 这里的区别是节点参数和图形参数、

    tivxSetNodeParameterNumBufByIndex(Obj->postProcObj.node, 4, 2);

    通过调用上述 API、您将为节点参数设置缓冲区深度。

    graph_parameter_index = 0;
    add_graph_parameter_by_node_index(graphObj->graph, Obj->postProcObj.node, 0);
    graphObj->postProcObj.graph_parameter_index = graph_parameter_index;
    graph_parameters_queue_params_list[graph_parameter_index].graph_parameter_index = graph_parameter_index;
    graph_parameters_queue_params_list[graph_parameter_index].refs_list_size = 2;
    graph_parameters_queue_params_list[graph_parameter_index].refs_list = (vx_reference*)&Obj->postProcObj.out_arr[0];
    graph_parameter_index++;

    如果这样做、则需要将该参数设置为图形参数、并为图形参数设置缓冲区深度。

    您所做的配置似乎是正确的。 我怀疑在(1)中处理的管道向上进入队列部分。 您能尝试一下吗、告诉我。

    谢谢。此致、
    Gokul

  • 请注意,本文内容源自机器翻译,可能存在语法或其它翻译错误,仅供参考。如需获取准确内容,请参阅链接中的英语原文或自行翻译。

    Gokul 您好:

    1. 您所做的配置似乎是正确的。 我怀疑在(1)中处理的管道向上进入队列部分。 您能尝试一下吗、告诉我。

    ----- 我写的也是这样,但我不小心删除了排队的代码,当修整代码.

    这是完整的代码、与您建议的代码相同

    	for (nIndex = 0; nIndex < graphObj->BevFeatureSaveTensorObj.num_buf; nIndex++)
    	{
    	 	if (pBuf->bevTensorArr == graphObj->BevFeatureSaveTensorObj.data_arr[nIndex])
    	 	{
    	 		// MV_LOG_DEBUG("nIndex = %d, pBuf->bevTensorArr = %p, tensor_data_arr = %p\n", nIndex, pBuf->bevTensorArr, graphObj->BevFeatureSaveTensorObj.data_arr[nIndex]);
    			status = vxGraphParameterEnqueueReadyRef(graphObj->graph, graphObj->BevFeatureSaveTensorObj.graph_parameter_index, (vx_reference*)&pBuf->bevTensorArr, 1);
    	 		if (status != VX_SUCCESS)
    	 		{
    	 			MV_LOG_ERROR("vxGraphParameterEnqueueReadyRef bevFeatureSaveTensorObj failed!!\n");
    	 			status = VX_FAILURE;
    	 			return status;
    	 		}
    	 		nTensorFlag = 1;
    	 		break;
    	 	}
    	}

     2.今天我找到了一个解决方法,如下面的代码所示。 但是、我不确定根本原因、您能帮我们解释一下吗?

    		vx_user_data_object data;
    		vx_object_array frameTensorCam;
    		
    		vxGraphParameterDequeueDoneRef(graphObj->graph, graphObj->CameraFeatureSaveTensorObj.graph_parameter_index, (vx_reference*)&frameTensorCam, 1, &num_refs);
    		
    		/*********add this code to solve*********/
    		data = (vx_user_data_object)vxGetObjectArrayItem(pBuf->bevTensorArr, 0);
    		vxQueryUserDataObject(data, VX_USER_DATA_OBJECT_SIZE, (void *)&size, sizeof(size));
    		status = vxMapUserDataObject(data, 0, size, &map_id, (void **)&data_ptr, VX_READ_ONLY, VX_MEMORY_TYPE_HOST, 0);
    		vxUnmapUserDataObject(data, map_id);
    		vxReleaseUserDataObject(&data);
    		/*********add this code to solve*********/
    
    		status = vxGraphParameterEnqueueReadyRef(graphObj->graph, graphObj->BevFeatureSaveTensorObj.graph_parameter_index, (vx_reference*)&frameTensorCam, 1);
    

    3、 解决这个问题后,我发现了我最初的问题背后的核心问题。 当从同一个图形运行多个帧时(这意味着数据源完全相同)、我发现从save_tensor节点开始、连续帧的结果并不相同。 例如、帧1、3、5和7产生相同的结果、帧2、4、6和8也彼此匹配、但奇数和偶数帧的输出不同。

    例如、附加的结果采用每像素8位(8bpp)格式、分辨率为160x96。帧37和39的输出与帧38和40的输出相同。 但是、第37帧和第38帧的结果之间存在明显差异。

    我今天还在使用 SDK 10.0的入门级平台上使用完全相同的代码测试了这个问题。 我发现在 Entry SDK 10.0上、连续帧之间的结果不同不存在问题-输出在多个帧之间保持一致。 到目前为止、仅在 VM SDK 10.1.e2e.ti.com/.../save_5F00_tensor.zip 上发现了此问题

    您能帮助分析这个问题吗? VM SDK 10.1与 Entry SDK 10.0之间有何区别? 我在两个平台上的测试代码完全相同。

    谢谢。此致、

    XJC

  • 请注意,本文内容源自机器翻译,可能存在语法或其它翻译错误,仅供参考。如需获取准确内容,请参阅链接中的英语原文或自行翻译。

    嗨、xie、

    1.我仍然需要了解 pBuf->bevTensorArr 的创建位置。 为什么要排队 pBuf->bevTensorArr 而不是 graphObj->BevFeatureSaveTensorObj.data_arr[nIndex]、
    我可以从 IF 块中看到中断、所以它只运行一次、我要求按缓冲区深度排队。

    和您建议的一样

    不、不是。 我要求在移液期间将 graphObj->BevFeatureSaveTensorObj.data_arr[nIndex]缓冲区排队。

    此外、对象的内存分配在 graphVerify 阶段发生、如果在任何节点中未使用 pBuf->bevTensorArr、则框架将不会为该对象分配内存。 这说明了(2)。

    2.框架不创建 pBuf->bevTensorArr 缓冲区的内存、因此 vxMapUserDataObject() API 分配内存(如果尚未分配)。 因此、当您调用此 API 存储器时、会为该缓冲区分配内存并获得输出。

    3.从10.0到10.1之间没有太多的变化就 tiovx 而言,你能在 VM SDK 10.0中尝试一下吗?

    此致、
    Gokul

  • 请注意,本文内容源自机器翻译,可能存在语法或其它翻译错误,仅供参考。如需获取准确内容,请参阅链接中的英语原文或自行翻译。

    尊敬的 Gokul:

    1.我仍然需要了解 pBuf->bevTensorArr 的创建位置。 为什么要排队 pBuf->bevTensorArr 而不是 graphObj->BevFeatureSaveTensorObj.data_arr[nIndex]、

    ----- 实际上、pBuf->bevTensorArr 和 graphObj->BevFeatureSaveTensorObj.data_arr[nIndex]指向同一存储器—我从 graph 参数出列 pBuf->bevTensorArr、其地址与 data_arr[nIndex]中的相应缓冲区匹配。

    所以当我进入 pBuf->bevTensorArr 队列时、它实际上是按照你的建议进入 data_arr[nIndex]队列。

    代码与:类似

    main()
    {
    
    	//enque buffer when init
    	for (nIndex = 0; nIndex < graphObj->CameraFeatureSaveTensorObj.num_buf; nIndex++)
    	{
    		if (pBuf->bevTensorArr == graphObj->CameraFeatureSaveTensorObj.data_arr[nIndex])
    		{
    			status = vxGraphParameterEnqueueReadyRef(graphObj->graph, graphObj->CameraFeatureSaveTensorObj.graph_parameter_index, (vx_reference*)&pBuf->bevTensorArr, 1);
    			if (status != VX_SUCCESS)
    			{
    				MV_LOG_ERROR("vxGraphParameterEnqueueReadyRef CameraFeatureSaveTensorObj failed!!\n");
    				status = VX_FAILURE;
    				return status;
    			}
    			nTensorFlag = 1;
    			break;
    		}
    	}
    
    	while(1)
    	{
    		vx_object_array frameTensorCam;
    
    		vxGraphParameterDequeueDoneRef(graphObj->graph, graphObj->CameraFeatureSaveTensorObj.graph_parameter_index, (vx_reference*)&frameTensorCam, 1, &num_refs);
    
    		pBuf->bevTensorArr = frameTensorCam;
    
    		for (nIndex = 0; nIndex < graphObj->CameraFeatureSaveTensorObj.num_buf; nIndex++)
    		{
    			if (pBuf->bevTensorArr == graphObj->CameraFeatureSaveTensorObj.data_arr[nIndex])
    			{
    				// MV_LOG_DEBUG("nIndex = %d, pBuf->bevTensorArr = %p, tensor_data_arr = %p\n", nIndex, pBuf->bevTensorArr, graphObj->CameraFeatureSaveTensorObj.data_arr[nIndex]);
    				status = vxGraphParameterEnqueueReadyRef(graphObj->graph, graphObj->CameraFeatureSaveTensorObj.graph_parameter_index, (vx_reference*)&pBuf->bevTensorArr, 1);
    				if (status != VX_SUCCESS)
    				{
    					MV_LOG_ERROR("vxGraphParameterEnqueueReadyRef CameraFeatureSaveTensorObj failed!!\n");
    					status = VX_FAILURE;
    					return status;
    				}
    				nTensorFlag = 1;
    				break;
    			}
    		}
    
    	}
    }
    

    实际上、我们的应用程序中有一些自定义的外部队列、因此我们会在自己的结构中封装数据。
    graphObj->CameraFeatureSaveTensorObj.data_arr[nIndex]pBuf->bevTensorArr它基本上可以被视为 同一缓冲器 、队列逻辑主要用于 零复制地址传递 并管理我们的内部流程。

    的内存graphObj->CameraFeatureSaveTensorObj.data_arr[nIndex]已在内部分配app_init_save_tensors()、我之前已经共享了初始化代码。
    此基于队列的流程已正常工作 非常好 在 VM SDK 8.4、Entry SDK 10.0和 ECO SDK 10.0上、因此内存分配问题的可能性很小。

    现在、问题出在哪里 仅显示在 VM SDK 10.1上

    2.10.0与10.1之间没有太大的变化就 tiovx 而言、您是否可以在 VM SDK 10.0中试用。

    ----- 目前、我们没有可用于验证的 VM SDK 10.0环境。
    所以、我可以问一下、由于 Entry SDK 10.0的结果是正确的、我们是否可以将其用作替代 VM 10.0的参考?
    这一观察结果能否帮助指导我们朝着可能的调试方向前进?

    此外、您是否可以提供一些信息 目标测试用例 以便我们在 VM SDK 10.1和 Entry SDK 10.0上进行验证? 例如、正如我之前提到的、一个最小演示在流水线中包含后处理节点。

    根据我到目前为止的测试 相同的代码 不同 SDK 版本和平台的行为不同、这让我认为问题确实存在 不太可能出现在我们的代码逻辑中

    此致、

    XJC

  • 请注意,本文内容源自机器翻译,可能存在语法或其它翻译错误,仅供参考。如需获取准确内容,请参阅链接中的英语原文或自行翻译。

    嗨、xie、

    有一些困惑,

    因此当我进入 pBuf->bevTensorArr 队列时、它实际上是按照您的建议进入 data_arr[nIndex]队列。

    我仍然不理解管道向上排队,因为根据你的代码 main()你只排队一个缓冲区,这是 pBuf->bevTensorArr ,而这没有在图形中使用。

    ----- 实际上 pBuf->bevTensorArr 和 graphObj->BevFeatureSaveTensorObj.data_arr[nIndex]指向同一存储器—我从 graph 参数出队 pBuf->bevTensorArr、其地址与 data_arr[nIndex]中的相应缓冲区匹配。

    在管道上升阶段、只能执行排队。 我不明白为什么你从图形中退队,并在管道上升时再次排队。

    此基于队列的流程一直有效 非常好 在 VM SDK 8.4、Entry SDK 10.0和 ECO SDK 10.0上、因此内存分配问题的可能性很低。

    让我们重点关注您现在分享的代码。

    为了进一步调试这一点、

    您能否在当前位置共享最终代码片段、
    1.创建图形参数,
    2.管道向上进入所有图形参数的队列部分,
    3.正常循环迭代的进入队列/出队部分。

    此致、
    Gokul

  • 请注意,本文内容源自机器翻译,可能存在语法或其它翻译错误,仅供参考。如需获取准确内容,请参阅链接中的英语原文或自行翻译。

    嗨、xie、

    我附加了一个 app_tidl_seg_cam 补丁、将 post_proc_output 作为图形参数、并将输出保存到文件中、

    e2e.ti.com/.../post_5F00_proc_5F00_output_5F00_graph_5F00_parameter.patch

    在 vision_apps 目录中应用此补丁并检查它是否在您这边工作(我们已经在 VM SDK 10.1中测试和工作),尝试相应地修改您的应用程序

    谢谢。此致、
    Gokul

  • 请注意,本文内容源自机器翻译,可能存在语法或其它翻译错误,仅供参考。如需获取准确内容,请参阅链接中的英语原文或自行翻译。

    Gokul 您好:

     谢谢、我现在来试试这个情况。

    此致、
    XJC
  • 请注意,本文内容源自机器翻译,可能存在语法或其它翻译错误,仅供参考。如需获取准确内容,请参阅链接中的英语原文或自行翻译。

    好的、确定、我将在尝试上述方法后等待您的响应。

    此致、
    Gokul

  • 请注意,本文内容源自机器翻译,可能存在语法或其它翻译错误,仅供参考。如需获取准确内容,请参阅链接中的英语原文或自行翻译。

    Hi Gokul:

    由于 EVM 板上没有摄像头、因此我将您提供的贴片中的修改内容移植到app_tidl_seg演示中。 但是、移植后、流水线无法正常运行并卡在图形中。 并且执行期间也不会报告错误。

    这是修改后的代码—您能帮我们看看吗? 谢谢!

    e2e.ti.com/.../app_5F00_tidl_5F00_seg.tar.gz

    此致、

    XJC

  • 请注意,本文内容源自机器翻译,可能存在语法或其它翻译错误,仅供参考。如需获取准确内容,请参阅链接中的英语原文或自行翻译。

    您好、谢:

    我在您的代码中看不到 pipe up 部分中的修改、

    能否 将修补程序的上述部分移植到以下块中?

    此致、
    Gokul

  • 请注意,本文内容源自机器翻译,可能存在语法或其它翻译错误,仅供参考。如需获取准确内容,请参阅链接中的英语原文或自行翻译。

    Hi Gokul:

    当我添加此代码并运行2帧时、图形会卡住。 您是否也会遇到同样的问题?

    此致、

    XJC

  • 请注意,本文内容源自机器翻译,可能存在语法或其它翻译错误,仅供参考。如需获取准确内容,请参阅链接中的英语原文或自行翻译。

    嗨、xie、

    我们在 app_tidl_seg_cam 上测试了2台摄像机、工作正常、让我测试 app_tidl_seg 并返回给您。

    此致、
    Gokul

  • 请注意,本文内容源自机器翻译,可能存在语法或其它翻译错误,仅供参考。如需获取准确内容,请参阅链接中的英语原文或自行翻译。

    嗨、xie、

    请查找 app_tidl_seg 和 app_tidl_seg_cam 的补丁

    e2e.ti.com/.../app_5F00_tidl_5F00_seg_5F00_and_5F00_cam.patch

    检查它是否适合您、我们已经过测试并可正常工作。

    此致、
    Gokul

  • 请注意,本文内容源自机器翻译,可能存在语法或其它翻译错误,仅供参考。如需获取准确内容,请参阅链接中的英语原文或自行翻译。

    尊敬的 Gokul:

    客户想知道应用在应用补丁后是否可以运行超过2帧? 此外、在测试过程中、您是否验证了两个连续帧数据都正确无误? 谢谢。

    BR、Tommy

  • 请注意,本文内容源自机器翻译,可能存在语法或其它翻译错误,仅供参考。如需获取准确内容,请参阅链接中的英语原文或自行翻译。

    Gokul 您好:

    运行时环境:10.01.00.04/ti-processor-sdk-rtos-j721e-evm-10_01_00_04-prebuilt.tar.gz

     1. 根据这个补丁, tidl_seg.out 现在正常运行。

     2.但当我尝试保存结果时,它会在该函数内崩溃、您在保存结果时遇到此问题吗?
    vx_object_array parent_obj_arr = vxCastRefAsObjectArray (tivxGetReferenceParent (vxCastRefFromImage (post_proc_output_img)、&status);
    3. 如果它在您的一侧成功运行,您是否可以尝试两次读取相同的图像并保存两个连续的帧(例如 Frame 560和 Frame 561)来检查两个二进制输出文件是否完全相同? 在我这边、保存结果的功能崩溃、因此我还无法验证此问题。
    此致、
    XJC
  • 请注意,本文内容源自机器翻译,可能存在语法或其它翻译错误,仅供参考。如需获取准确内容,请参阅链接中的英语原文或自行翻译。

    尊敬的 Tommy:

    客户想知道应用程序在应用补丁后是否可以运行2帧以上? 此外、在测试过程中、您是否验证了两个连续帧数据都正确无误? 谢谢。

    是的、它运行了2个以上的帧、我还验证了两个连续的帧数据都是正确的、并附加了下面的日志。

    root@j721e-evm-gokul:/opt/vision_apps# ./run_app_tidl_seg.sh
    APP: Init ... !!!
    425277.701384 s: MEM: Init ... !!!
    425277.701452 s: MEM: Initialized DMA HEAP (fd=5) !!!
    425277.701603 s: MEM: Init ... Done !!!
    425277.701647 s: IPC: Init ... !!!
    425277.770493 s: IPC: Init ... Done !!!
    REMOTE_SERVICE: Init ... !!!
    REMOTE_SERVICE: Init ... Done !!!
    425277.778186 s: GTC Frequency = 200 MHz
    APP: Init ... Done !!!
    425277.782373 s:  VX_ZONE_INFO: Globally Enabled VX_ZONE_ERROR
    425277.782410 s:  VX_ZONE_INFO: Globally Enabled VX_ZONE_WARNING
    425277.782417 s:  VX_ZONE_INFO: Globally Enabled VX_ZONE_INFO
    425277.791101 s:  VX_ZONE_INFO: [tivxPlatformCreateTargetId:134] Added target MPU-0 
    425277.791302 s:  VX_ZONE_INFO: [tivxPlatformCreateTargetId:134] Added target MPU-1 
    425277.791405 s:  VX_ZONE_INFO: [tivxPlatformCreateTargetId:134] Added target MPU-2 
    425277.791478 s:  VX_ZONE_INFO: [tivxPlatformCreateTargetId:134] Added target MPU-3 
    425277.791488 s:  VX_ZONE_INFO: [tivxInitLocal:126] Initialization Done !!!
    425277.791504 s:  VX_ZONE_INFO: Globally Disabled VX_ZONE_INFO
    
    
     =========================
     TIDL Demo - Semantic Segmentation
     =========================
    
     p: Print performance statistics
    
     x: Exit
    
     Enter Choice: post_proc dequeued
    frame id 501enqueued post_proc output
    post_proc dequeued
    frame id 502enqueued post_proc output
    post_proc dequeued
    frame id 503enqueued post_proc output
    post_proc dequeued
    frame id 504enqueued post_proc output
    post_proc dequeued
    frame id 505enqueued post_proc output
    post_proc dequeued
    frame id 506enqueued post_proc output
    post_proc dequeued
    frame id 507enqueued post_proc output
    post_proc dequeued
    frame id 508enqueued post_proc output
    post_proc dequeued
    frame id 509enqueued post_proc output
    post_proc dequeued
    frame id 510enqueued post_proc output
    post_proc dequeued
    frame id 511enqueued post_proc output
    post_proc dequeued
    frame id 512enqueued post_proc output
    post_proc dequeued
    frame id 513enqueued post_proc output
    post_proc dequeued
    frame id 514enqueued post_proc output
    post_proc dequeued
    frame id 515enqueued post_proc output
    post_proc dequeued
    frame id 516enqueued post_proc output
    post_proc dequeued
    frame id 517enqueued post_proc output
    post_proc dequeued
    frame id 518enqueued post_proc output
    post_proc dequeued
    frame id 519enqueued post_proc output
    post_proc dequeued
    frame id 520enqueued post_proc output
    post_proc dequeued
    frame id 521enqueued post_proc output
    post_proc dequeued
    frame id 522enqueued post_proc output
    post_proc dequeued
    frame id 523enqueued post_proc output
    post_proc dequeued
    frame id 524enqueued post_proc output
    post_proc dequeued
    frame id 525enqueued post_proc output
    post_proc dequeued
    frame id 526enqueued post_proc output
    post_proc dequeued
    frame id 527enqueued post_proc output
    post_proc dequeued
    frame id 528enqueued post_proc output
    post_proc dequeued
    frame id 529enqueued post_proc output
    post_proc dequeued
    frame id 530enqueued post_proc output
    post_proc dequeued
    frame id 531enqueued post_proc output
    post_proc dequeued
    frame id 532enqueued post_proc output
    post_proc dequeued
    frame id 533enqueued post_proc output
    post_proc dequeued
    frame id 534enqueued post_proc output
    post_proc dequeued
    frame id 535enqueued post_proc output
    post_proc dequeued
    frame id 536enqueued post_proc output
    post_proc dequeued
    frame id 537enqueued post_proc output
    post_proc dequeued
    frame id 538enqueued post_proc output
    post_proc dequeued
    frame id 539enqueued post_proc output
    post_proc dequeued
    frame id 540enqueued post_proc output
    post_proc dequeued
    frame id 541enqueued post_proc output
    post_proc dequeued
    frame id 542enqueued post_proc output
    post_proc dequeued
    frame id 543enqueued post_proc output
    post_proc dequeued
    frame id 544enqueued post_proc output
    post_proc dequeued
    frame id 545enqueued post_proc output
    post_proc dequeued
    frame id 546enqueued post_proc output
    post_proc dequeued
    frame id 547enqueued post_proc output
    post_proc dequeued
    frame id 548enqueued post_proc output
    post_proc dequeued
    frame id 549enqueued post_proc output
    post_proc dequeued
    frame id 550enqueued post_proc output
    post_proc dequeued
    frame id 551enqueued post_proc output
    post_proc dequeued
    frame id 552enqueued post_proc output
    post_proc dequeued
    frame id 553enqueued post_proc output
    post_proc dequeued
    frame id 554enqueued post_proc output
    post_proc dequeued
    frame id 555enqueued post_proc output
    post_proc dequeued
    frame id 556enqueued post_proc output
    post_proc dequeued
    frame id 557enqueued post_proc output
    post_proc dequeued
    frame id 558enqueued post_proc output
    post_proc dequeued
    frame id 559enqueued post_proc output
    post_proc dequeued
    frame id 560imgaddr_width = 768 
    imgaddr_height = 384 
    imgaddr_stride = 768 
    width = 768 
    height = 384 
    Written 442368 bytes 
    enqueued post_proc output
    post_proc dequeued
    frame id 561imgaddr_width = 768 
    imgaddr_height = 384 
    imgaddr_stride = 768 
    width = 768 
    height = 384 
    Written 442368 bytes 
    enqueued post_proc output
    post_proc dequeued
    frame id 562enqueued post_proc output
    post_proc dequeued
    frame id 563enqueued post_proc output
    post_proc dequeued
    frame id 564enqueued post_proc output
    post_proc dequeued
    frame id 565enqueued post_proc output
    post_proc dequeued
    frame id 566enqueued post_proc output
    post_proc dequeued
    frame id 567enqueued post_proc output
    post_proc dequeued
    frame id 568enqueued post_proc output
    post_proc dequeued
    frame id 569enqueued post_proc output
    post_proc dequeued
    frame id 570enqueued post_proc output
    post_proc dequeued
    frame id 571enqueued post_proc output
    post_proc dequeued
    frame id 572enqueued post_proc output
    post_proc dequeued
    frame id 573enqueued post_proc output
    post_proc dequeued
    frame id 574enqueued post_proc output
    post_proc dequeued
    frame id 575enqueued post_proc output
    post_proc dequeued
    frame id 576enqueued post_proc output
    post_proc dequeued
    frame id 577enqueued post_proc output
    post_proc dequeued
    frame id 578enqueued post_proc output
    post_proc dequeued
    frame id 579enqueued post_proc output
    post_proc dequeued
    frame id 580enqueued post_proc output
    post_proc dequeued
    frame id 581enqueued post_proc output
    post_proc dequeued
    frame id 582enqueued post_proc output
    post_proc dequeued
    frame id 583enqueued post_proc output
    post_proc dequeued
    frame id 584enqueued post_proc output
    post_proc dequeued
    frame id 585enqueued post_proc output
    post_proc dequeued
    x
    frame id 586
    enqueued post_proc output
    425321.057651 s:  VX_ZONE_ERROR: [ownReleaseReferenceInt:747] Invalid reference
    APP: Deinit ... !!!
    REMOTE_SERVICE: Deinit ... !!!
    REMOTE_SERVICE: Deinit ... Done !!!
    425321.508193 s: IPC: Deinit ... !!!
    425321.508790 s: IPC: DeInit ... Done !!!
    425321.508815 s: MEM: Deinit ... !!!
    425321.508821 s: DDR_SHARED_MEM: Alloc's: 30 alloc's of 23168662 bytes 
    425321.508827 s: DDR_SHARED_MEM: Free's : 30 free's  of 23168662 bytes 
    425321.508832 s: DDR_SHARED_MEM: Open's : 0 allocs  of 0 bytes 
    425321.508839 s: MEM: Deinit ... Done !!!
    APP: Deinit ... Done !!!
    

    我还通过保持所有帧的输入相同和保存的帧560和561都相同来验证。

    附加文件以供参考、

    e2e.ti.com/.../frameid560channel0    e2e.ti.com/.../frameid561channel0

    此致、
    Gokul

  • 请注意,本文内容源自机器翻译,可能存在语法或其它翻译错误,仅供参考。如需获取准确内容,请参阅链接中的英语原文或自行翻译。

    嗨、xie、

    2.  但当我尝试保存结果时、它会在该函数内崩溃、您在保存结果时是否遇到此问题? [/报价]

    我没有遇到任何问题、您是否在 vision_apps 内创建了"post_proc_output"目录、框架将保存在此目录"/opt/vision_apps/post_proc_output "内。

    3.  如果它在您的一侧成功运行、您能否尝试两次读取同一图像并保存两个连续的帧(例如 Frame 560和 Frame 561)、以检查两个二进制输出文件是否完全相同?

    是的、我已验证、两个输出是相同的。

    此致、
    Gokul

    [/quote]
  • 请注意,本文内容源自机器翻译,可能存在语法或其它翻译错误,仅供参考。如需获取准确内容,请参阅链接中的英语原文或自行翻译。

    Hi Gokul:

    我创建了这个目录、文件编写函数中没有发生崩溃。 它在到达文件保存步骤之前就会在该函数中崩溃。

    vx_object_array parent_obj_arr = vxCastRefAsObjectArray (tivxGetReferenceParent (vxCastRefFromImage (post_proc_output_img)、&status);
    我们的运行时环境之间有什么区别吗? 我将在使用本地10.1 SDK 的演示板上运行它。 或者、我们如何同步我们的环境以确保一致性?
    此致、
    XJC
  • 请注意,本文内容源自机器翻译,可能存在语法或其它翻译错误,仅供参考。如需获取准确内容,请参阅链接中的英语原文或自行翻译。

    嗨、xie、

    我在 main.c 中没有看到我共享的补丁中的此#include 行。

    您能再检查一次吗?

    此致、
    Gokul

  • 请注意,本文内容源自机器翻译,可能存在语法或其它翻译错误,仅供参考。如需获取准确内容,请参阅链接中的英语原文或自行翻译。

    Hi Gokul:

    添加此头文件后、我现在也可以正确地将结果保存在自己一侧。 我将把这个演示与我自己的代码进行仔细比较、如果我遇到任何其他问题、很高兴有机会再次咨询您。 非常感谢您的帮助!

    此致、

    XJC

  • 请注意,本文内容源自机器翻译,可能存在语法或其它翻译错误,仅供参考。如需获取准确内容,请参阅链接中的英语原文或自行翻译。

    「我知道,我知道你想要我。

    此致、
    Gokul