This thread has been locked.

If you have a related question, please click the "Ask a related question" button in the top right corner. The newly created question will be automatically linked to this question.

[参考译文] SK-AM62-LP:SK-AM62-LP

Guru**** 2330830 points
Other Parts Discussed in Thread: UNIFLASH, SYSCONFIG
请注意,本文内容源自机器翻译,可能存在语法或其它翻译错误,仅供参考。如需获取准确内容,请参阅链接中的英语原文或自行翻译。

https://e2e.ti.com/support/processors-group/processors/f/processors-forum/1515741/sk-am62-lp-sk-am62-lp

器件型号:SK-AM62-LP
Thread 中讨论的其他器件:UNIFLASHSYSCONFIG

工具/软件:

尊敬的团队:
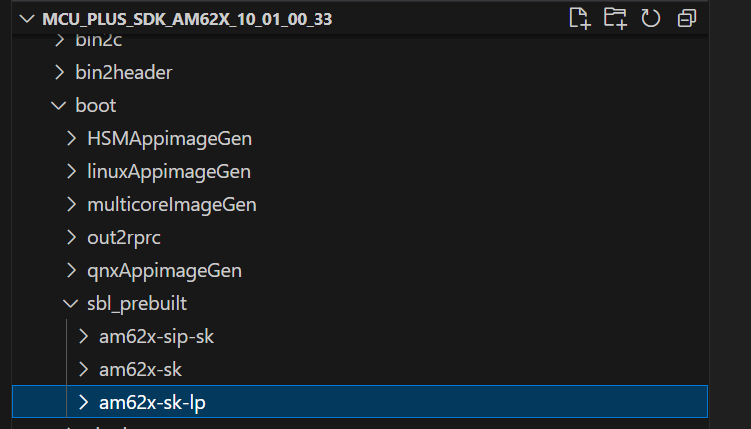
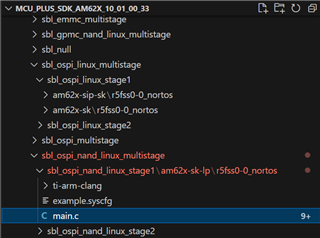
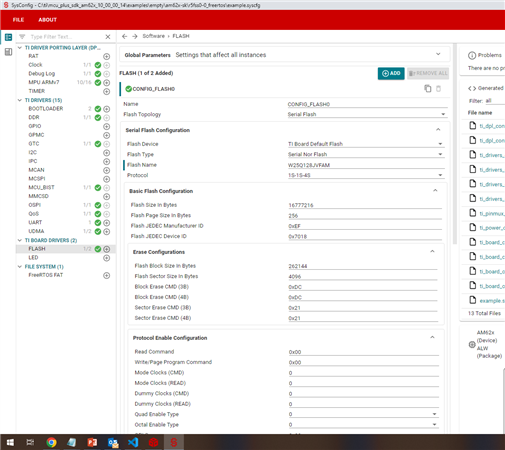
我正在使用 MCU_SDK 10版本、对于 am62-LP-SK 定制器件、我更改了 示例。 SYSCFG 路径 C:\ti\mcu_plus_sdk_am62x_10_00_00_14\examples\drivers\boot\sbl_ospi_linux_multistage\sbl_ospi_linux_stage1\am62x-sk\r5fss0-0_nortos 和 board_IpaddrReginit.h  C:\ti\mcu_plus_sdk_am62x_10_00_00_14\source\drivers\DDR\V0\am62x 中的文件 soc。

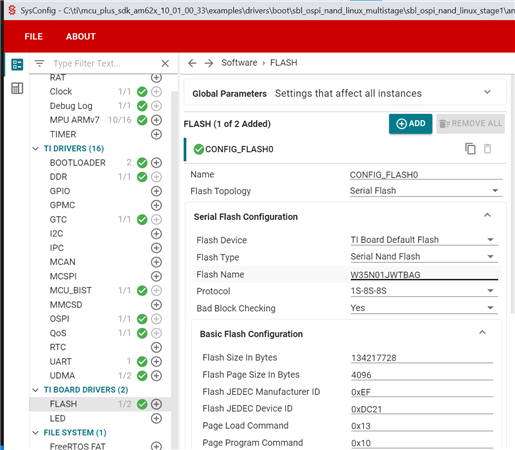
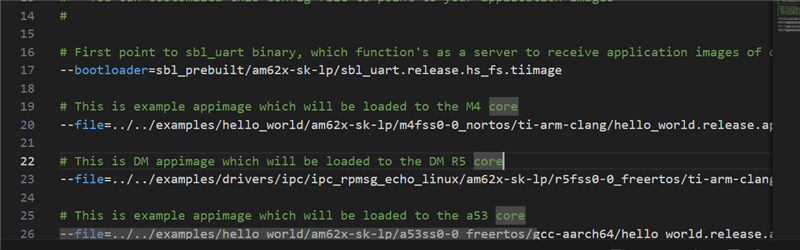
使用 cmd 编译 MCU_SDK make -s board=am62x-sk all、 并将 ~/ti/mcu_plus_sdk_am62x_10_00_00_14/tools/boot/sbl_prebuilt/am62x-sk/default_sbl_ospi_linux_hs_fs.cfg 用于我的 NOR 芯片(Winbond)。 此外、还编译 default_sbl_ospi_linux_hs_fs.cfg 中提到的所有 appimage。

  1. sbl_ospi_linux_stage1.release.hs_fs.tiimage
  2. sbl_ospi_linux_stage2.release.appimage.hs_fs
  3. ipc_rpmsg_echo_linux.release.appimage.hs_fs
  4. HSM.appimage.hs_fs
  5. ipc_rpmsg_echo_linux.release.appimage.hs_fs
  6. linux.appimage.hs_fs
  7. u-boot.img

但我没有使用 Uart_uniflash.py 方法、而是使用 DFU 方法刷写上述所有映像。 但面临下一个问题。

案例1: 完成代码后、我在函数中发现了这一点  bootloader_parseMultiCoreAppImage  被调用   bootloader_verifyMulticoreImage (句柄) 由于 certzise = 0 (零)、检查失败并获得状态= SystemP_FAILURE。

案例2:
其中一项在 TI 论坛中提到的建议、因为这是一个已知问题、我们可以对此检查条件进行评论。 所以,我评论和尝试,但后来它没有通过的条件  
status = config->Fxns->imgReadFxn(&mHdrStr、 sizeof (Bootloader_Meta HeaderStart)、config->args);  
if (mHdrStr.magicStr != (uint32_t) bootloader_meta_hdr_magic_str)
   状态= SystemP_FAILURE
}
因为 mHdrStr 用零填充
请帮帮我。
进一步调试、它可能是从 QSPI_readMemMapMode 读取。
  • 请注意,本文内容源自机器翻译,可能存在语法或其它翻译错误,仅供参考。如需获取准确内容,请参阅链接中的英语原文或自行翻译。

    您好、

    请允许我花点时间向您说明可以执行的调试步骤。

    此致、

    Vaibhav

  • 请注意,本文内容源自机器翻译,可能存在语法或其它翻译错误,仅供参考。如需获取准确内容,请参阅链接中的英语原文或自行翻译。

    尊敬的 Vaibhav:

    是否有任何更新?

  • 请注意,本文内容源自机器翻译,可能存在语法或其它翻译错误,仅供参考。如需获取准确内容,请参阅链接中的英语原文或自行翻译。

    尊敬的 Manu:

    感谢您的等待。

    我的第一个指针将用于检查您正在使用的器件类型。 您可以参考本指南进行操作: https://e2e.ti.com/support/processors-group/processors/f/processors-forum/1228618/faq-am6xx-how-to-check-if-device-type-is-hs-se-hs-fs-or-gp

    我的第二个指针是使用正确的图像、我看到该线程是使用 AM62x-SK-LP 作为器件型号创建的、因此我假设您需要转到第三个目录中的文件:

    请告诉我您对这个问题的看法。

    恭敬地说:

    Vaibhav

  • 请注意,本文内容源自机器翻译,可能存在语法或其它翻译错误,仅供参考。如需获取准确内容,请参阅链接中的英语原文或自行翻译。

    我也认为、如果 TI EVM 如下所示: https://www.ti.com/tool/SK-AM62B-P1

    则可以参考第二个目录(即 am62x-sk)中的配置文件。

    也请告诉我您对此的想法。

  • 请注意,本文内容源自机器翻译,可能存在语法或其它翻译错误,仅供参考。如需获取准确内容,请参阅链接中的英语原文或自行翻译。

    尊敬的 Vaibhav:

    对于您的第一点、我已经查看了它的 HS-EMA FS 器件。

    对于第二点、我使用定制的 am62x-sk-LP 器件、它有 NOR 芯片(Winbond)而非 NAND、因此在 am62x-sk-LP 中没有 sbl_ospi_linux_multistage.cfg 的 NOR 芯片示例、这就是为什么要使用 am62x-sk .cfg。

  • 请注意,本文内容源自机器翻译,可能存在语法或其它翻译错误,仅供参考。如需获取准确内容,请参阅链接中的英语原文或自行翻译。

    尊敬的 Manu:

    感谢您的澄清。

    由于您刚刚将闪存从 NAND 更改为 NOR、如果您可以继续修改所有应用的 Example.sysconfig 文件(默认添加了 OSPI/QSPI 闪存)、并根据 am62x-sk-LP 示例更改该文件以使其适用于 NOR 闪存、而不是 NAND 闪存。

    希望你明白我的观点,让我知道,如果你需要进一步的帮助,其他任何东西.

    此致、

    Vaibhav

  • 请注意,本文内容源自机器翻译,可能存在语法或其它翻译错误,仅供参考。如需获取准确内容,请参阅链接中的英语原文或自行翻译。

    尊敬的 Vaibhav:
    我已修改 示例。 SYSCFG  路径 C:\ti\mcu_plus_sdk_am62x_10_00_00_14\examples\drivers\boot\sbl_ospi_linux_multistage\sbl_ospi_linux_stage1\am62x-sk\r5fss0-0_nortos 和  board_IpaddrReginit.h   C:\ti\mcu_plus_sdk_am62x_10_00_00_14\source\drivers\DDR\V0\am62x 中的文件 soc。

    使用 cmd 编译 MCU_SDK  使-s board=am62x-sk 全部为

    1. sbl_ospi_linux_stage1.release.hs_fs.tiimage
    2. sbl_ospi_linux_stage2.release.appimage.hs_fs
    3. ipc_rpmsg_echo_linux.release.appimage.hs_fs
    4. HSM.appimage.hs_fs
    5. ipc_rpmsg_echo_linux.release.appimage.hs_fs
    6. linux.appimage.hs_fs
    7. u-boot.img

    但是是 AM 不会 使用 Uart_uniflash.py 方法、但使用 DFU 方法刷写上述所有映像。  因此、获得上述错误。

  • 请注意,本文内容源自机器翻译,可能存在语法或其它翻译错误,仅供参考。如需获取准确内容,请参阅链接中的英语原文或自行翻译。

    尊敬的 Manu:

    我已经完成了您的回复。

    看起来您修改了该文件、但我建议您继续使用以下文件:

    并在此处修改 example.syscfg。

    此致、

    Vaibhav

  • 请注意,本文内容源自机器翻译,可能存在语法或其它翻译错误,仅供参考。如需获取准确内容,请参阅链接中的英语原文或自行翻译。

    您好、

    我想修改此参数:  

    此致、

    Vaibhav

  • 请注意,本文内容源自机器翻译,可能存在语法或其它翻译错误,仅供参考。如需获取准确内容,请参阅链接中的英语原文或自行翻译。

    谢谢 Vaibhav、将尽力让您知道

  • 请注意,本文内容源自机器翻译,可能存在语法或其它翻译错误,仅供参考。如需获取准确内容,请参阅链接中的英语原文或自行翻译。

    尊敬的 Manu:

    感谢大家的关注。

    期待您的答复。

    此致、

    Vaibhav

  • 请注意,本文内容源自机器翻译,可能存在语法或其它翻译错误,仅供参考。如需获取准确内容,请参阅链接中的英语原文或自行翻译。

    仍然是第一个问题中提到的相同问题、

    案例1: 完成代码后、我在函数中发现了这一点  bootloader_parseMultiCoreAppImage  被调用   bootloader_verifyMulticoreImage (句柄)  由于 certzise = 0 (零)、检查失败并获得状态= SystemP_FAILURE。

    案例2:
    其中一项在 TI 论坛中提到的建议、因为这是一个已知问题、我们可以对此检查条件进行评论。 所以,我评论和尝试,但后来它没有通过的条件  
    status = config->Fxns->imgReadFxn(&mHdrStr、 sizeof (Bootloader_Meta HeaderStart)、config->args);  
    if (mHdrStr.magicStr != (uint32_t) bootloader_meta_hdr_magic_str)
       状态= SystemP_FAILURE
    }
    因为 mHdrStr 用零填充
  • 请注意,本文内容源自机器翻译,可能存在语法或其它翻译错误,仅供参考。如需获取准确内容,请参阅链接中的英语原文或自行翻译。

    尊敬的 Manu:

    您能否在此处共享您的 SysConfig 文件、该文件对 am62-sk-LP 示例进行了 OSPI 更改?

    此致、

    Vaibhav

  • 请注意,本文内容源自机器翻译,可能存在语法或其它翻译错误,仅供参考。如需获取准确内容,请参阅链接中的英语原文或自行翻译。

    尊敬的 Vaibhav:  
    我在使用 Winbond 或芯片,也我认为所有的闪存和其他函数都在调用  

     .Fxns =&gFlashNorOspiFxns

     而是需要调用 gFlashNorQspiFxns。 此外、请参阅与 SPI NOR 相关的读取/写入命令 ID

  • 请注意,本文内容源自机器翻译,可能存在语法或其它翻译错误,仅供参考。如需获取准确内容,请参阅链接中的英语原文或自行翻译。

    /**
    *这些参数是在生成此文件时使用的。 它们将自动应用于后续载荷
    *通过 GUI 或 CLI 运行带有"--help"的 CLI 以获取有关如何覆盖这些参数的更多信息。
    *@cliArgs --device "AM62x"--package "ALW"--part"默认"--context "r5fss0-0"--product "MCU_PLUS_SDK_AM62x@10.00.00
    *@版本{"tool":"1.20.0+3587"}
    */

    /**
    *导入此配置中使用的模块。
    */
    const flash = scripting.AddModule ("/board/flash/flash "、{}、false);
    const flash1 = flash.addInstance ();
    const bootloader = scripting.AddModule ("/drivers/bootloader/bootloader、{}、false);
    const bootloader1 = bootloader.addInstance ();
    const bootloader2 = bootloader.addInstance ();
    const DDR = scripting.AddModule ("/drivers/ddr/ddr、{}、false);
    const DDR1 = DDR.addInstance ();
    const GTC = scripting.AddModule ("/drivers/gtc/gtc ");
    const MCU_BIST = scripting.AddModule ("/drivers/mcu_bist/mcu_bist、{}、false);
    const MCU_bist1 = MCU_BIST.addInstance ();
    const QoS = scripting.AddModule ("/drivers/qos/qos "、{}、false);
    const qos1 = qos.addInstance ();
    const clock = scripting.AddModule ("/kernel/dpl/clock);
    const debug_log = scripting.AddModule ("/kernel/dpl/debug_log);
    const mpu_armv7 = scripting.AddModule ("/kernel/dpl/mpu_armv7、{}、false);
    const mpu_armv71 = mpu_armv7.addInstance ();
    const mpu_armv72 = mpu_armv7.addInstance ();
    const mpu_armv73 = mpu_armv7.addInstance ();
    const mpu_armv74 = mpu_armv7.addInstance ();
    const mpu_armv75 = mpu_armv7.addInstance ();
    const mpu_armv76 = mpu_armv7.addInstance ();
    const mpu_armv77 = mpu_armv7.addInstance ();
    const mpu_armv78 = mpu_armv7.addInstance ();
    const mpu_armv79 = mpu_armv7.addInstance ();
    const mpu_armv710 = mpu_armv7.addInstance ();

    /**
    *将自定义配置值写入导入的模块。
    */
    bootloader1.EMMCAppImageOffset ="0x800000";
    bootloader1.$name ="config_bootloader_flash_mcu";
    bootloader1.appImageOffset ="0x10000";
    bootloader1.bootloaderDma = true;

    bootloader2.EMMCAppImageOffset ="0xC00000";
    bootloader2.$name ="config_bootloader_flash_sbl";
    bootloader2.appImageOffset ="0x80000";

    flash1.$name ="config_FLASH0";
    bootloader1.flashDriver = flash1;
    bootloader2.flashDriver = flash1;
    flash1.serialFlashDriver.$name ="board_flash_serialFlash_serialflash0";
    flash1.serialFlashDriver.flashSize = 16777216;
    flash1.serialFlashDriver.flashManfId ="0xEF";
    flash1.serialFlashDriver.dummy_isAddrReg =错误;
    flash1.serialFlashDriver.dummy_cfgReg ="0x00";
    flash1.serialFlashDriver.dummy_cmdRegRd ="0x00";
    flash1.serialFlashDriver.dummy_cmdRegWr ="0x00";
    flash1.serialFlashDriver.dummy_mask ="0x00";
    flash1.serialFlashDriver.dummy_bitP = 0;
    flash1.serialFlashDriver.proto_isAddrReg =错误;
    flash1.serialFlashDriver.proto_cfgReg ="0x00";
    flash1.serialFlashDriver.proto_cmdRegRd ="0x00";
    flash1.serialFlashDriver.proto_cmdRegWr ="0x00";
    flash1.serialFlashDriver.proto_mask ="0x00";
    flash1.serialFlashDriver.proto_bitP = 0;
    flash1.serialFlashDriver.fname ="W25Q128JVFAM";
    flash1.serialFlashDriver.protocol ="1s_1s_4s";
    flash1.serialFlashDriver.flashDeviceId ="0x7018";
    flash1.serialFlashDriver.peripheralDriver.$name ="CONFIG_OSPI0";
    flash1.serialFlashDriver.peripheralDriver.dmaEnable = true;
    flash1.serialFlashDriver.peripheralDriver.OSPI.DQS.$used =错误;
    flash1.serialFlashDriver.peripheralDriver.OSPI.D7.$used =错误;
    flash1.serialFlashDriver.peripheralDriver.OSPI.D6.$used =错误;
    flash1.serialFlashDriver.peripheralDriver.OSPI.D5.$used =错误;
    flash1.serialFlashDriver.peripheralDriver.OSPI.D4.$used =错误;

    DDR1.$name ="CONFIG_DDR0";
    ddr1.ddrConfigIncludeFileName ="drivers/ddr/V0/ddr/am62x/board_lpddrReginit.h" soc;

    MCU_bist1.$name ="CONFIG_MCU_BIST0";

    qos1.$name ="config_QOS0";

    const UDMA = scripting.AddModule ("/drivers/udma/udma、{}、false);
    const udma1 = UDMA.addInstance ({}、false);
    udma1.$name ="CONFIG_UDMA0";
    bootloader1.udmaDriver = udma1;
    flash1.serialFlashDriver.peripheralDriver.udmaDriver = udma1;

    const UDMA_blkcopy_channel = scripting.AddModule ("/drivers/udma/udma_blkcopy_channel、{}、false);
    const UDMA_blkcopy_channel1 = UDMA_blkcopy_channel.addInstance ({}、false);
    UDMA_blkcopy_channel1.$name ="CONFIG_UDMA_BLKCOPY_CH0";
    bootloader1.udmaBlkCopyChannel = UDMA_blkcopy_channel1;
    flash1.serialFlashDriver.peripheralDriver.udmaBlkCopyChannel = UDMA_blkcopy_channel1;

    clock.instance ="Timer1";

    debug_log.enableUartLog = true;
    debug_log.enableCssLog = false;
    debug_log.sysfwUartTrace = true;
    debug_log.uartLog.$name ="config_UART0";
    debug_log.uartLog.intrEnable ="禁用";
    debug_log.uartLog.useWakeupDomainPeripherals =错误;
    DEBUG_LOG.sysfwUartLog.$NAME ="CONFIG_UART_TRACE0";
    debug_log.sysfwUartLog.useWakeupDomainPeripherals =错误;
    debug_log.sysfwUartLog.uart.$assign ="USART1";
    debug_log.sysfwUartLog.uart.RXD.$assign ="McASP0_AFSR";
    DEBUG_LOG.sysfwUartLog.UART.TXD.$ASSIGN ="MCASP0_ACLKR";
    debug_log.sysfwUartLog.uart.RTSn.$assign ="McASP0_AXR2";
    debug_log.sysfwUartLog.uart.ctns.$assign ="McASP0_AXR3";

    MPU_armv71.$name ="CONFIG_MPU_REGION0";
    MPU_armv71.accessPermissions ="Supervisor RD+WR、User RD";
    mpu_armv71.allowExecute = false;
    mpu_armv71.attributes ="NonCached";

    mpu_armv72.$name ="CONFIG_MPU_REGION1";
    MPU_armv72.accessPermissions ="Supervisor RD+WR、User RD";
    mpu_armv72.size = 7;

    mpu_armv73.$name ="CONFIG_MPU_Region2";
    MPU_armv73.accessPermissions ="Supervisor RD+WR、User RD";
    MPU_armv73.baseAddr = 0x41C00000;
    mpu_armv73.size = 19;

    mpu_armv74.$name ="CONFIG_MPU_Region3";
    MPU_armv74.accessPermissions ="Supervisor RD+WR、User RD";
    mpu_armv74.baseAddr = 0x70000000;
    mpu_armv74.size = 16;

    mpu_armv75.$name ="CONFIG_MPU_REGION4";
    mpu_armv75.baseAddr = 0x80000000;
    mpu_armv75.size = 31;

    MPU_armv76.$name ="CONFIG_MPU_REGION5";
    mpu_armv76.baseAddr = 0x41010000;
    mpu_armv76.size = 15;
    mpu_armv76.attributes ="NonCached";

    mpu_armv77.$name ="CONFIG_MPU_REGION6";
    mpu_armv77.size = 15;
    mpu_armv77.attributes ="NonCached";

    mpu_armv78.$name ="CONFIG_MPU_REGION8";
    mpu_armv78.baseAddr = 0x43C00000;
    mpu_armv78.size = 18;

    mpu_armv79.$name ="CONFIG_MPU_REGION7";
    mpu_armv79.baseAddr = 0xFC40000;
    mpu_armv79.size = 8;
    mpu_armv79.attributes ="Device";
    mpu_armv79.allowExecute = false;

    MPU_armv710.$name ="CONFIG_MPU_REGION9";
    mpu_armv710.allowExecute = false;
    mpu_armv710.size = 9;
    mpu_armv710.attributes ="Device";
    mpu_armv710.baseAddr = 0x2800000;

    /**
    *用于未锁频引脚/外设的 Pinmux 解决方案。 这可确保将来对自动解算器进行细微更改
    *该工具的版本不会影响您最初看到的 pinmux。 这些行可以完全删除、以便于
    *从头开始重新解决。
    */
    flash1.serialFlashDriver.peripheralDriver.OSPI.$suggestSolution ="OSPI0";
    flash1.serialFlashDriver.peripheralDriver.OSPI.CLK.$suggestSolution ="OSPI0_CLK";
    flash1.serialFlashDriver.peripheralDriver.OSPI.CSn0.$suggestSolution ="OSPI0_CSn0";
    flash1.serialFlashDriver.peripheralDriver.OSPI.D3.$suggestSolution ="OSPI0_D3";
    flash1.serialFlashDriver.peripheralDriver.OSPI.D2.$suggestSolution ="OSPI0_D2";
    flash1.serialFlashDriver.peripheralDriver.OSPI.D1.$suggestSolution ="OSPI0_D1";
    flash1.serialFlashDriver.peripheralDriver.OSPI.D0.$suggestSolution ="OSPI0_D0";
    debug_log.uart.$IngestSolution ="USART0";
    debug_log.uart.RXD.$暗示 解决方案="UART0_RXD";
    debug_log.uart.TXD.$暗示 解决方案="UART0_TXD";

  • 请注意,本文内容源自机器翻译,可能存在语法或其它翻译错误,仅供参考。如需获取准确内容,请参阅链接中的英语原文或自行翻译。

    上面是我的 example.sycfg 文件  

  • 请注意,本文内容源自机器翻译,可能存在语法或其它翻译错误,仅供参考。如需获取准确内容,请参阅链接中的英语原文或自行翻译。
    gFlashNorQspiFxns

    您好、

    无需调用以下内容、因为闪存或 OSPI API 本身负责 QSPI 操作(如果有)。

    主要部分是协议集函数。

    请参阅 flash_nor_ospi.c 文件中的以下代码片段。

    此致、

    Vaibhav

  • 请注意,本文内容源自机器翻译,可能存在语法或其它翻译错误,仅供参考。如需获取准确内容,请参阅链接中的英语原文或自行翻译。

    感谢您提供 SysConfig 文件。

    我正在审查相同的,然后我可以在某个时候进一步评论。

    此致、

    Vaibhav

  • 请注意,本文内容源自机器翻译,可能存在语法或其它翻译错误,仅供参考。如需获取准确内容,请参阅链接中的英语原文或自行翻译。

    尊敬的 Manu:

    我已经查看了您分享的 SysConfig 文件。

    我觉得奇怪的是、读写命令没有写。

    请参阅本指南以设置 QSPI 闪存: https://e2e.ti.com/support/processors-group/processors/f/processors-forum/1500011/faq-mcu-plus-sdk-am62x-how-to-interface-qspi-flash-part

    如果您在了解常见问题解答方面需要进一步的帮助、请告诉我。

    此致、

    Vaibhav

  • 请注意,本文内容源自机器翻译,可能存在语法或其它翻译错误,仅供参考。如需获取准确内容,请参阅链接中的英语原文或自行翻译。

    尊敬的 Vaibhav:

    首先、无法看到 ospi_flash_diag 上述路径中的示例。

    第二件事是构建 ospi_flash_diag 示例如何刷写后、我们是否有任何 default.cfg 文件可以使用 python 进行刷写?

    我已经引用了您编写的链接。  

  • 请注意,本文内容源自机器翻译,可能存在语法或其它翻译错误,仅供参考。如需获取准确内容,请参阅链接中的英语原文或自行翻译。

    尊敬的 Manu:

    我看到 AM62x 的最新 SDK 中的 OSPI 闪存诊断示例。

    但它不适用于 AM62x-SK-LP。

    为此、我希望您挑选一个空示例并将其转换/使其发挥作用、就像 ospi flash diag 一样。

    如果您遇到任何问题、请告诉我。

    此致、

    Vaibhav

  • 请注意,本文内容源自机器翻译,可能存在语法或其它翻译错误,仅供参考。如需获取准确内容,请参阅链接中的英语原文或自行翻译。

    尊敬的  Vaibhav:

    我的 NCU+SD 版本为10.14、我无法安装 MCU+SDK 为11版本、能否请将其压缩并发送给我诊断。 这将是伟大的。

    谢谢你

  • 请注意,本文内容源自机器翻译,可能存在语法或其它翻译错误,仅供参考。如需获取准确内容,请参阅链接中的英语原文或自行翻译。

    尊敬的 Manu:

    我可以下载版本11。

    您遇到的具体问题是什么、请告诉我、然后我可以继续向您发送 OSPI 闪存诊断应用。

    此致、

    Vaibhav

  • 请注意,本文内容源自机器翻译,可能存在语法或其它翻译错误,仅供参考。如需获取准确内容,请参阅链接中的英语原文或自行翻译。

    尊敬的  Vaibhav:
    是否可以 使用 Lauterbach 刷写 OSPI 闪存诊断应用程序? 这会支持吗? 因为 Lauterbach 支持我们的定制电路板。

  • 请注意,本文内容源自机器翻译,可能存在语法或其它翻译错误,仅供参考。如需获取准确内容,请参阅链接中的英语原文或自行翻译。

    此外、我们使用 Trace32进行刷写

  • 请注意,本文内容源自机器翻译,可能存在语法或其它翻译错误,仅供参考。如需获取准确内容,请参阅链接中的英语原文或自行翻译。

    尊敬的 Manu:

    感谢您的等待。

    Lauterbach 是否有自己的应用程序/UI 来刷写 QSPI?

    我认为、您可以尝试通过 UART 进行刷写、并对 SBL UART 使用以下文件:default_sbl_uart_hs_fs.cfg 文件

    为此、您的命令应如下所示:python uart_bootloader.py -p COM -- cfg = PATH_TO_default_sbl_uart_hs_fs.cfg

    在 cfg 文件中、您需要提供 ospi 闪存诊断的路径(对于 am62x-sk-LP 示例、您必须将其移植到空应用)。

    在这里、您只需替换第22行:

    此致、

    Vaibhav