This thread has been locked.
If you have a related question, please click the "Ask a related question" button in the top right corner. The newly created question will be automatically linked to this question.
您好!
使用最新版本的 MCU-Plus SDK 08.05.00.24、"Enet Layer 2 CPSW"示例在 SK-AM64x 上不再起作用。 示例适用于 SDK 版本08.04.00.17。
这是 Debug-UART 的输出:
========================== Layer 2 CPSW Test ========================== Init all peripheral clocks ---------------------------------------------- Enabling clocks! Create RX tasks ---------------------------------------------- cpsw-3g: Create RX task Open all peripherals ---------------------------------------------- cpsw-3g: Open enet EnetAppUtils_reduceCoreMacAllocation: Reduced Mac Address Allocation for CoreId:1 From 4 To 3 Init all configs ---------------------------------------------- cpsw-3g: init config Mdio_open: MDIO Manual_Mode enabled EnetRm_open: Resource partition validation failed: -3 EnetMod_open: cpsw3g.rm: Failed to open: -3 Cpsw_openInternal: Failed to open RM: -3 Assertion @ Line: 984 in /home/gtbldadm/nightlybuilds/mcupsdk_internal/jenkins/mcu_plus_sdk_am64x_08_05_00_24/source/networking/enet/core/src/per/V1/cpsw.c: hCpsw->hRxRsvdFlow != NULL
BTW:我正在讨论 MCU-PLUS-SDK-AM64X,但在创建线程时无法选择此器件型号...
感谢您的查询。
我将检查并很快回来。
此致
Ashwani
Dominik、
感谢您的指出。 我们确认存在问题"Enet Layer 2 CPSW Example"。 我们正与开发团队合作以解决问题。
请允许我给您一些时间、以确定解决方案的时间表。
此致
安州
尊敬的 Dominik:
并确保在 AM64x-SK 电路板中对 CPSW 进行了与引脚多路复用相关的更改。
此致
Ashwani
您好、Ashwani、
这不能解决我的问题。 我在该 SDK 版本中使用的是 SDK 版本8.5.0.24、已经明确地为 SK-AM64x 提供了一个示例。 在该示例中、pinmux 看起来是正确的。 那么、无需更改任何内容?!
此处是使用的 example.syscfg 中的相关行
enet_cpsw1.$name = "CONFIG_ENET_CPSW0"; enet_cpsw1.DisableMacPort2 = true; enet_cpsw1.mdioMode = "MDIO_MODE_MANUAL"; enet_cpsw1.txDmaChannel[0].$name = "ENET_DMA_TX_CH0"; enet_cpsw1.rxDmaChannel[0].$name = "ENET_DMA_RX_CH0"; enet_cpsw1.pinmux[0].$name = "ENET_CPSW_PINMUX0"; enet_cpsw1.pinmux[0].MDIO.$assign = "MDIO0"; enet_cpsw1.pinmux[0].MDIO.MDC.$assign = "ball.R2"; enet_cpsw1.pinmux[0].MDIO.MDIO.$assign = "ball.P5"; enet_cpsw1.pinmux[0].RGMII1.$assign = "RGMII1"; enet_cpsw1.pinmux[0].RGMII1.RD0.$assign = "ball.AA13"; enet_cpsw1.pinmux[0].RGMII2.$assign = "RGMII2"; const udma = scripting.addModule("/drivers/udma/udma", {}, false); const udma1 = udma.addInstance({}, false); enet_cpsw1.udmaDrv = udma1; /** * Pinmux solution for unlocked pins/peripherals. This ensures that minor changes to the automatic solver in a future * version of the tool will not impact the pinmux you originally saw. These lines can be completely deleted in order to * re-solve from scratch. */ debug_log.uartLog.UART.$suggestSolution = "USART0"; debug_log.uartLog.UART.RXD.$suggestSolution = "ball.D15"; debug_log.uartLog.UART.TXD.$suggestSolution = "ball.C16"; enet_cpsw1.pinmux[0].RGMII1.RD1.$suggestSolution = "ball.U12"; enet_cpsw1.pinmux[0].RGMII1.RD2.$suggestSolution = "ball.Y13"; enet_cpsw1.pinmux[0].RGMII1.RD3.$suggestSolution = "ball.V12"; enet_cpsw1.pinmux[0].RGMII1.RX_CTL.$suggestSolution = "ball.V13"; enet_cpsw1.pinmux[0].RGMII1.RXC.$suggestSolution = "ball.W13"; enet_cpsw1.pinmux[0].RGMII1.TD0.$suggestSolution = "ball.V15"; enet_cpsw1.pinmux[0].RGMII1.TD1.$suggestSolution = "ball.V14"; enet_cpsw1.pinmux[0].RGMII1.TD2.$suggestSolution = "ball.W14"; enet_cpsw1.pinmux[0].RGMII1.TD3.$suggestSolution = "ball.AA14"; enet_cpsw1.pinmux[0].RGMII1.TX_CTL.$suggestSolution = "ball.U15"; enet_cpsw1.pinmux[0].RGMII1.TXC.$suggestSolution = "ball.U14"; enet_cpsw1.pinmux[0].RGMII2.RD0.$suggestSolution = "ball.W11"; enet_cpsw1.pinmux[0].RGMII2.RD1.$suggestSolution = "ball.V11"; enet_cpsw1.pinmux[0].RGMII2.RD2.$suggestSolution = "ball.AA12"; enet_cpsw1.pinmux[0].RGMII2.RD3.$suggestSolution = "ball.Y12"; enet_cpsw1.pinmux[0].RGMII2.RX_CTL.$suggestSolution = "ball.W12"; enet_cpsw1.pinmux[0].RGMII2.RXC.$suggestSolution = "ball.U11"; enet_cpsw1.pinmux[0].RGMII2.TD0.$suggestSolution = "ball.AA10"; enet_cpsw1.pinmux[0].RGMII2.TD1.$suggestSolution = "ball.V10"; enet_cpsw1.pinmux[0].RGMII2.TD2.$suggestSolution = "ball.U10"; enet_cpsw1.pinmux[0].RGMII2.TD3.$suggestSolution = "ball.AA11"; enet_cpsw1.pinmux[0].RGMII2.TX_CTL.$suggestSolution = "ball.Y11"; enet_cpsw1.pinmux[0].RGMII2.TXC.$suggestSolution = "ball.Y10";
我还完成了此处介绍的最后一步:
您能否对 MCU+ SDK 8.02中提供的 SBL 空引导加载程序进行编程、而不是07.03.00.19。 您可以按照相同的步骤刷写二进制文件。
两个 SDK 之间的二进制文件可能存在差异
因此、我使用了 SDK 8.5.0.24中提供的最新配置"default_sbl_null cfg"+ python 脚本
但问题仍然存在!
感谢 Dominik 的更新。
是否有本地编译设置?
如果是、请执行以下步骤:
/*! * \brief CPSW3G default configuration * * Note: If user wishes to change the Resource Partition the following * things must be considered: * 1. Sum of numTxCh allocated to each core should not exceed 8. * 2. Sum of numRxFlows allocated to each core should not exceed 7 (not 8), * as one Rx flow is reserved to the master core. * */ static EnetRm_ResPrms gEnetAppRmDefCfg_3G = { .coreDmaResInfo = { [0] = { .coreId = `module.getCpuID()`, .numTxCh = ENET_SYSCFG_TX_CHANNELS_NUM, /* numTxCh */ .numRxFlows = (ENET_SYSCFG_RX_FLOWS_NUM + 1), /* numRxFlows. Need one additional flow for reserved flow */ .numMacAddress = 3U, /* numMacAddress */ }, }, .numCores = 1U, };
不应出现此问题。
此致
Ashwani
您好、Ashwani、
========================== Layer 2 CPSW Test ========================== Init all peripheral clocks ---------------------------------------------- Enabling clocks! Create RX tasks ---------------------------------------------- cpsw-3g: Create RX task Open all peripherals ---------------------------------------------- cpsw-3g: Open enet EnetAppUtils_reduceCoreMacAllocation: Reduced Mac Address Allocation for CoreId:1 From 3 To 2 Init all configs ---------------------------------------------- cpsw-3g: init config Mdio_open:282 EnetUdma_openRxCh:2086 EnetHostPortDma_open:121 Cpsw_openInternal:893 Cpsw_closeInternal:984 Assertion @ Line: 984 in /home/gtbldadm/nightlybuilds/mcupsdk_internal/jenkins/mcu_plus_sdk_am64x_08_05_00_24/source/networking/enet/core/src/per/V1/cpsw.c: hCpsw->hRxRsvdFlow != NULL
尊敬的 Dominic:
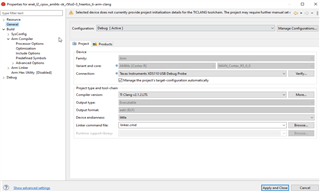
我将共享 CCS 项目设置的屏幕截图。 请确认您的一方是否相同?
在我的设置中、我可以重现您所面临的问题。
但是、在添加更改之后、我建议您、我可以摆脱问题。
e2e.ti.com/.../enet_5F00_l2_5F00_cpsw.release.out
打开所有外设
------------------------
CPsw-3G:开放环境
EnetAppUtils_reduceCoreMacAllocation:将 CoreID:1的 MAC 地址分配从4减少到3
初始化所有配置
------------------------
cpsw-3G:初始化配置
MDIO_OPEN:启用 MDIO 手动模式
正在启动 NULL 引导加载程序...
DMSC 固件版本8.5.3-v08.05.03 (Chill Capybar
DMSC 固件版本0x8
DMSC ABI 修订版3.1
INFO:bootloader_runCpu:155:CPU r5F1-0初始化为800000000 Hz!!!
INFO:bootloader_runCpu:155:CPU r5F1-1被初始化为800000000 Hz!!!
INFO:bootloader_runCpu:155:CPU m4f0-0初始化为400000000 Hz!!!
INFO:bootloader_runCpu:155:CPU A530-0初始化为800000000 Hz!!!
INFO:bootloader_runCpu:155:CPU A530-1初始化为800000000 Hz!!!
INFO:bootloader_loadSelfCpu:207:CPU r5f0-0初始化为800000000 Hz!!!
INFO:bootloader_loadSelfCpu:207:CPU r5f0-1初始化为800000000 Hz!!!
INFO:bootloader_runSelfCpu:217:全部完成,正在重新发送...
===================================
第2层 CPSW 测试
===================================
初始化所有外设时钟
------------------------
启用时钟!
创建 RX 任务
------------------------
cpsw-3G:创建 RX 任务
打开所有外设
------------------------
CPsw-3G:开放环境
EnetAppUtils_reduceCoreMacAllocation:将 CoreID:1的 MAC 地址分配从3减少到2
初始化所有配置
------------------------
cpsw-3G:初始化配置
MDIO_OPEN:282
CPsw-3G:打开端口1
EnetPhy_bindDriver:1718
PHY 0处于活动状态
PHY 1处于活动状态
在所有外设上连接内核 ID 1
------------------------
CPsw-3G:连接内核
CPsw-3G:打开 DMA
initQs() txFreePtInfoQ 初始化为16pts
CPsw-3G:正在等待链路建立...
此致
Ashwani
尊敬的 Dominic:
您能否提供您正在使用的工具的详细信息,例如 :sysfw 版本?
此致
Ashwani
您好、Ashwani、
感谢您的耐心等待。 我已完全删除旧项目并重新导入该项目。 现在、它适用于您建议的解决方案。
谢谢!
此致
Dominik
针对具有相同问题的其他人的提示:在 SDK 中应用了更改后、您还可以使用 CCS 来通常构建您不一定需要通过 gmake 生成的工程
尊敬的 Dominic:
感谢您的确认。
但这并不是一个干净的解决方案。 这只是为了确保我们正确获得根本原因、并且这种更改不会对您的电路板产生其他副作用。
我将与开发团队合作、制定时间表、为您提供解决此问题的全新方法。
此致
Ashwani
Ashwani、您好!
我在我这边也有同样的问题、我认为问题是 EEPROM 的内容。
实际上、在 SDK 8.05中、MAC 地址的数量从电路板的 EEPROM 存储器中读取:
我认为、写入 2个最大地址可以解决这个问题(尽管实际 MAC 地址值不是第二个值是0x00)。这个行为看起来像 SDK 8.04
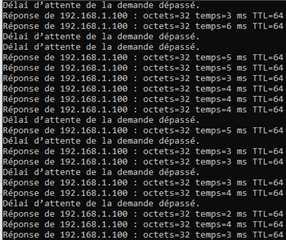
但是、我在以太网数据包的交换部分的性能非常差:
抱歉,它是法语的,但每秒 ping 一次,我就会丢失数据包:/
(如果您愿意、我可以为此打开另一个问题)
此致、
纪尧姆
这会很有帮助。 请打开另一个主题以跟踪问题。
此致
Ashwani