主题中讨论的其他部件:UNIFLASH、 DP83848K
您好!
我使用 了 AM4377中提到的同一个项目:适用于 AM4377的 QSPI-Flash 、我们仍然遇到了电路板有时无法启动的问题。
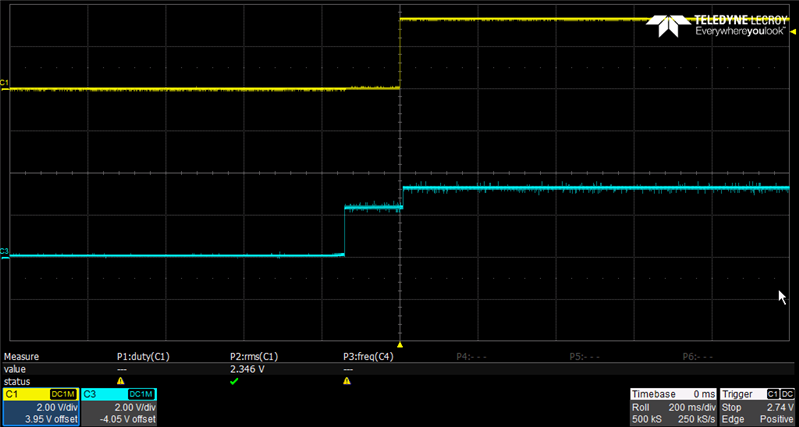
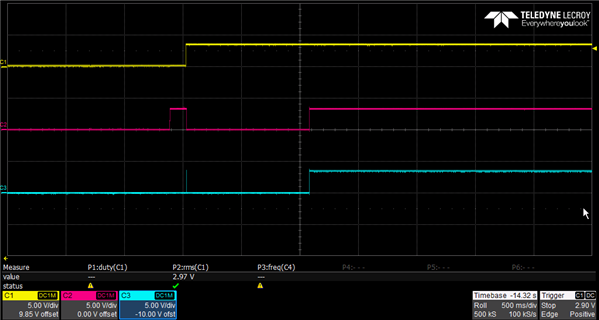
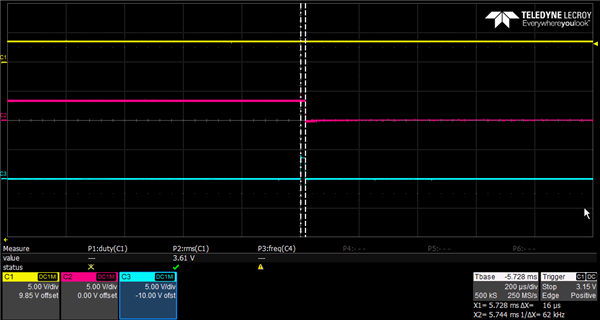
当引导过程失败并且即使 SYSBOOT 配置处于 QSPI (110'0100'0000'0100'1010)模式、通信甚至无法启动时、我已经测量了 QSPI 的 DCLK 和 nCS。
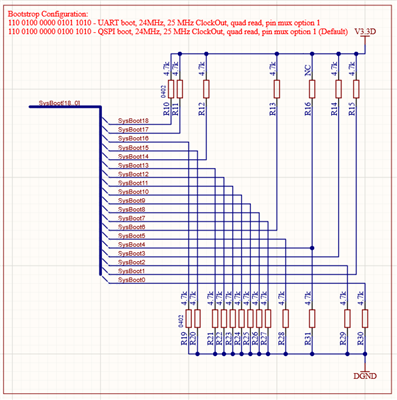
是否有任何方法可确保我们处于正确的引导模式?
也许这是一个硬件问题、因为某些电路板工作正常、而其他电路板则每隔一段时间就会出现错误。 当器件开启且关断时间约为0.5s 时、我能够通过"坏"电路板持续重现故障。 如果设备关闭时间超过一秒、则引导时不会出现任何问题。 在这两种情况下、电源定序是相同的。 我认为这是一个针对硬件故障的参数。
我发现的一个可能相关的问题:
以下问题只是"坏"电路板发生、大约为20%。 与其他器件一起使用 UniFlash 进行编程是成功的。
通过 UniFlash CLI 对闪存进行编程时、在通过 JTAG 使用 USB560v2 System Trace 加载.out 文件后、尽管返回值成功、COM 端口上仍没有"C"输出。
CMD 行指令:
dslite.bat --mode load --config=path\TargetConfig\sqpAM437x.ccxml -f path\ProgFiles\UART_sqpAM437x_flash_programmer.out -n 1.
输出:
> "C:\TI\uniflash_8.1.1\deskdb\content\TICloudAgent\win\ccs_base\DebugServer\bin\DSLite" load --config=PATH\TargetConfig\sqpAM437x.ccxml -f PATH\ProgFiles\uart_sqpAM437x_flash_programmer.out -n 1

For more details and examples, please refer to the UniFlash Quick Start guide.

DSLite version 12.2.0.2919
Configuring Debugger (may take a few minutes on first launch)...
        Initializing Register Database...
        Initializing: IcePick_D_0
Loaded FPGA Image: C:\TI\uniflash_8.1.1\deskdb\content\TICloudAgent\win\ccs_base\common\uscif\dtc_top.jbc
        Executing Startup Scripts: IcePick_D_0
        Initializing: CS_DAP_M3
        Executing Startup Scripts: CS_DAP_M3
        Initializing: M3_wakeupSS_1
        Executing Startup Scripts: M3_wakeupSS_1
        Initializing: CS_DAP_DebugSS
        Executing Startup Scripts: CS_DAP_DebugSS
        Initializing: CortexA9
        Executing Startup Scripts: CortexA9
        Initializing: CSSTM_0
        Executing Startup Scripts: CSSTM_0
        Initializing: CSETB_0
        Executing Startup Scripts: CSETB_0
        Initializing: PRU_ICSS1_PRU0
        Executing Startup Scripts: PRU_ICSS1_PRU0
        Initializing: PRU_ICSS1_PRU1
        Executing Startup Scripts: PRU_ICSS1_PRU1
        Initializing: PRU_ICSS0_PRU0
        Executing Startup Scripts: PRU_ICSS0_PRU0
        Initializing: PRU_ICSS0_PRU1
        Executing Startup Scripts: PRU_ICSS0_PRU1
Connecting...
GEL: CortexA9: Output: ****  AM437x SQP Initialization is in progress ..........
GEL: CortexA9: Output:  **** Device Type: GP
GEL: CortexA9: GEL Output: System input clock is 24MHz
GEL: CortexA9: GEL Output: ****  AM43xx NITRO (1000MHz) with CLKIN=24MHz is in progress .........
GEL: CortexA9: GEL Output:       ****  Going to Bypass...
GEL: CortexA9: GEL Output:       ****  Bypassed, changing values...
GEL: CortexA9: Output:   ****  Locking PLL
GEL: CortexA9: GEL Output:       ****  MPU PLL locked
GEL: CortexA9: GEL Output:       ****  Core Bypassed
GEL: CortexA9: GEL Output:       ****  Now locking Core...
GEL: CortexA9: GEL Output:       ****  Core locked
GEL: CortexA9: GEL Output:       ****  Calculated PER SD Divisor=4
GEL: CortexA9: GEL Output:       ****  PER DPLL Bypassed
GEL: CortexA9: GEL Output:       ****  PER DPLL Locked
GEL: CortexA9: GEL Output:       ****  Calculated EXTDEV SD Divisor=2
GEL: CortexA9: GEL Output:       ****  EXTDEV DPLL Bypassed
GEL: CortexA9: GEL Output:       ****  EXTDEV DPLL Locked
GEL: CortexA9: GEL Output:       ****  DISP PLL Config is in progress ..........
GEL: CortexA9: GEL Output:       ****  DISP PLL Locked
GEL: CortexA9: GEL Output:       ****  DDR DPLL Bypassed
GEL: CortexA9: GEL Output:       ****  DDR DPLL Locked
GEL: CortexA9: GEL Output: ****  Setting DDR3  = 400MHz
GEL: CortexA9: GEL Output: ****  AM43xx NITRO configuration is done .........
GEL: CortexA9: GEL Output: Starting DDR3 configuration...
GEL: CortexA9: Output: EMIF PRCM is in progress .......
GEL: CortexA9: Output: EMIF PRCM Done
GEL: CortexA9: GEL Output: EMIF CLK enabled...
GEL: CortexA9: GEL Output: Waiting for VTP Ready .......
GEL: CortexA9: GEL Output: VTP is Ready!
GEL: CortexA9: GEL Output: VTP controller enabled
GEL: CortexA9: GEL Output: Checking if DLL is ready...
GEL: CortexA9: GEL Output: DLL is ready
GEL: CortexA9: GEL Output: Configuring DDR IOs and Control Module registers...
GEL: CortexA9: GEL Output: Configuration of Control Module registers complete
GEL: CortexA9: GEL Output: Setting up DDR3 H/W leveling configuration...
GEL: CortexA9: GEL Output: Starting EMIF controller configuration...
GEL: CortexA9: GEL Output: EMIF Config for SQP
GEL: CortexA9: GEL Output:

DDR3 Hardware leveling complete... Outputing all the leveling results !!!

GEL: CortexA9: GEL Output: PHY_STATUS_12=0x07000099
GEL: CortexA9: GEL Output: PHY_STATUS_13=0x070000A0
GEL: CortexA9: GEL Output: PHY_STATUS_14=0x070000B4
GEL: CortexA9: GEL Output: PHY_STATUS_15=0x070000AD
GEL: CortexA9: GEL Output: PHY_STATUS_16=0x00000000
GEL: CortexA9: GEL Output: PHY_STATUS_7 =0x00000046
GEL: CortexA9: GEL Output: PHY_STATUS_8 =0x00000044
GEL: CortexA9: GEL Output: PHY_STATUS_9 =0x00000046
GEL: CortexA9: GEL Output: PHY_STATUS_10=0x00000044
GEL: CortexA9: GEL Output: PHY_STATUS_11=0x00000000
GEL: CortexA9: GEL Output: PHY_STATUS_17=0x012700D1
GEL: CortexA9: GEL Output: PHY_STATUS_18=0x000000CD
GEL: CortexA9: GEL Output: PHY_STATUS_19=0x019300E0
GEL: CortexA9: GEL Output: PHY_STATUS_20=0x010300DF
GEL: CortexA9: GEL Output: PHY_STATUS_21=0x00000000
GEL: CortexA9: GEL Output: PHY_STATUS_22=0x00E70091
GEL: CortexA9: GEL Output: PHY_STATUS_23=0x03C0008D
GEL: CortexA9: GEL Output: PHY_STATUS_24=0x015300A0
GEL: CortexA9: GEL Output: PHY_STATUS_25=0x00C3009F
GEL: CortexA9: GEL Output: PHY_STATUS_26=0x00000000
GEL: CortexA9: GEL Output:

DDR3 configuration is complete!!!

GEL: CortexA9: GEL Output: Turning on EDMA...
GEL: CortexA9: GEL Output: EDMA is turned on...
GEL: CortexA9: Output: ****  AM437x IDK EVM Initialization is Done ******************


GEL: CortexA9: Output:  **** PRU-ICSS PRCM Enable Step 1 is in progress ****
GEL: CortexA9: Output:  **** PRU-ICSS PRCM Enable Step 1 is Done ****
GEL: CortexA9: Output:  **** PRU-ICSS PRCM Enable Step 2 is in progress ****
GEL: CortexA9: Output:  **** PRU-ICSS PRCM Enable Step 2 is Done ****
Fill Memory
        Verifying 0x54410000
        Filling 0x54417FF0: 99%
        Verifying 0x54417FF0: 99%
        Filling 0x54418000: 100%
Loading Program: PATH\ProgFiles\uart_sqpAM437x_flash_programmer.out
        Preparing ...
        PT_LOAD[0]: 0 of 40084 at 0x40300000
        PT_LOAD[0]: 32752 of 40084 at 0x40300000: 81%
        Finished: 81%
        Setting PC to entry point.: 81%
Running...
Success
当使用 Code Composer Studio (10.4.0.00006)加载.out-file 时、COM 端口上的"C"输出存在、但在大多数情况下、当尝试刷写映像时、该过程会以8%的速度失败。
发生这种情况时、QSPI 通信也不会启动。 当我以这种方式尝试时、加载成功、每10次加载一次。
CMD 行指令:
C:\TI\uniflash_8.1.1>dslite.bat -模式处理器-c COM6 -f path\ProgFiles\bootloader_boot_qspi_a9host_release.bin -d 2 -o 0
输出:
Executing the following command:
> C:\TI\uniflash_8.1.1\processors\ProcessorSDKSerialFlash.exe -c COM6 -f PATH\ProgFiles\bootloader_boot_qspi_a9host_release.bin -d 2 -o 0

For more details and examples, please refer to the UniFlash Quick Start guide.

The file extension is .bin

----------------------------------------------------------------------------
ProcessorSDKSerialFlash CLI Tool
Copyright (C) 2017-2022 Texas Instruments Incorporated - http://www.ti.com/
Version 1.7.0.0
----------------------------------------------------------------------------
Transferring the Image to Flash Programmer..

Transferring Header Information..
Header Transfer Complete!

Flashing Image of size 37768 bytes
8% complete
Flash Programming Failed!!
在尝试删除闪存时、闪存和 am4377之间也没有通信、即使很困难、也表示闪存擦除成功!
CMD 行指令:
C:\TI\uniflash_8.1.1>dslite.bat -模式处理器-c COM6 -d 2 -e 0x200000
输出:
Executing the following command:
> C:\TI\uniflash_8.1.1\processors\ProcessorSDKSerialFlash.exe -c COM6 -d 2 -e 0x200000

For more details and examples, please refer to the UniFlash Quick Start guide.


----------------------------------------------------------------------------
ProcessorSDKSerialFlash CLI Tool
Copyright (C) 2017-2022 Texas Instruments Incorporated - http://www.ti.com/
Version 1.7.0.0
----------------------------------------------------------------------------
Erasing Flash....

Transferring Header information..
Header Transfer Complete!!
Flash Erase Success!
在 Quicik 开始指南中、它显示了%errorlever%、可以检查先前的操作是否通过。 在我的案例中,“dslite.bat --mode load....” 命令,但"dslite.bat --mode processors..." 即使所有内容都成功加载(引导加载程序和.bin 文件)、指令也始终返回1。
这是否是批处理文件的错误、或者是否确定有错误? 是否有其他方法可以确保该流程成功/失败?
您对如何继续有什么建议吗?
此致、Timo