This thread has been locked.

If you have a related question, please click the "Ask a related question" button in the top right corner. The newly created question will be automatically linked to this question.

[FAQ] [参考译文] [常见问题解答] PROCESSOR-SDK-AM62X:如何在 AM62x EVM 上启用和使用 TPIC2810

Guru**** 2482225 points
Other Parts Discussed in Thread: SK-AM62B-P1, SK-AM62B, SK-AM62-SIP, TPIC2810

请注意,本文内容源自机器翻译,可能存在语法或其它翻译错误,仅供参考。如需获取准确内容,请参阅链接中的英语原文或自行翻译。

https://e2e.ti.com/support/processors-group/processors/f/processors-forum/1447811/faq-processor-sdk-am62x-how-to-enable-and-use-tpic2810-on-am62x-evms

器件型号:PROCESSOR-SDK-AM62X
主题中讨论的其他器件:SK-AM62B-P1SK-AM62BSK-AM62-SIPTPIC2810

工具与软件:

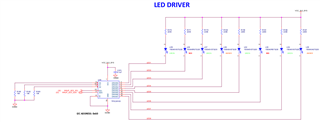
TPIC2810 是一款基于 I2C 的8位 LED 驱动器、可在下面列出的少数 AM62x EVM 上使用:

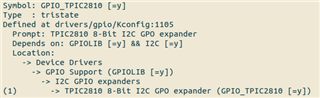
此常见问题解答将展示如何在 AM62x EVM 上启用和使用。

  • 请注意,本文内容源自机器翻译,可能存在语法或其它翻译错误,仅供参考。如需获取准确内容,请参阅链接中的英语原文或自行翻译。

    比较

    在 AM62x EVM 上、TPIC2810连接到 WKUP_I2C0总线。 请注意、TPIC2810的地址为0x60。

    EVM 的产品页面上提供了指向原理图的链接。

    Linux 内核

    器件树补丁

    在器件树中、需要设置引脚多路复用、将节点参考为 I2C、最后通过 LED-GPIO 更改默认状态。

    diff --git a/arch/arm64/boot/dts/ti/k3-am625-sk.dts b/arch/arm64/boot/dts/ti/k3-am625-sk.dts
    index b17379781..e6b18e208 100644
    --- a/arch/arm64/boot/dts/ti/k3-am625-sk.dts
    +++ b/arch/arm64/boot/dts/ti/k3-am625-sk.dts
    @@ -120,6 +120,74 @@ wlan_en: regulator-7 {
     		pinctrl-names = "default";
     		pinctrl-0 = <&wlan_en_pins_default>;
     	};
    +
    +	led-controller {
    +		compatible = "gpio-leds";
    +
    +		led-0 {
    +			color = <LED_COLOR_ID_GREEN>;
    +			function = LED_FUNCTION_INDICATOR;
    +			function-enumerator = <1>;
    +			gpios = <&exp2 0 GPIO_ACTIVE_HIGH>;
    +			default-state = "off";
    +		};
    +
    +		led-1 {
    +			color = <LED_COLOR_ID_RED>;
    +			function = LED_FUNCTION_INDICATOR;
    +			function-enumerator = <2>;
    +			gpios = <&exp2 1 GPIO_ACTIVE_HIGH>;
    +			default-state = "off";
    +		};
    +
    +		led-2 {
    +			color = <LED_COLOR_ID_GREEN>;
    +			function = LED_FUNCTION_INDICATOR;
    +			function-enumerator = <3>;
    +			gpios = <&exp2 2 GPIO_ACTIVE_HIGH>;
    +			default-state = "off";
    +		};
    +
    +		led-3 {
    +			color = <LED_COLOR_ID_AMBER>;
    +			function = LED_FUNCTION_INDICATOR;
    +			function-enumerator = <4>;
    +			gpios = <&exp2 3 GPIO_ACTIVE_HIGH>;
    +			default-state = "off";
    +		};
    +
    +		led-4 {
    +			color = <LED_COLOR_ID_GREEN>;
    +			function = LED_FUNCTION_INDICATOR;
    +			function-enumerator = <5>;
    +			gpios = <&exp2 4 GPIO_ACTIVE_HIGH>;
    +			default-state = "off";
    +		};
    +
    +		led-5 {
    +			color = <LED_COLOR_ID_RED>;
    +			function = LED_FUNCTION_INDICATOR;
    +			function-enumerator = <6>;
    +			gpios = <&exp2 5 GPIO_ACTIVE_HIGH>;
    +			default-state = "off";
    +		};
    +
    +		led-6 {
    +			color = <LED_COLOR_ID_GREEN>;
    +			function = LED_FUNCTION_INDICATOR;
    +			function-enumerator = <7>;
    +			gpios = <&exp2 6 GPIO_ACTIVE_HIGH>;
    +			default-state = "off";
    +		};
    +
    +		led-7 {
    +			color = <LED_COLOR_ID_AMBER>;
    +			function = LED_FUNCTION_HEARTBEAT;
    +			function-enumerator = <8>;
    +			linux,default-trigger = "heartbeat";
    +			gpios = <&exp2 7 GPIO_ACTIVE_HIGH>;
    +		};
    +	};
     };
     
     &main_pmx0 {
    @@ -193,6 +261,15 @@ AM62X_IOPAD(0x128, PIN_INPUT, 7) /* (B23) MMC2_SDWP.GPIO0_72 */
     	};
     };
     
    +&mcu_pmx0 {
    +	tpic_pins_default: tpic-default-pins {
    +		pinctrl-single,pins = <
    +			AM62X_MCU_IOPAD(0x004c, PIN_INPUT, 0) /* (B9) WKUP_I2C0_SCL */
    +			AM62X_MCU_IOPAD(0x0050, PIN_INPUT, 0) /* (A9) WKUP_I2C0_SDA */
    +		>;
    +	};
    +};
    +
     &main_i2c1 {
     	exp1: gpio@22 {
     		compatible = "ti,tca6424";
    @@ -285,6 +362,21 @@ mbox_m4_0: mbox-m4-0 {
     	};
     };
     
    +&wkup_i2c0 {
    +	status = "okay";
    +	pinctrl-names = "default";
    +	pinctrl-0 = <&tpic_pins_default>;
    +	clock-frequency = <400000>;
    +
    +	exp2: gpio@60 {
    +		compatible = "ti,tpic2810";
    +		reg = <0x60>;
    +		gpio-controller;
    +		#gpio-cells = <2>;
    +		gpio-line-names = "LED0","LED1","LED2","LED3","LED4","LED5","LED6","LED7";
    +	};
    +};
    +
     &ospi0 {
     	status = "okay";
     	pinctrl-names = "default";
    

    可以在器件树中更改 LED 的默认状态/触发器。

    内核模块

    按照 SDK 文档中的说明构建设备树和内核模块: https://software-dl.ti.com/processor-sdk-linux/esd/AM62X/10_00_07_04/exports/docs/linux/sdk.html Foundational_Components_Kernel_Users_Guide

    编译.dtb 和映像并将其加载到 EVM 中。

    如何切换 LED

    root@am62xx-evm:~# cd /sys/class/leds/
    root@am62xx-evm:/sys/class/leds# ls -lt
    total 0
    lrwxrwxrwx 1 root root 0 Apr 28 17:42 amber:heartbeat-8 -> ../../devices/platform/led-controller/leds/amber:heartbeat-8
    lrwxrwxrwx 1 root root 0 Apr 28 17:42 green:indicator-7 -> ../../devices/platform/led-controller/leds/green:indicator-7
    lrwxrwxrwx 1 root root 0 Apr 28 17:42 mmc0:: -> ../../devices/platform/bus@f0000/fa10000.mmc/leds/mmc0::
    lrwxrwxrwx 1 root root 0 Apr 28 17:42 mmc1:: -> ../../devices/platform/bus@f0000/fa00000.mmc/leds/mmc1::
    lrwxrwxrwx 1 root root 0 Apr 28 17:42 am62-sk:green:heartbeat -> ../../devices/platform/leds/leds/am62-sk:green:heartbeat
    lrwxrwxrwx 1 root root 0 Apr 28 17:42 amber:indicator-4 -> ../../devices/platform/led-controller/leds/amber:indicator-4
    lrwxrwxrwx 1 root root 0 Apr 28 17:42 green:indicator-1 -> ../../devices/platform/led-controller/leds/green:indicator-1
    lrwxrwxrwx 1 root root 0 Apr 28 17:42 green:indicator-3 -> ../../devices/platform/led-controller/leds/green:indicator-3
    lrwxrwxrwx 1 root root 0 Apr 28 17:42 green:indicator-5 -> ../../devices/platform/led-controller/leds/green:indicator-5
    lrwxrwxrwx 1 root root 0 Apr 28 17:42 mmc2:: -> ../../devices/platform/bus@f0000/fa20000.mmc/leds/mmc2::
    lrwxrwxrwx 1 root root 0 Apr 28 17:42 red:indicator-2 -> ../../devices/platform/led-controller/leds/red:indicator-2
    lrwxrwxrwx 1 root root 0 Apr 28 17:42 red:indicator-6 -> ../../devices/platform/led-controller/leds/red:indicator-6
    root@am62xx-evm:/sys/class/leds# echo 1 > amber\:indicator-4/brightness 
    

    所有 LED 均已填充在/sys/class/leds 中。 对于简单的切换、将1/0回显到亮度目录。

    有关使用 SYSFS 连接 LED 的更多信息、请参见此处获取 SYSFS 类 LED 文档: git.ti.com/.../sysfs-class-led