If you have a related question, please click the "Ask a related question" button in the top right corner. The newly created question will be automatically linked to this question.
#include "DSP280x_Device.h" // DSP280x Headerfile Include File #include "DSP280x_Examples.h" // DSP280x Examples Include File
// Prototype statements for functions found within this file.
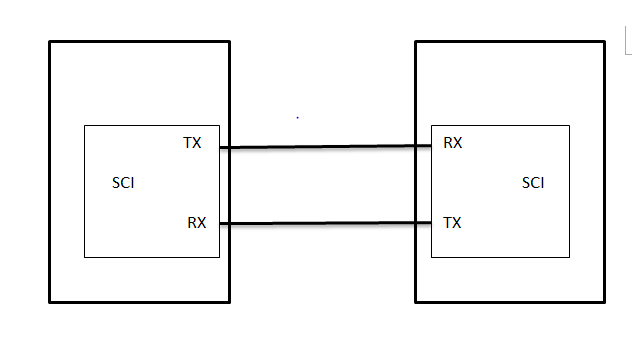
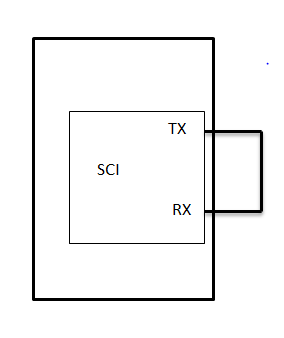
interrupt void sciaRxFifoIsr(void);
void scia_fifo_init(void); void scia_xmit(int a); //int SciaRx_Ready(void); // Global variables
Uint16 ReceivedChar[20]; // Received data for SCI-A Uint16 loop; void main(void) { Uint16 i; Uint16 SendChar;
// Step 1. Initialize System Control: // PLL, WatchDog, enable Peripheral Clocks // This example function is found in the DSP280x_SysCtrl.c file. InitSysCtrl();
// Step 2. Initalize GPIO: // This example function is found in the DSP280x_Gpio.c file and // illustrates how to set the GPIO to it's default state. // InitGpio(); // Setup only the GP I/O only for SCI-A and SCI-B functionality // This function is found in DSP280x_Sci.c InitSciGpio();
// Step 3. Clear all interrupts and initialize PIE vector table: // Disable CPU interrupts DINT;
// Initialize PIE control registers to their default state. // The default state is all PIE interrupts disabled and flags // are cleared. // This function is found in the DSP280x_PieCtrl.c file. InitPieCtrl();
// Disable CPU interrupts and clear all CPU interrupt flags: IER = 0x0000; IFR = 0x0000;
// Initialize the PIE vector table with pointers to the shell Interrupt // Service Routines (ISR). // This will populate the entire table, even if the interrupt // is not used in this example. This is useful for debug purposes. // The shell ISR routines are found in DSP280x_DefaultIsr.c. // This function is found in DSP280x_PieVect.c. InitPieVectTable();
// Interrupts that are used in this example are re-mapped to // ISR functions found within this file. EALLOW; // This is needed to write to EALLOW protected registers PieVectTable.SCIRXINTA = &sciaRxFifoIsr;
EDIS; // This is needed to disable write to EALLOW protected registers
// Step 4. Initialize all the Device Peripherals: // This function is found in DSP280x_InitPeripherals.c // InitPeripherals(); // Not required for this example
// Enable interrupts required for this example
IER |= M_INT9; PieCtrlRegs.PIECTRL.bit.ENPIE = 1; // Enable the PIE block PieCtrlRegs.PIEIER9.bit.INTx1=1; // PIE Group 9, INT1 RXINT //IER = 0x100; // Enable CPU INT //EINT; EINT; // Enable Global interrupt INTM ERTM; // Enable Global realtime interrupt DBGM // Step 5. User specific code, enable interrupts:
scia_fifo_init(); // Init SCI-A SendChar=0; loop=0; // Init send data. for(i=0;i<20;i++) { scia_xmit(SendChar); //Move to the next character and repeat the test SendChar++; // Limit the character to 8-bits SendChar &= 0x00FF;
} // Step 6. IDLE loop. Just sit and loop forever (optional): for(;;);
}
interrupt void sciaRxFifoIsr(void) {
ReceivedChar[loop] =SciaRegs.SCIRXBUF.all; // Read data loop++; SciaRegs.SCIFFRX.bit.RXFFOVRCLR=1; // Clear Overflow flag SciaRegs.SCIFFRX.bit.RXFFINTCLR=1; // Clear Interrupt flag