This thread has been locked.

If you have a related question, please click the "Ask a related question" button in the top right corner. The newly created question will be automatically linked to this question.

[FAQ] CCSTUDIO-MSP: 如何在 Code Composer Studio (CCS) 中手动选择 JTAG 接口类型

Part Number: CCSTUDIO-MSP

默认情况下,CCS 将根据器件和调试器自动检测 JTAG 接口。但是,您可能需要将接口类型手动更改为 2 线 SBW 或 4 线 JTAG。目前,CCS 不允许您在不对驱动程序进行一些手动更改的情况下更改 JTAG 接口。以下是有关如何使用 CCS v10 执行此操作的说明。

步骤 1.确保 CCS 已关闭,然后在文本编辑器中打开以下文件(假设位于默认安装位置)。

C:\ti\ccs<此处为版本>\ccs\ccs_base\common\targetdb\drivers\msp430_emu.xml

步骤 2.根据您的特定器件所属系列为您的器件更新“msp430_emu.xml”。对于每个系列,您将看到多个“isa”部分,因此应根据您的器件在相应部分中进行更改。

原始“msp430_emu.xml

Fullscreen
1
2
3
4
5
6
7
8
9
10
11
12
13
14
15
16
17
18
19
20
21
<?xml version="1.0"?>
<drivers id="MSP430">
<isa Type="MSP430" ProcID="0x6b800000">
<driver file="../../DebugServer/drivers/msp430_emu.dvr">
<connectionType Type="MSP430"/>
<property Type="hiddenfield" Value="msp430.dll" id="dllName" />
<property Type="hiddenfield" Value="MSP430" id="interface" />
<property Name="JTAG/SBW Speed" desc="JTAG/SBW Speed" Type="choicelist" id="interfaceSpeed" Value="1">
<choice Name="Fast" value="0"/>
<choice Name="Medium" value="1"/>
<choice Name="Slow" value="2"/>
</property>
</driver>
</isa>
<isa Type="MSP430L092" ProcID="0x6b800000">
<driver file="../../DebugServer/drivers/msp430_emu.dvr">
<connectionType Type="MSP430"/>
<property Type="hiddenfield" Value="msp430.dll" id="dllName" />
<property Type="hiddenfield" Value="MSP430" id="interface" />
<property Name="Emulation Type" desc="Emulation Types" Type="choicelist" id="emuType" Value="0">
XXXXXXXXXXXXXXXXXXXXXXXXXXXXXXXXXXXXXXXXXXXXXXXXXX

添加的接口类型属性

Fullscreen
1
2
3
4
5
6
<property Name="Interface Type" desc="Interface Type" Type="choicelist" id="interfaceType" Value="3">
<choice Name="4 Wire JTAG protocol used" value="0"/>
<choice Name="2 Wire (Spy-bi-wire) JTAG protocol used" value="1"/>
<choice Name="2 Wire Devices accessed by 4wire JTAG protocol" value="2"/>
<choice Name="Protocol will be detected automatically" value="3"/>
</property>
XXXXXXXXXXXXXXXXXXXXXXXXXXXXXXXXXXXXXXXXXXXXXXXXXX

修改后的“msp430_emu.xml

Fullscreen
1
2
3
4
5
6
7
8
9
10
11
12
13
14
15
16
17
18
19
20
21
<?xml version="1.0"?>
<drivers id="MSP430">
<isa Type="MSP430" ProcID="0x6b800000">
<driver file="../../DebugServer/drivers/msp430_emu.dvr">
<connectionType Type="MSP430"/>
<property Type="hiddenfield" Value="msp430.dll" id="dllName" />
<property Name="Interface Type" desc="Interface Type" Type="choicelist" id="interfaceType" Value="3">
<choice Name="4 Wire JTAG protocol used" value="0"/>
<choice Name="2 Wire (Spy-bi-wire) JTAG protocol used" value="1"/>
<choice Name="2 Wire Devices accessed by 4wire JTAG protocol" value="2"/>
<choice Name="Protocol will be detected automatically" value="3"/>
</property>
<property Name="JTAG/SBW Speed" desc="JTAG/SBW Speed" Type="choicelist" id="interfaceSpeed" Value="1">
<choice Name="Fast" value="0"/>
<choice Name="Medium" value="1"/>
<choice Name="Slow" value="2"/>
</property>
</driver>
</isa>
<isa Type="MSP430L092" ProcID="0x6b800000">
XXXXXXXXXXXXXXXXXXXXXXXXXXXXXXXXXXXXXXXXXXXXXXXXXX

步骤 3.保存该文件,然后重新打开 CCS。

步骤 4.通过双击工程文件夹,在 CCS Project Explorer 中选择并展开 CCS 工程。

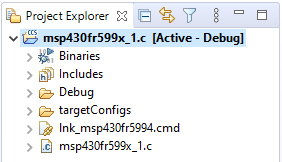
步骤 5.双击“targetConfigs”文件夹将其展开。

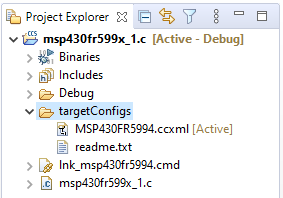
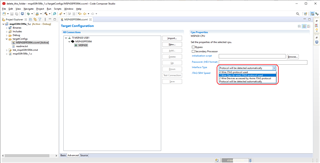
步骤 6.双击以“.ccxml”结尾的目标配置文件将其打开,然后点击“Advanced”选项卡。
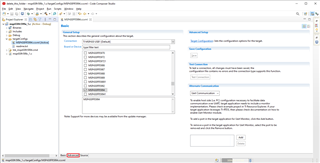
步骤 7.点击“MSP430”CPU。

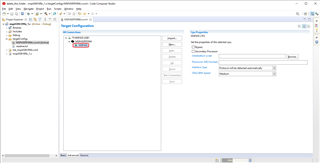
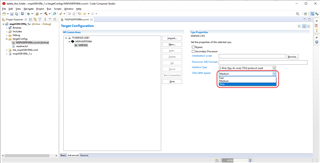
第 8 步:在“CPU Properties”下,将“Interface Type”更改为“Protocol will be detected automatically”以外的其他内容。请注意,某些选项可能会因您的器件而异。

步骤 9(可选):如有必要,请调整通信速度以确保可靠通信。

步骤 10:点击“Save”以保存对目标配置的更改。

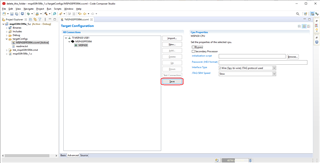
现在,假设硬件连接和 JTAG 电路都正确,您可以使用指定的接口对器件进行编程或调试。

注意:通过修改 UniFlash 位于以下位置的驱动程序,可以对 UniFlash 进行相同的更改。

C:\ti\uniflash_<此处为版本>\deskdb\content\TICloudAgent\win\ccs_base\common\targetdb\drivers\msp430_emu.xml

  • 我们建议您在发布新问题之前先搜索 E2E支持论坛,E2E支持论坛已经拥有数十万个已得到解答的话题。  这通常是解决问题的最快方法。