This thread has been locked.

If you have a related question, please click the "Ask a related question" button in the top right corner. The newly created question will be automatically linked to this question.

[参考译文] TMS320F28384S:调试多个内核问题

Guru**** 2393275 points
Other Parts Discussed in Thread: TMS320F28384S, C2000WARE

请注意,本文内容源自机器翻译,可能存在语法或其它翻译错误,仅供参考。如需获取准确内容,请参阅链接中的英语原文或自行翻译。

https://e2e.ti.com/support/microcontrollers/c2000-microcontrollers-group/c2000/f/c2000-microcontrollers-forum/1123785/tms320f28384s-debugging-multiple-cores-problem

器件型号:TMS320F28384S
主题中讨论的其他器件: C2000WARE

尊敬的 TI:

我正在尝试调试 TMS320F28384S 控制器上的多个内核(CPU1和 CM)、但 调试连接管理器(CM)内核时遇到问题。 每次加载程序并在 CPU1上单步执行代码都能完美地工作。 但是、在 CM 上加载程序后、它会转到 boot.asm、而不是在 main 处中断。 这会阻止我单步执行 CM 代码、因为无法从 boot.asm 文件中退出。 我无法使其在 main 处中断、当我添加断点时、它会弹出一个"所有资源都在使用中"错误。

这些是我尝试调试 CM 内核的步骤、但我很幸运。  

1.   选择要调试的 C28x 应用程序
2.   连接 CM
   3.加载符号,然后加载程序

当我第一次执行这些步骤时、它可以正常工作、并且在 CM 中的 main 开始处断路、但在第二次或第三次调试之后、它停止工作、此后我无法使其正常工作。

我正在使用 Blackhawk XDS200调试探针、但我也遇到了与 XDS100相同的问题。
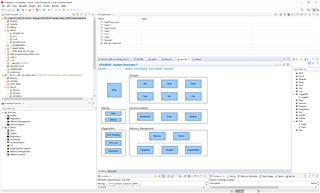
调试 CPU1工作正常、如下所示:

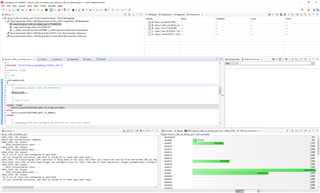
连接到 CM 后、我会加载符号和程序(如下图所示)。 符号似乎加载不正确、我不确定原因是什么?

当尝试向程序添加断点时、会出现以下错误消息:

当我复位 CPU 并重新启动程序时、它会在 boot.asm 中停止、而不是在 main 中停止:

有什么帮助或建议会很好?

此致、

Warrick

  • 请注意,本文内容源自机器翻译,可能存在语法或其它翻译错误,仅供参考。如需获取准确内容,请参阅链接中的英语原文或自行翻译。

    您好!

    您是否正在使用 C2000Ware LED 示例在 TI 电路板上遇到问题、或者您的定制电路板是这样?

    我刚刚在我的设置上测试了相同的 LED 示例、它工作正常。 请参见电路板图像。 只需确保将"led_ex1_C28x_cm_blinky_cm.out"从 CM 工程加载到 M4即可。

    谢谢、此致、

    桑托什

  • 请注意,本文内容源自机器翻译,可能存在语法或其它翻译错误,仅供参考。如需获取准确内容,请参阅链接中的英语原文或自行翻译。

    您好、Santosh、

    感谢你的答复。 是的、这是一个定制板、并且 LED 示例代码也已更改、以考虑不同的 GPIO 引脚、时钟设置等。我还可以使此默认 LED 示例正常工作、并且能够调试 CM。

    但是、我已经修改了 CM 代码以允许使用 TI SYS/BIOS 和 XDCtools。 添加这些文件的目的是使用 CM 的 RTOS 功能以及使用.cfg 文件的简单配置界面。 我已附加主程序、因此您可以看到我对 CM 代码所做的修改。 CPU1代码保持相对不变。

    是否有任何可能导致 CM 调试器失败的配置设置?

    /*
     *  ======== main.c ========
     */
    
    #include <xdc/std.h>
    
    #include <xdc/runtime/Error.h>
    #include <xdc/runtime/System.h>
    
    #include <ti/sysbios/BIOS.h>
    
    #include <ti/sysbios/knl/Task.h>
    
    #include "cm.h"
    
    //
    // LEDs
    //
    #define HEART_BEAT_LED    36U  // GPIO number for LD2
    #define AC_PLL_LED        37U  // GPIO number for LD3
    
    /*
     *  ======== taskFxn ========
     */
    Void taskFxn_1(UArg a0, UArg a1)
    {
        System_printf("enter taskFxn_1 \n");
    
        int i = 0;
    
        for (;;) {
    
            System_printf("Running task 1 function\n");
    
            GPIO_writePin(HEART_BEAT_LED, 1);
            Task_sleep(1000);
            GPIO_writePin(HEART_BEAT_LED, 0);
            Task_sleep(1000);
    
            System_flush(); /* force SysMin output to console */
        }
    
        Task_sleep(10);
    
        System_printf("exit taskFxn_1 \n");
    
        System_flush(); /* force SysMin output to console */
    }
    
    
    /*
     *  ======== taskFxn ========
     */
    Void taskFxn_2(UArg a0, UArg a1)
    {
    
        System_printf("enter taskFxn_2\n");
    
        int i = 0;
    
        for (;;) {
    
            System_printf("Running task 2 function\n");
    
            GPIO_writePin(AC_PLL_LED, 1);
            Task_sleep(1000);
            GPIO_writePin(AC_PLL_LED, 0);
            Task_sleep(1000);
    
            System_flush(); /* force SysMin output to console */
        }
    
        System_printf("exit taskFxn_2 \n");
    
        System_flush(); /* force SysMin output to console */
    }
    
    /*
     *  ======== main ========
     */
    Int main()
    { 
        Task_Handle task;
        Error_Block eb;
       // uint32_t UART_CLK_FREQ = 125000000;
        System_printf("enter main()\n");
        SysCtl_enablePeripheral(SYSCTL_PERIPH_CLK_UART0);
       // CM_init();
        //
        // Configure UART0 for echoback.Set up to transfer data at 115200 baud.
        //
        //UART_enableModule(UART0_BASE);
    
        UART_setConfig(UART0_BASE, UART_CLK_FREQ , 115200, (UART_CONFIG_WLEN_8 |
                       UART_CONFIG_STOP_ONE | UART_CONFIG_PAR_NONE));
    
        //UART_getConfig(UART0_BASE,UART_CLK_FREQ , 115200, config);
        //
        // Put a character to show start of example.  This will display on the
        // terminal.
        //
        UART_writeChar(UART0_BASE, '5');
    
        while(UART_isBusy(UART0_BASE) == 1)
        {
        }
    
        UART_writeCharNonBlocking(UART0_BASE, '1');
    
        while(UART_isBusy(UART0_BASE) == 1)
        {
        }
    
        BIOS_start();    /* does not return */
        return(0);
    }
    

    下图显示了.cfg 文件设置。

    此致、

    Warrick

  • 请注意,本文内容源自机器翻译,可能存在语法或其它翻译错误,仅供参考。如需获取准确内容,请参阅链接中的英语原文或自行翻译。

    Warrick、

    没有配置更改、但我不熟悉 CM 上的 RTOS。 我将与 RTOS 专家一起查看 问题并提供帮助。

    谢谢、此致、

    桑托什

  • 请注意,本文内容源自机器翻译,可能存在语法或其它翻译错误,仅供参考。如需获取准确内容,请参阅链接中的英语原文或自行翻译。

    谢谢 Santosh。 期待收到您的回复。

  • 请注意,本文内容源自机器翻译,可能存在语法或其它翻译错误,仅供参考。如需获取准确内容,请参阅链接中的英语原文或自行翻译。

    Warrick、您好!

    似乎正在加载,但 CCS 无法放置运行至主断点。 您能否 按照此主题中的说明释放一些断点:

    https://e2e.ti.com/support/tools/code-composer-studio-group/ccs/f/code-composer-studio-forum/489225/c28xx-autorun-target-not-run-as-breakpoint-could-not-be-set-error-enabling-this-function-this-task-cannot-be-accomplished-with-the-existing-aet-resources/1766863#1766863


    上面的线程用于 C28x、但 CM 应该有类似的设置。

    谢谢、此致、

    桑托什

  • 请注意,本文内容源自机器翻译,可能存在语法或其它翻译错误,仅供参考。如需获取准确内容,请参阅链接中的英语原文或自行翻译。

    您好、Santosh、感谢您的回复。

    我以前看过这个线程,这是我尝试过的,但不幸的是,我没有运气。  

    此致、

    Warrick

  • 请注意,本文内容源自机器翻译,可能存在语法或其它翻译错误,仅供参考。如需获取准确内容,请参阅链接中的英语原文或自行翻译。

    Warrick、

    我假设 CM 从闪存运行、因为看起来 CCS 正在尝试设置硬件断点、但无法这样做。  通常、如果所有断点资源都被占用、就会发生这种情况。

    请尝试以下操作

    启动 CM 的调试会话

    转至 View (视图)菜单并选择"Scripting Console"(脚本控制台)

    运行以下命令: eval ("debug_DumpBreakpoints()")

    这应该显示已设置的所有断点、即使这些断点是由 CCS 在后台完成的。

    从控制台复制输出并粘贴到此处。

    此致、

    John

  • 请注意,本文内容源自机器翻译,可能存在语法或其它翻译错误,仅供参考。如需获取准确内容,请参阅链接中的英语原文或自行翻译。

    尊敬的 John:

    我想我已经禁用并删除了所有相关的断点。

    不过、以下是输出:

    C28xx_CPU1: GEL Output: 
    Memory Map Initialization Complete
    C28xx_CPU1: GEL Output: 
    ... DCSM Initialization Start ... 
    C28xx_CPU1: GEL Output: 
    ... DCSM Initialization Done ...
    C28xx_CPU1: GEL Output: 
     CM is out of reset and configured to wait boot.
     (If you connected previously, may have to resume CM to reach wait boot loop.)
    C28xx_CPU1: If erase/program (E/P) operation is being done on one core, the other core should not execute from shared-RAM (SR) as they are used for the E/P code. User code execution from SR could commence after both flash banks are programmed.
    C28xx_CPU1: Only CPU1 on-chip Flash Plugin can configure clock for CPU1, CPU2 and CM Flash operations. Plugin automatically configures PLL when CPU1 Flash operations are invoked. However, if users want to do only CPU2 or CM Flash operations without doing a prior CPU1 operation in the current session, they should click on 'Configure Clock' button in CPU1's on-chip Flash Plugin before invoking CPU2 and CM Flash operations. When this button is used, Flash Plugin will configure the clock for CPU1/CPU2 at 190MHz and CM at 95MHz using INTOSC2 as the clock source. Plugin will leave PLL config like this and user application should configure the PLL as required by application.
    C28xx_CPU1: GEL Output: 
    ... DCSM Initialization Start ... 
    C28xx_CPU1: GEL Output: 
    ... DCSM Initialization Done ...
    C28xx_CPU1: GEL Output: 
     CM is out of reset and configured to wait boot.
     (If you connected previously, may have to resume CM to reach wait boot loop.)
    C28xx_CPU1: GEL Output: 
    ... DCSM Initialization Start ... 
    C28xx_CPU1: GEL Output: 
    ... DCSM Initialization Done ...
    C28xx_CPU1: GEL Output: 
     CM is out of reset and configured to wait boot.
     (If you connected previously, may have to resume CM to reach wait boot loop.)
    Cortex_M4_0: GEL Output: Memory Map Initialization Complete
    Cortex_M4_0: GEL Output: Windowed Watchdog Enabled
    Cortex_M4_0: GEL Output: UART0 Enabled
    Cortex_M4_0: Only CPU1 on-chip Flash Plugin can configure clock for CPU1, CPU2 and CM Flash operations. Plugin automatically configures PLL when CPU1 Flash operations are invoked. However, if users want to do only CPU2 or CM Flash operations without doing a prior CPU1 operation in the current session, they should click on 'Configure Clock' button in CPU1's on-chip Flash Plugin before invoking CPU2 and CM Flash operations. When this button is used, Flash Plugin will configure the clock for CPU1/CPU2 at 190MHz and CM at 95MHz using INTOSC2 as the clock source. Plugin will leave PLL config like this and user application should configure the PLL as required by application.
    Cortex_M4_0: Breakpoint Manager Dump: Total Allocated Logical Breakpoints: 59
    
    Cortex_M4_0: Breakpoint Manager Dump: Total Allocated Software Physical Breakpoints: 59
    
    Cortex_M4_0: Breakpoint Manager Dump: Total Allocated Legacy Hardware Physical Breakpoints: 0
    
    Cortex_M4_0: Breakpoint Manager Dump: Total Allocated 55 Hardware Physical Breakpoints: 0
    
    Cortex_M4_0: Breakpoint Manager Dump: Total Allocated Thread Physical Breakpoints: 0
    
    Cortex_M4_0: Breakpoint Manager Dump: 
    
    Cortex_M4_0: Breakpoint Manager Dump: Enabled: 0
    
    Cortex_M4_0: Breakpoint Manager Dump: 
    
    Cortex_M4_0: Breakpoint Manager Dump: Disabled: 5
    
    Cortex_M4_0: Breakpoint Manager Dump: 
    
    Cortex_M4_0: Breakpoint Manager Dump: 	Hardware Configuration
    
    Cortex_M4_0: Breakpoint Manager Dump: 		Location: "C$$IO$$"
    
    Cortex_M4_0: Breakpoint Manager Dump: 	Debugger Response
    
    Cortex_M4_0: Breakpoint Manager Dump: 		Condition: 
    
    Cortex_M4_0: Breakpoint Manager Dump: 		Skip Count: 0
    
    Cortex_M4_0: Breakpoint Manager Dump: 			Current Count: 0
    
    Cortex_M4_0: Breakpoint Manager Dump: 		Action: Process CIO
    
    Cortex_M4_0: Breakpoint Manager Dump: 	Miscellaneous
    
    Cortex_M4_0: Breakpoint Manager Dump: 		Group: Default Group
    
    Cortex_M4_0: Breakpoint Manager Dump: 		Name: 
    
    Cortex_M4_0: Breakpoint Manager Dump: 	Breakpoint set by the system
    
    Cortex_M4_0: Breakpoint Manager Dump: 
    
    Cortex_M4_0: Breakpoint Manager Dump: 	Hardware Configuration
    
    Cortex_M4_0: Breakpoint Manager Dump: 		Location: "C$$IOE$$"
    
    Cortex_M4_0: Breakpoint Manager Dump: 	Debugger Response
    
    Cortex_M4_0: Breakpoint Manager Dump: 		Condition: 
    
    Cortex_M4_0: Breakpoint Manager Dump: 		Skip Count: 0
    
    Cortex_M4_0: Breakpoint Manager Dump: 			Current Count: 0
    
    Cortex_M4_0: Breakpoint Manager Dump: 		Action: Process CIO
    
    Cortex_M4_0: Breakpoint Manager Dump: 	Miscellaneous
    
    Cortex_M4_0: Breakpoint Manager Dump: 		Group: Default Group
    
    Cortex_M4_0: Breakpoint Manager Dump: 		Name: 
    
    Cortex_M4_0: Breakpoint Manager Dump: 	Breakpoint set by the system
    
    Cortex_M4_0: Breakpoint Manager Dump: 
    
    Cortex_M4_0: Breakpoint Manager Dump: 	Hardware Configuration
    
    Cortex_M4_0: Breakpoint Manager Dump: 		Location: "C$$EXIT"
    
    Cortex_M4_0: Breakpoint Manager Dump: 	Debugger Response
    
    Cortex_M4_0: Breakpoint Manager Dump: 		Condition: 
    
    Cortex_M4_0: Breakpoint Manager Dump: 		Skip Count: 0
    
    Cortex_M4_0: Breakpoint Manager Dump: 			Current Count: 0
    
    Cortex_M4_0: Breakpoint Manager Dump: 		Action: Terminate Program Execution
    
    Cortex_M4_0: Breakpoint Manager Dump: 	Miscellaneous
    
    Cortex_M4_0: Breakpoint Manager Dump: 		Group: Default Group
    
    Cortex_M4_0: Breakpoint Manager Dump: 		Name: 
    
    Cortex_M4_0: Breakpoint Manager Dump: 	Breakpoint set by the system
    
    Cortex_M4_0: Breakpoint Manager Dump: 
    
    Cortex_M4_0: Breakpoint Manager Dump: 	Hardware Configuration
    
    Cortex_M4_0: Breakpoint Manager Dump: 		Location: "SVC_Handler"
    
    Cortex_M4_0: Breakpoint Manager Dump: 	Debugger Response
    
    Cortex_M4_0: Breakpoint Manager Dump: 		Condition: 
    
    Cortex_M4_0: Breakpoint Manager Dump: 		Skip Count: 0
    
    Cortex_M4_0: Breakpoint Manager Dump: 			Current Count: 0
    
    Cortex_M4_0: Breakpoint Manager Dump: 		Action: Semi hosting
    
    Cortex_M4_0: Breakpoint Manager Dump: 	Miscellaneous
    
    Cortex_M4_0: Breakpoint Manager Dump: 		Group: Default Group
    
    Cortex_M4_0: Breakpoint Manager Dump: 		Name: 
    
    Cortex_M4_0: Breakpoint Manager Dump: 	Breakpoint set by the system
    
    Cortex_M4_0: Breakpoint Manager Dump: 
    
    Cortex_M4_0: Breakpoint Manager Dump: 	Hardware Configuration
    
    Cortex_M4_0: Breakpoint Manager Dump: 		Location: "C$$EXITE"
    
    Cortex_M4_0: Breakpoint Manager Dump: 	Debugger Response
    
    Cortex_M4_0: Breakpoint Manager Dump: 		Condition: 
    
    Cortex_M4_0: Breakpoint Manager Dump: 		Skip Count: 0
    
    Cortex_M4_0: Breakpoint Manager Dump: 			Current Count: 0
    
    Cortex_M4_0: Breakpoint Manager Dump: 		Action: Terminate Program Execution
    
    Cortex_M4_0: Breakpoint Manager Dump: 	Miscellaneous
    
    Cortex_M4_0: Breakpoint Manager Dump: 		Group: Default Group
    
    Cortex_M4_0: Breakpoint Manager Dump: 		Name: 
    
    Cortex_M4_0: Breakpoint Manager Dump: 	Breakpoint set by the system


    感谢您抽出时间为您提供帮助。

    此致、

    Warrick

  • 请注意,本文内容源自机器翻译,可能存在语法或其它翻译错误,仅供参考。如需获取准确内容,请参阅链接中的英语原文或自行翻译。

    Warrick、

    它们看起来都是禁用的。  我想知道是否有其他东西阻止它们被设置?

     该器件、Santosh Jha Santosh 将 Cortex 配置为等待引导时意味着什么?

    CM 处于复位状态并配置为等待引导。
    (如果您以前连接过、可能必须恢复 CM 才能到达等待引导循环。)

    如果您转到"Breakpoints"视图、则可以在有效闪存地址上设置 h/w 断点。  应有一个带有+的小断点图标、该图标将为您提供可设置的断点类型的下拉列表。  您可以尝试以这种方式设置硬件断点、它将允许您指定一个地址或符号来将其设置为。  我很好奇它是否起作用。

    此致、

    John

  • 请注意,本文内容源自机器翻译,可能存在语法或其它翻译错误,仅供参考。如需获取准确内容,请参阅链接中的英语原文或自行翻译。

    尊敬的 John:

    我无法在 CM 上设置任何类型的断点。 所有使用中的资源都会出现错误(请参阅下文)。

    奇怪的 是、当我按下绿色的"Resume"按钮时、CM 代码运行正常、但由于某种原因、调试器不想工作。

    另一件值得提及的事情是、我能够通过将符号加载到 CM、然后加载.out 程序来使其正常调试。 代码在 main 处停止、我能够像正常那样向代码添加断点。 我重复这些步骤 两三次、然后它再次停止工作、之后我没有使它工作。 我想知道问题是与将符号加载到内核有关、还是与这些 行有关?

    另一个选项是 保留 SYS/BIOS 和 XDCtools 功能并返回到使用标准 LED 模板代码。 这似乎每次都能正常工作、 我们对此设置没有任何问题。

    此致、

    Warrick

  • 请注意,本文内容源自机器翻译,可能存在语法或其它翻译错误,仅供参考。如需获取准确内容,请参阅链接中的英语原文或自行翻译。

    Warrick、

    我会考虑跳过 SYS/BIOS 和 XDCTools。  SYS/BIOS 确实提供了相当多的功能、但在 C2000上没有很多采用。

    似乎正在发生的事情会导致 CM4处于不良状态。

    John