请注意,本文内容源自机器翻译,可能存在语法或其它翻译错误,仅供参考。如需获取准确内容,请参阅链接中的英语原文或自行翻译。
器件型号:TM4C123GH6PM 工具与软件:
您好!
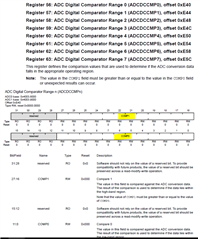
我将尝试实施 ADC 比较器中断、以便在测量的电压高于0.11V 时红色 LED 亮起、并在低于0.11V (约为136/4096 * 3.3V)时熄灭。 下面是我的代码。 我怀疑 InitADC 和 ADC0Seq2Handler 中的中断条件/配置有问题。 我已经正确地更新了 startup_ccs.c 中的矢量表


#define ADC_SEQUENCER3_LENGTH 1
#define ADC_SEQUENCER2_LENGTH 4
#define ADC_SEQUENCER1_LENGTH 4
#define ADC_SEQUENCER0_LENGTH 8
#define VOLTAGE_PRIORITY 0
#define VOLTAGE_CALIBRATION_FACTOR 1.008

uint32_t VoltBuf[ADC_SEQUENCER2_LENGTH];                        // SS2 has the size of 4 samples
uint32_t voltage;
int32_t VoltIntegerPart;
int32_t VoltFractionPart;

void ADC0Seq2Handler(void){
    IntMasterDisable();
    uint32_t ulStatus = ADCIntStatus(ADC0_BASE, 2, true);
    uint32_t comparatorStatus = ADCComparatorIntStatus(ADC0_BASE);
    ADCIntClear(ADC0_BASE,2);

    if (comparatorStatus & (1 << 0)) {
        GPIOPinWrite(GPIO_PORTF_BASE, GPIO_PIN_2, GPIO_PIN_2);
        ADCComparatorIntClear(ADC0_BASE, 0);
    }
    if (comparatorStatus & (1 << 1)) {
        GPIOPinWrite(GPIO_PORTF_BASE, GPIO_PIN_2, 0);
        ADCComparatorIntClear(ADC0_BASE, 1);
    }
    IntMasterEnable();
}

void InitADC(void){
  SysCtlPeripheralEnable(SYSCTL_PERIPH_GPIOE);
  GPIOPinTypeADC(GPIO_PORTE_BASE, GPIO_PIN_3);                                                          // Configure PE3 as an ADC input
  SysCtlPeripheralEnable(SYSCTL_PERIPH_ADC0);                                                           // Enable the ADC0 peripheral
  ADCHardwareOversampleConfigure(ADC0_BASE,32);                                                         // Set the auto average to 64

  // Configure sequence 2 for voltage measurement on AIN0 (PE)
  ADCSequenceDisable(ADC0_BASE, 2);                                                                     // Disable sequence 2
  ADCSequenceConfigure(ADC0_BASE, 2, ADC_TRIGGER_PROCESSOR, VOLTAGE_PRIORITY);                          // Configure sequence 2
  ADCSequenceStepConfigure(ADC0_BASE, 2, 0, ADC_CTL_CH0);
  ADCSequenceStepConfigure(ADC0_BASE, 2, 1, ADC_CTL_CH0);
  ADCSequenceStepConfigure(ADC0_BASE, 2, 2, ADC_CTL_CH0);
  ADCSequenceStepConfigure(ADC0_BASE, 2, 3, ADC_CTL_CH0 | ADC_CTL_IE | ADC_CTL_END);                     // Set up the last step and start an interrupt when the conversion is over
  ADCSequenceEnable(ADC0_BASE, 2);                                                                       // Enable the sequence again
  ADCIntEnable(ADC0_BASE,0);
  ADCIntClear(ADC0_BASE, 2);                                                                             // Clear the interrupt flag


  // Configure the ADC comparator
  ADCComparatorConfigure(ADC0_BASE, 1, ADC_COMP_TRIG_NONE | ADC_COMP_INT_HIGH_HALWAYS); ////////////////////////////////////////////////////////////////////////////////// could be wrong
  ADCComparatorRegionSet(ADC0_BASE, 0, 136, 4095); // Set the comparator region (136 corresponds to 0.11V)
  ADCComparatorReset(ADC0_BASE, 0, true, true); // Reset the comparator
  ADCComparatorIntEnable(ADC0_BASE, 0); // Enable the comparator interrupt

  ADCComparatorConfigure(ADC0_BASE, 2, ADC_COMP_TRIG_NONE | ADC_COMP_INT_LOW_HALWAYS ); ////////////////////////////////////////////////////////////////////////////////// could be wrong
  ADCComparatorRegionSet(ADC0_BASE, 1, 0, 136); // Set the comparator region (136 corresponds to 0.11V)
  ADCComparatorReset(ADC0_BASE, 1, true, true); // Reset the comparator
  ADCComparatorIntEnable(ADC0_BASE, 1); // Enable the comparator interrupt

  IntEnable(INT_ADC0SS2); // Enable the ADC sequence 2 interrupt in the NVIC
  IntMasterEnable();
}

void InitGPIO(void) {
    // Enable the GPIO port for the LED (PF2)
    SysCtlPeripheralEnable(SYSCTL_PERIPH_GPIOF);
    GPIOPinTypeGPIOOutput(GPIO_PORTF_BASE, GPIO_PIN_1); // Configure PF2 as an output
    GPIOPinWrite(GPIO_PORTF_BASE, GPIO_PIN_1, 0); // Initialize the LED to be off
}


void main(void) {
    SysCtlClockSet(SYSCTL_SYSDIV_2_5 | SYSCTL_USE_PLL | SYSCTL_OSC_MAIN | SYSCTL_XTAL_16MHZ); // System clock: 16*12.5/2.5 = 80MHz (MAX)
    InitADC();
    InitGPIO();
    while(1){}
}
现在、PE3正在收集电压数据、我已确认它工作正常。 怎么了?