请注意,本文内容源自机器翻译,可能存在语法或其它翻译错误,仅供参考。如需获取准确内容,请参阅链接中的英语原文或自行翻译。
器件型号:TMS320F28377D 主题中讨论的其他器件:SysConfig、 C2000WARE
工具与软件:
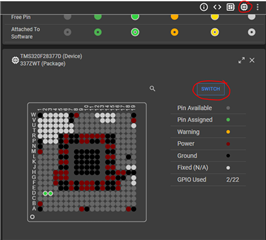
我正在寻找用于 C2000的数据可视化工具。 类似于 NXP FreeMaster Recorder 功能(采样数据频率非常高(可能高于100kHz))
工具与软件:
我正在寻找用于 C2000的数据可视化工具。 类似于 NXP FreeMaster Recorder 功能(采样数据频率非常高(可能高于100kHz))