This thread has been locked.

If you have a related question, please click the "Ask a related question" button in the top right corner. The newly created question will be automatically linked to this question.

TMS320F28035: PWM输出不按照设置改变

Part Number: TMS320F28035
Other Parts Discussed in Thread: C2000WARE, CONTROLSUITE

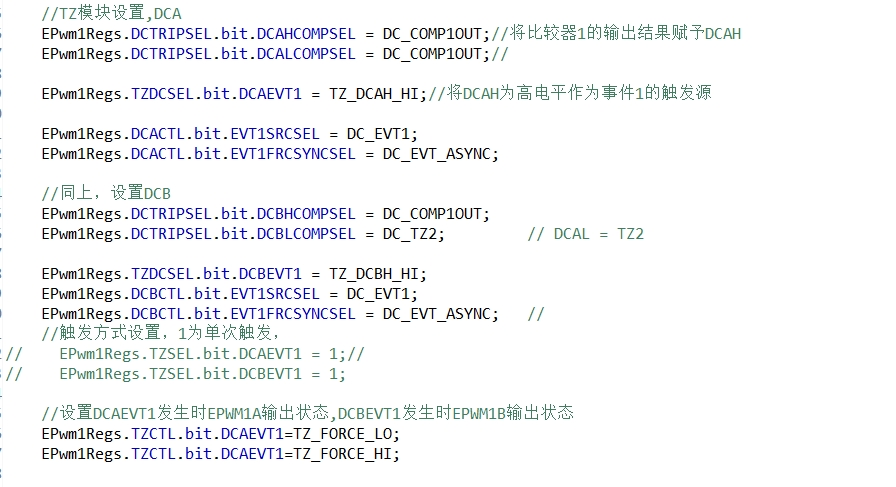
按照如图设置了epwm1的DC以及TZ模块,当COMP1OUT输出高电平时,EPWM1A输出低电平,EPWM1B输出高电平,但是现在COMP1OUT有输出了,但是EPWM1输出并未发生变化
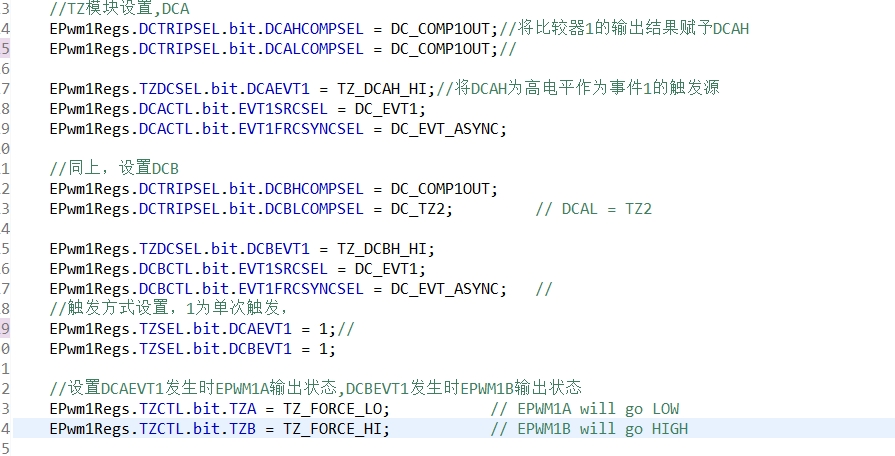
  • 蓝色通道为GPIO20的输出(我复用了GPIO20看COMP1OUT的输出),黄色通道为EPWM1A(GPIO00)的输出

  • 1. DCxEVT1用于单次触发,DCxEVT2用于逐次触发;

    你选的是单次触发,所以只会触发一次。

    解决的方法就是将DCxEVT1修改为DCxEVT2

    2. 也可以试一下这个方法:

    红色部分注释掉,黄色部分替换为:

    EPwm1Regs.TZCTL.bit.DCAEVT1 = TZ_FORCE_LO;
    EPwm1Regs.TZCTL.bit.DCBEVT1 = TZ_FORCE_HI;

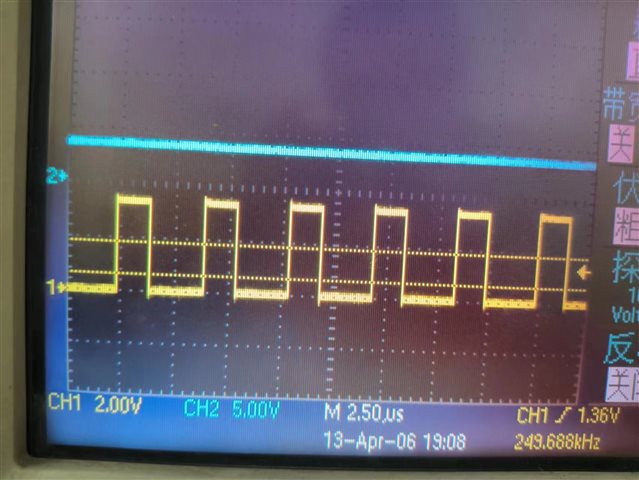
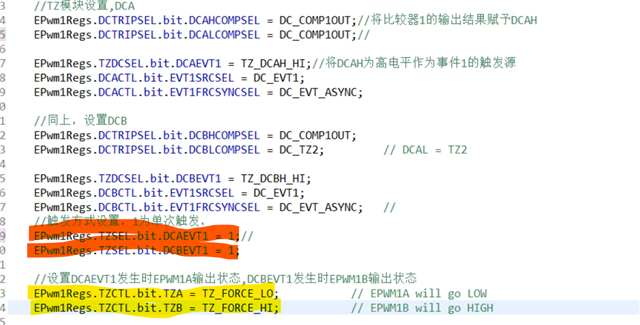
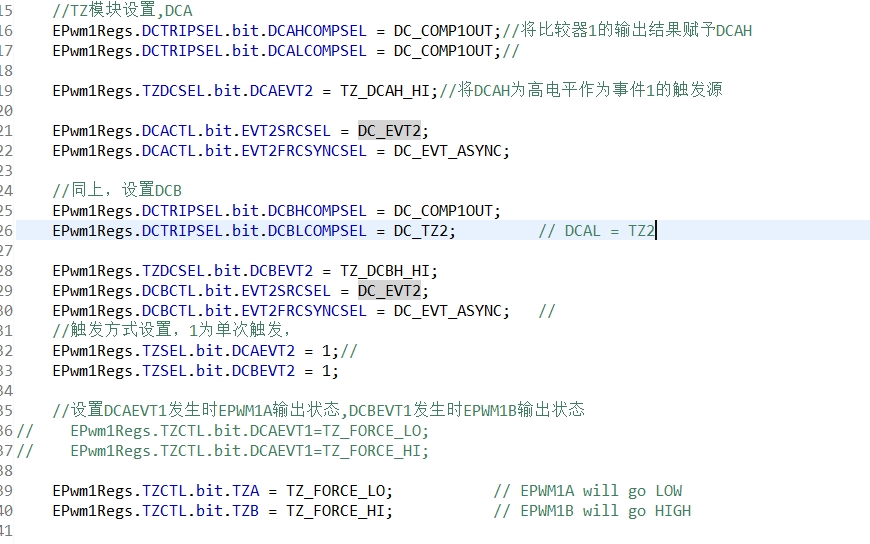
  •   您好,按照您说方法尝试了一下,EPWM1的输出还是没有任何变化,两种方法尝试代码如图
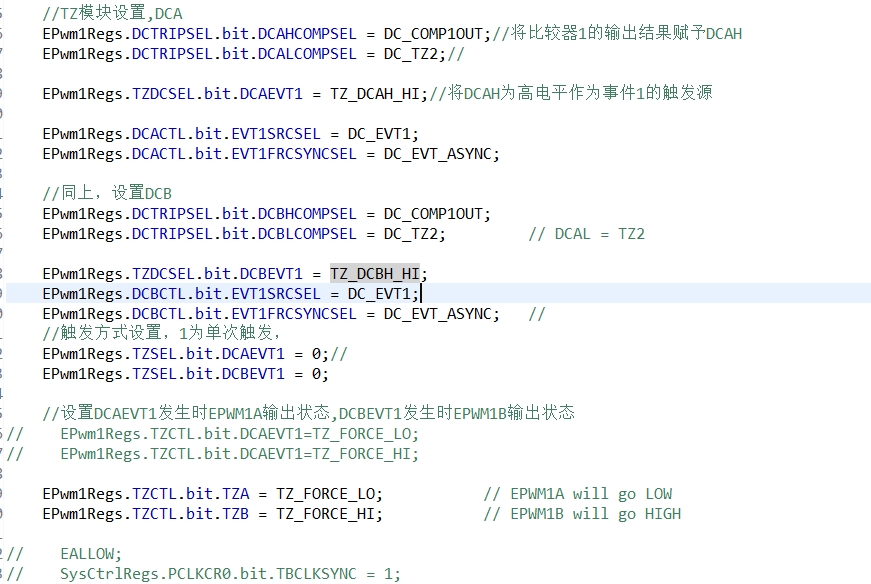
  • 有试过例程吗?

    C:\ti\c2000\C2000Ware_5_00_00_00\device_support\f2803x\examples\c28\epwm_dcevent_trip

    C:\ti\c2000\C2000Ware_5_00_00_00\device_support\f2803x\examples\c28\epwm_dcevent_trip_comp

    C:\ti\c2000\C2000Ware_5_00_00_00\device_support\f2803x\examples\c28\epwm_trip_zone

  • 昨天重新仿照例程编写了代码,当比较器高电平时,epwm1输出有了变化,但是epwm1的两相pwm都输出低电平了,我预想的是两路为互补输出,我比较器正向输入现在是用的一个直流源

  •  这是EPWM1的配置

  • 你把你的工程上传一下,我帮你看一下

  • 您好,因为其它代码涉及项目所以不能上传所有的代码。。但是我现在用TI的例程C:\ti\controlSUITE\device_support\f2803x\v130\DSP2803x_examples_ccsv5\epwm_dcevent_trip_comp,对其做一定配置后也不能实现我想要的效果

    //###########################################################################
    // Description:
    //! \addtogroup f2803x_example_list
    //! <h1>ePWM DC Event Trip Comparator (epwm_dcevent_trip_comp)</h1>
    //!
    //! In this example ePWM1 is configured for PWM Digital Compare Event
    //! Trip using Comparator1A and comparator1B pin inputs.
    //! DCAEVT1, DCBEVT1 events are triggered by increasing the voltage on
    //! COMP1B pin to be higher than that of COMP1A pin.
    //! In this example:
    //!    - ePWM1 has DCAEVT1 and DCBEVT1 as one shot trip sources
    //!            DCAEVT1 will pull EPWM1A high
    //!            DCBEVT1 will pull EPWM1B low
    //!
    //! Initially make the voltage level at COMP1A to be higher than that of COMP1B.
    //! Increase voltage on inverting side of comparator(COMP1B pin) to trigger
    //! a DCAEVT1, and DCBEVT1. ePWM1 will react to DCAEVT1 and DCBEVT1 as a 1 shot
    //! trip. View the EPWM1A/B waveforms on an oscilloscope to see the effect of
    //! the events.
    //!
    //! \b External \b Connections \n
    //!  - EPWM1A is on GPIO0
    //!  - EPWM1B is on GPIO1
    //!  - COMP1A is on ADCA2
    //!  - COMP1B is on ADCB2
    //!  - pull COMP1B to a higher voltage level than COMP1A.
    //
    //###########################################################################
    // $TI Release: F2803x C/C++ Header Files and Peripheral Examples V130 $
    // $Release Date: May  8, 2015 $
    // $Copyright: Copyright (C) 2009-2015 Texas Instruments Incorporated -
    //             http://www.ti.com/ ALL RIGHTS RESERVED $
    //###########################################################################
    
    #include "DSP28x_Project.h"     // Device Headerfile and Examples Include File
    
    // Prototype statements for functions found within this file.
    void InitEPwm1Example(void);
    __interrupt void epwm1_tzint_isr(void);
    
    // Global variables used in this example
    Uint32  EPwm1TZIntCount;
    Uint32  EPwm2TZIntCount;
    
    void main(void)
    {
    // Step 1. Initialize System Control:
    // PLL, WatchDog, enable Peripheral Clocks
    // This example function is found in the DSP2803x_SysCtrl.c file.
       InitSysCtrl();
    
    // Step 2. Initialize GPIO:
    // This example function is found in the DSP2803x_Gpio.c file and
    // illustrates how to set the GPIO to it's default state.
    // InitGpio();  // Skipped for this example
    
    // For this case just init GPIO pins for ePWM1, ePWM2, and TZ pins
       InitEPwm1Gpio();
    
    // Step 3. Clear all interrupts and initialize PIE vector table:
    // Disable CPU interrupts
       DINT;
    
    // Initialize the PIE control registers to their default state.
    // The default state is all PIE interrupts disabled and flags
    // are cleared.
    // This function is found in the DSP2803x_PieCtrl.c file.
       InitPieCtrl();
    
    // Disable CPU interrupts and clear all CPU interrupt flags:
       IER = 0x0000;
       IFR = 0x0000;
    
    // Initialize the PIE vector table with pointers to the shell Interrupt
    // Service Routines (ISR).
    // This will populate the entire table, even if the interrupt
    // is not used in this example.  This is useful for debug purposes.
    // The shell ISR routines are found in DSP2803x_DefaultIsr.c.
    // This function is found in DSP2803x_PieVect.c.
       InitPieVectTable();
    
    // Interrupts that are used in this example are re-mapped to
    // ISR functions found within this file.
       EALLOW;  // This is needed to write to EALLOW protected registers
       PieVectTable.EPWM1_TZINT = &epwm1_tzint_isr;
       EDIS;    // This is needed to disable write to EALLOW protected registers
    
    // Step 4. Initialize all the Device Peripherals:
    // Not required for this example
       EALLOW;
       SysCtrlRegs.PCLKCR0.bit.ADCENCLK = 1;                 // Enable Clock to the ADC
       AdcRegs.ADCCTL1.bit.ADCBGPWD = 1;                     // Comparator shares the internal BG reference of the ADC, must be powered even if ADC is unused
       DELAY_US(1000L);                                      // Delay to allow BG reference to settle.
    
       SysCtrlRegs.PCLKCR3.bit.COMP1ENCLK = 1;               // Enable clock to the Comparator 1 block
       Comp1Regs.COMPCTL.bit.COMPDACEN = 1;                  // Power up Comparator 1 locally
    //   Comp1Regs.COMPCTL.bit.COMPSOURCE = 1;                 // Connect the inverting input to pin COMP1B
    ////////////////Uncomment following 2 lines to use DAC instead of pin COMP1B //////////////////
       Comp1Regs.COMPCTL.bit.COMPSOURCE = 0;              // Connect the inverting input to the internal DAC
       Comp1Regs.DACVAL.bit.DACVAL = 512;				    // Set DAC output to midpoint
       Comp1Regs.DACCTL.bit.DACSOURCE=0;                  // Set DAC output to midpoint
    //////////////////////////////////////////////////////////////////////////////////////////////
       SysCtrlRegs.PCLKCR0.bit.TBCLKSYNC = 0;
       EDIS;
    
       InitEPwm1Example();
    
       EALLOW;
       SysCtrlRegs.PCLKCR0.bit.TBCLKSYNC = 1;
       EDIS;
    
    // Step 5. User specific code, enable interrupts
    // Initialize counters:
       EPwm1TZIntCount = 0;
    
    // Enable CPU INT3 which is connected to EPWM1-3 INT:
       IER |= M_INT2;
    
    // Enable EPWM INTn in the PIE: Group 2 interrupt 1-3
       PieCtrlRegs.PIEIER2.bit.INTx1 = 1;
    
    // Enable global Interrupts and higher priority real-time debug events:
       EINT;   // Enable Global interrupt INTM
       ERTM;   // Enable Global realtime interrupt DBGM
    
    // Step 6. IDLE loop. Just sit and loop forever (optional):
       for(;;)
       {
           __asm("          NOP");
       }
    }
    
    __interrupt void epwm1_tzint_isr(void)
    {
       EPwm1TZIntCount++;
    
    // Leave these flags set so we only take this
    // interrupt once
    //
    // EALLOW;
    // EPwm1Regs.TZCLR.bit.OST = 1;
    // EPwm1Regs.TZCLR.bit.INT = 1;
    // EDIS;
    
       // Acknowledge this interrupt to receive more interrupts from group 2
       PieCtrlRegs.PIEACK.all = PIEACK_GROUP2;
    }
    
    void InitEPwm1Example()
    {
       EALLOW;
       EPwm1Regs.TBPRD = 6000;                         // Set timer period
       EPwm1Regs.TBPHS.half.TBPHS = 0x0000;            // Phase is 0
       EPwm1Regs.TBCTR = 0x0000;
    
       // Setup TBCLK
       EPwm1Regs.TBCTL.bit.CTRMODE = TB_COUNT_UPDOWN; // Count up/down
       EPwm1Regs.TBCTL.bit.PHSEN = TB_DISABLE;        // Disable phase loading
       EPwm1Regs.TBCTL.bit.HSPCLKDIV = TB_DIV4;       // Clock ratio to SYSCLKOUT
       EPwm1Regs.TBCTL.bit.CLKDIV = TB_DIV4;
    
       EPwm1Regs.CMPCTL.bit.SHDWAMODE = CC_SHADOW;    // Load registers every ZERO
       EPwm1Regs.CMPCTL.bit.SHDWBMODE = CC_SHADOW;
       EPwm1Regs.CMPCTL.bit.LOADAMODE = CC_CTR_ZERO;
       EPwm1Regs.CMPCTL.bit.LOADBMODE = CC_CTR_ZERO;
    
       // Setup compare
       EPwm1Regs.CMPA.half.CMPA = 3000;
    
       // Set actions
       EPwm1Regs.AQCTLA.bit.CAU = AQ_SET;             // Set PWM1A on CAU
       EPwm1Regs.AQCTLA.bit.CAD = AQ_CLEAR;			  // Clear PWM1A on CAD
    
       EPwm1Regs.AQCTLB.bit.CAU = AQ_CLEAR;           // Clear PWM1B on CAU
       EPwm1Regs.AQCTLB.bit.CAD = AQ_SET;             // Set PWM1B on CAD
    
       // Define an event (DCAEVT1) based on TZ1 and TZ2
       EPwm1Regs.DCTRIPSEL.bit.DCAHCOMPSEL = DC_COMP1OUT;        // DCAH = Comparator 1 output
       EPwm1Regs.DCTRIPSEL.bit.DCALCOMPSEL = DC_TZ2;             // DCAL = TZ2
       EPwm1Regs.TZDCSEL.bit.DCAEVT1 = TZ_DCAH_LOW;              // DCAEVT1 =  DCAH low(will become active as Comparator output goes low)
       EPwm1Regs.DCACTL.bit.EVT1SRCSEL = DC_EVT1;                // DCAEVT1 = DCAEVT1 (not filtered)
       EPwm1Regs.DCACTL.bit.EVT1FRCSYNCSEL = DC_EVT_ASYNC;       // Take async path
    
       // Define an event (DCBEVT1) based on TZ1 and TZ2
       EPwm1Regs.DCTRIPSEL.bit.DCBHCOMPSEL = DC_COMP1OUT;        // DCBH = Comparator 1 output
       EPwm1Regs.DCTRIPSEL.bit.DCBLCOMPSEL = DC_TZ2;             // DCAL = TZ2
       EPwm1Regs.TZDCSEL.bit.DCBEVT1 = TZ_DCBH_LOW;              // DCBEVT1 =  (will become active as Comparator output goes low)
       EPwm1Regs.DCBCTL.bit.EVT1SRCSEL = DC_EVT1;                // DCBEVT1 = DCBEVT1 (not filtered)
       EPwm1Regs.DCBCTL.bit.EVT1FRCSYNCSEL = DC_EVT_ASYNC;       // Take async path
    
       // Enable DCAEVT1 and DCBEVT1 are one shot trip sources
       // Note: DCxEVT1 events can be defined as one-shot.
       //       DCxEVT2 events can be defined as cycle-by-cycle.
       EPwm1Regs.TZSEL.bit.DCAEVT1 = 0;
       EPwm1Regs.TZSEL.bit.DCBEVT1 = 0;
    
       // What do we want the DCAEVT1 and DCBEVT1 events to do?
       // DCAEVTx events can force EPWMxA
       // DCBEVTx events can force EPWMxB
       EPwm1Regs.TZCTL.bit.TZA = TZ_FORCE_HI;           // EPWM1A will go high
       EPwm1Regs.TZCTL.bit.TZB = TZ_FORCE_LO;           // EPWM1B will go low
    
       // Enable TZ interrupt
       EPwm1Regs.TZEINT.bit.OST = 1;
       EDIS;
    }
    
    //===========================================================================
    // No more.
    //===========================================================================


  • 一步一步的调试,先不要添加TZ相关的代码,把正常的PWM波先调出来,再添加TZ相关的代码

  • 普通的PWM是正常的,添加TZ是为了配合控制才加上的,加上后无法实现想要的效果

  • 这里是1,使能OST